


This shop has been compensated by Collective Bias, Inc. and its advertiser. All opinions are mine alone. Garlic Herb Skillet Rolls
Are you looking for a one-pan side dish to go with your dinner menu? Say hello to the incredibly delicious, feather-light Garlic rolls that come together quickly and are a great addition to any meal. Made in a cast-iron skillet, these effortless rolls are the perfect accompaniment to any meal.
If you love made-from-scratch bread as much as I do, check my One-hour pull-apart rolls and these dinner rolls.

There’s nothing quite like freshly baked homemade skillet rolls right out of the oven. Trust me, while they are baking, the scent of these rolls is will fill your home with an intoxicating smell that is downright heavenly and truly irresistible.
And who doesn’t love that smell? At least we do!
Baking bread is a staple in our home. I don’t know about you, but feasting on freshly-baked rolls coming out of the oven is my utter weakness. Tearing it apart from the batch, the hot steam release, and that smell – it’s pure deliciousness!
What are Garlic herb skillet rolls
These skillets rolls infused with garlic herb seasoning are a recent favorite in my house, and we enjoy these rolls to the fullest with creamy pasta dishes. Just dip the rolls in the sauce and enjoy all the delicious flavors. It’s so good!
Making these Garlic herb skillet rolls at home is super easy, although the bread-making process takes a few hours from start to finish. But don’t worry, most of this time is inactive and is required for the dough to rest and rise.
So, with the holiday season just around the corner, I plan to bake these rolls again. A basket full of freshly-baked garlic herb skillet rolls will make a stunning appearance on my dinner table.
And I am sure; my guests will have a tough time stopping at just one roll!
Reasons You’ll ♡ Garlic Herb Skillet rolls
- Comes together with pantry staples
- You will love how light, buttery, and soft the rolls are
- This garlic herb skillet rolls pair well with a pasta dinner to soups
- A perfect accompaniment to a weeknight night or for your holiday table
- Oh, and if your guests are vegans, no problem! Simply swap the butter with vegan butter and milk with plant-based milk.
Making your very own garlic rolls from scratch is always the best – all that mixing, measuring, and pouring – brings pure joy and makes the wait worth the effort.

Ingredient list for Garlic Herb Skillet Rolls
You will need only 7 ingredients to make these pull-apart skillet rolls. They are (scroll down for a full printable recipe):
Flour – You will need all-purpose flour for this recipe. You can surely try bread flour for much softer, fluffier rolls.
Sugar – Yeast feeds on sugar; therefore, it is a necessary ingredient to jump-start the yeast. In addition to that, when mixed with yeast, this mix releases CO2 gas, which pushes the dough up, resulting in soft and light-textured garlic rolls.
Salt – for flavor. Use little or more as per taste.
Instant Yeast – I have used instant yeast to speed up the process. Active dry yeast works great too. Unlike instant yeast, active dry yeast needs to be bloomed/activated before adding to the flour.
Milk + water – wet ingredients required to knead the dough. Use lukewarm warm for the garlic skillet rolls. Not too hot, as it will kill the yeast. The best temperature for water should be between 95°F to 105°F.
Butter – You will need butter for the dough and brushing the freshly-baked pull-apart garlic rolls. You can use salted or unsalted butter, but adjust the salt in the recipe if using salted butter.
Garlic Herb seasoning – I love garlic herb seasoning on my dinner rolls, as this seasoning takes the rolls to a whole new level. But you can use whatever seasoning you have on hand.
How to make Garlic Herb Skillet Rolls?
These cast iron garlic skillet rolls are super easy, foolproof, and comes together without much fuss. The only chunk of times goes in, waiting for the dough to rise.
1. Combine 3/4 cup flour, sugar, and salt in a large mixer bowl.
2. Stir in rapid-rise instant yeast.

3. Stir until blended.
4. Combine milk, water, and butter in a small microwave-safe bowl.
5. Microwave on HIGH in 15-second increments until very warm but not hot to the touch. Add lukewarm water (heated to 120˚F-130˚F) and if you are not sure always use a thermometer to check the temperature.
6. Butter won’t melt completely.

7. Add the milk+water mix to the flour mixture. Beat 2 minutes at medium speed of electric mixer, scraping bowl occasionally.
8. Add 1/4 cup flour.
9. Beat 2 minutes at high speed.
10. Stir in the remaining flour. Add garlic-herb seasoning and mix.

11. The dough will form into a ball.
12. Time to pamper the dough. Transfer the dough on to a lightly floured surface and knead until smooth and elastic.
13. Transfer the dough to a bowl.
14. Cover with a towel. As with any other bread, these garlic skillet rolls also need some time alone, therefore, let the dough rest for 10 minutes.
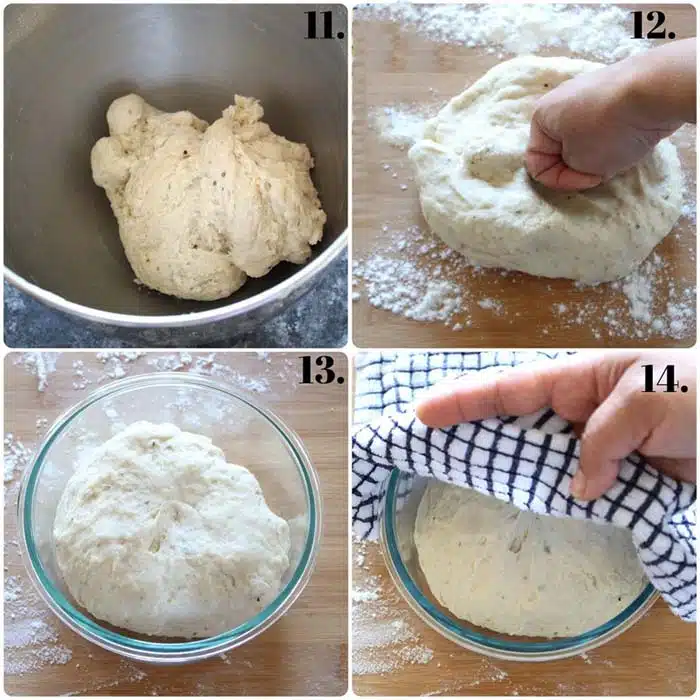
15. Cut dough into 12 equal pieces; shape into balls using your hands.

16. Place in greased 8-inch round iron skillet or square pan.
17. Cover with towel; let rise in a warm place until doubled in size, about 30 minutes. For pillowy-soft and fluffy dinner rolls, the second rise is an important step.

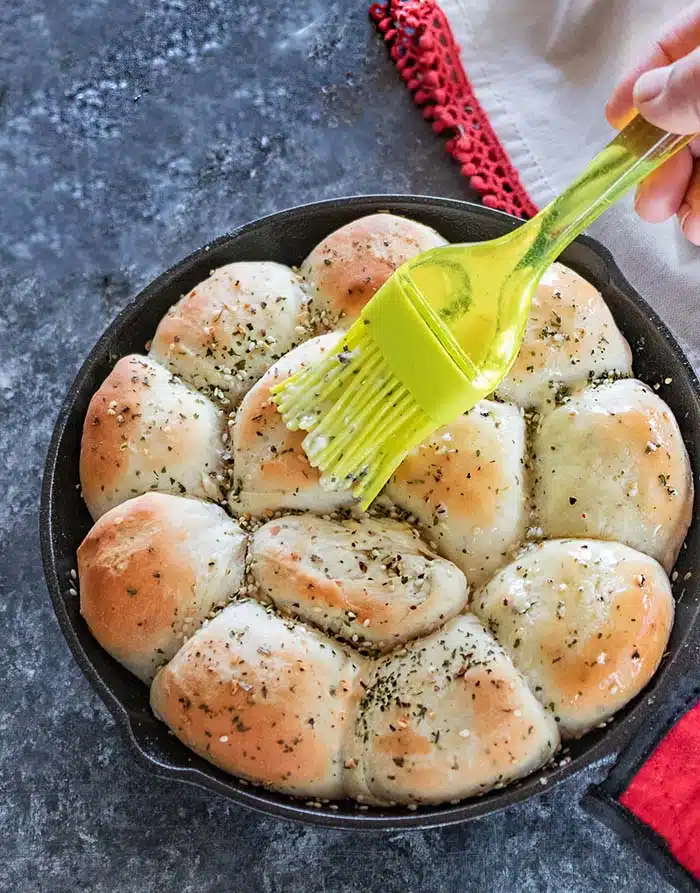
18. After the resting time, generously top these rolls with garlic herb seasoning.
19. Bake in preheated 375ºF oven for 20 minutes or until golden brown. These garlic rolls will bake up beautifully in a cast-iron skillet because cast iron retains the heat really well, and you end up with nice crusty rolls.

20. Brush the freshly-baked rolls with additional melted butter and serve warm.
Mmmm, can you smell that! Homemade bread, fresh from the oven..yum!
Tips on making the best Garlic Herb Skillet rolls – troubleshooting Guide!
Baking bread is an art, and patience is key! Therefore, to bake the best dinner rolls, follow these guidelines below-
- The yeast used for this recipe is– Rapid -rise yeast. With rapid rise yeast, you don’t need to activate the yeast. Simply combine all the ingredients in a bowl, add yeast, and begin mixing.
- The dough did not rise – reason no. 1- Always use fresh yeast. The yeast shouldn’t be expired. That is often the reason for the dough ‘not rising.’
- The dough did not rise – reason no. 2- The yeast was too hot. Meaning the wet ingredients (water) added to the yeast were hot. Water should be lukewarm and not hot. Otherwise, it will kill the yeast. Please use a thermometer to check the temperature of the water, but if no thermometer, then make sure the water shouldn’t be very hot to touch.
- The dough did not rise – reason no. 3- Yeast needs a warmer environment to make the dough rise. A hot, humid temperature is perfect for proofing the dough. But, if your kitchen is on the colder end, then place the dough in a preheated oven. In colder weather, I preheat my oven to 180 degrees F then immediately turn it off. Allow the oven to cool for 3-4 minutes, then place the dough in there. The dough will double in size, guaranteed (if all other parameters are matched correctly).
- For an easy slide-out – I highly recommend buttering/oiling the cast iron skillet.
Frequently asked questions
How to Store these dinner Rolls?
These soft and fluffy garlic dinner rolls stay good for 2 days at room temperature. Cover the skillet with a foil and leave it on the counter.
After that, transfer the rolls to a plastic bag and store it in the fridge. They stay good for 3 days. But I can guarantee they won’t last that long. At least not in my fridge, we devoured them all.
Protip – In sweltering warm weather, please store the skillet rolls in the fridge after they have cooled down.
These Garlic rolls are a perfect make-ahead recipe!
Hosting a family get-together, then this is your go-to recipe. Bake these cast iron garlic herb skillet rolls in the morning and set them aside.
When ready to serve, transfer the skillet back into the preheated oven and warm the rolls for 5-10 minutes. Serve and watch them disappear.

Can I freeze these dinner rolls?
Yes, you sure can! These pull-apart dinner rolls can be frozen after baking. Once the baked rolls have cooled completely, wrap the skillet with a plastic wrap and store it in the freezer. Stays well for a month.
When ready to serve, allow the rolls to thaw at room temperature. Bake them again in a preheated oven for 5-7 minutes until evenly warm.
I don’t have a cast iron skillet!
No worries. You can bake these delicious garlic herb dinner rolls in a round baking pan or a round oven-proof casserole dish.
What other toppings can I use other than Garlic herb?
You can swap garlic herb seasoning with –
- Rosemary and sea salt topping
- Italian seasoning
- Cajun seasoning
- Sea salt and Chili flakes
- Or simply leave them as is – Plain!
Serving Suggestions
For the upcoming holidays, you can pair these garlic skillet rolls with-
These skillet rolls will be a hit at the dinner table. I promise they will be loved by all, and people will come back for seconds. So consider yourself warned, make a big batch.

LET ME KNOW WHAT YOU THINK!
From busy weeknight dinners to luxurious holiday meals, these Garlic herb skillet rolls are your new best friend. Pair it with a bowl of soup or pasta and watch it disappear.
Should you make these skillet garlic rolls, please let me know your thoughts by sharing your comment below. And don’t forget to share it with your family and friends.
SOME OTHER YUMMY BREAD RECIPES THAT YOU’LL LOVE:

Garlic Herb Skillet Rolls
INGREDIENTS
- 2¼ cups All-purpose flour
- 2 tablespoons Sugar
- 1 teaspoon Rapid rise Yeast or Instant yeast
- ½ teaspoon Salt
- ½ cup Milk
- ¼ cup Water
- 2 tablespoons Unsalted Butter
- 1 tablespoon Garlic-herb seasoning
GARNISHES
- – – Garlic-herb seasoning (sprinkle on top)
- – – Unsalted Butter for brushing the rolls
INSTRUCTIONS
- Combine 3/4 cup flour, sugar, dry yeast and salt in a large mixer bowl and stir until blended. Combine milk, water, and butter in a small microwave-safe bowl.
- Microwave on HIGH in 15-second increments until very warm but not hot to the touch. Add lukewarm water (heated to 120˚F-130˚F) and if you are not sure always use a thermometer to check the temperature. Add the milk+water mix to the flour mixture.
- Beat 2 minutes at medium speed of electric mixer, scraping bowl occasionally. Add 1/4 cup flour; beat 2 minutes at high speed.
- Stir in the remaining flour. Add garlic-herb seasoning and mix. The dough will form into a ball.
- Time to pamper the dough. Transfer the dough on to a lightly floured surface and knead until smooth and elastic.
- Transfer the dough to a bowl. Cover with a towel. As with any other bread, these garlic skillet rolls also need some time alone, therefore, let the dough rest for 10 minutes.
- Cut dough into 12 equal pieces; shape into balls using your hands. Place in greased 8-inch round or square pan.
- Cover with towel; let rise in a warm place until doubled in size, about 30 minutes. For pillowy-soft and fluffy dinner rolls, the second rise is an important step. After the resting time, generously top these skillet rolls with garlic herb seasoning.
- Bake in preheated 375ºF oven for 20 minutes or until golden brown. These garlic rolls will bake up beautifully in a cast-iron skillet because cast iron retains the heat really well, and you end up with nice crusty rolls.
- Brush the freshly-baked rolls with additional melted butter and serve warm.
RECIPE NOTES
- Rosemary and sea salt topping
- Italian seasoning
- Cajun seasoning
- Sea salt and Chili flakes
- Or simply leave them as is – Plain!
Instead of yeast in the garlic herb skillet rolls can we use eno. ?
Hello Shefali,
I have not tried baking bread with eno. Sorry, dear can’t help you here.
This recipe looks & sounds so tasty … I’m going to try it. The amount of garlic herb seasoning is not mentioned – please advise. Thanks so much. Kathy
Oops, did I skip that? My bad. Have updated that recipe.
Kathy, please do give it a try and share your reviews.
Had dinner guests last night & made these rolls for the first time … everyone LOVED them (needless to say, I’ll be doubling the recipe next batch). And the recipe is a must share. Thank you Ruchis ♥
Yay! So glad you loved them.
Thank you, Kathy. 😊