


Do you prefer light and crumbly cookies to enjoy with your evening tea? This bite-sized, melt-in-your-mouth Nankhatai recipe is just for you! Just like eggless coconut cookies, these Indian butter cookies require just a few pantry staples and are deceptively easy to make.
So get ready to fill your home with the delightful smell of the Nankhatai recipe, which is an excellent accompaniment to coffee or tea at any time of the day!

What is Nankhatai?
For those unfamiliar with this term, the name Nankhatai comes from the Persian word ‘Naan,’ which translates to bread in English, and khatai means light and flaky biscuit.
In simple words, it indicates light and buttery biscuits or Indian shortbread cookies made without eggs or leavening agents (baking powder and baking soda).
I am a cookie lover, and whether it be eggless coconut cookies, Dulce de leche thumbprint cookies, eggless shortbread swirl cookies, or tutti frutti cookies, I love freshly baked golden-brown cookies with my cup of chai.
So, if you are looking for THE perfect cookie recipe for your upcoming tea party, this nankhatai recipe is worth a try.
This best nankhatai recipe will take you back to your childhood days.
Reasons You’ll ♡ Nankhatai recipe
These yummy Nankhatais are absolutely amazing! Soft and flavorful, with the melt-in-the-mouth texture, these little bites of deliciousness indeed have more reasons to be loved.
- Easy and quick to make
- Loved by kids and adults alike
- Perfect make-ahead recipe
- Easy to carry while traveling
- Purely vegetarian
- Satiate sweet cravings instantly!
The best part is that during the festive season, make a huge batch of nankhatais, box them up and share them with family, friends, and neighbors.
Nankhatais, or should I say Indian buttery cookies are a perfect sweet treat for every season and occasion.

The secret to Khasta Nanakhatai Recipe!
This nankhatai recipe is not your regular cut-out sugar cookies. They are the perfect no-fuss, round and buttery shortbread that doesn’t require any fancy ingredients or baking tools.
All you need is a mixing bowl, your fingers, or maybe a spoon, a little refrigeration time before baking, and you are good to go.
The secret to these crumbly yet soft, melt-in-your-mouth nankhatais is ghee. The crunchiness of a nankhatai depends on a good balance of fat and its low moisture content.
During baking, the moisture in the ghee evaporates, producing acceptably stiff and crumbly nankhatais.
So, without further ado, let’s get ready to recapture the joy of your childhood with this khasta (flaky) nankhatai recipe that –
- Takes just a few minutes of hands-on time
- Soft, moist, and delicate, just like the old traditional bakery-bought nankhatais
- Rich and flavorful with a slight hint of cardamom, and
- Incredibly delicious.

Nankhatai Recipe Ingredient List
Flours — I have used a combination of all-purpose flour, chickpea flour (besan), wheat flour, and semolina (sooji) to create this perfect, no-fail nankhatai recipe.
All-purpose flour and wheat flour are the staples, but the addition of besan lends a nice subtle earthy flavor, and likewise, sooji gives a great crunch to the finished cookie nankhatais. This combination lends a sturdy texture, a khasta (crunchy) bite, and a melt-in-your-mouth feeling of a perfect nankhatai.
Powdered Sugar — Also called confectioners’ sugar, the addition of powdered sugar is what makes these nankhatais incredibly soft and delicate. In addition to that, sugar lends crispy edges and smooth texture to our nankhatais.
Cardamom Powder — for a hint of flavor. You can substitute cardamom with your favorite extract.
Salt — An essential ingredient as it draws out the flavor of this nankhatai.
Ghee — Ghee lends a subtle nutty flavor to these Indian buttery cookies. And its low moisture content adds to the crispiness of our nankhatais.
Silvered nuts — as a garnish.

Recipe Tips and Variations
Ghee is an essential ingredient — This delicious recipe of Nankhatai derives its richness, moisture, and soft texture from the ghee. The correct amount of ghee in this recipe is what makes it khasta and delectable. So, do not cut back up on this ingredient.
The right time to add melted ghee — Use semi-solid ( room temperature) ghee when you are combining the flours. The first batch of ghee that’s added to the flour mix should be in a granular semi-solid state, not melted. Once the mixture becomes crumbly, then gradually add the melted ghee to the mixture.
Always use powdered sugar — This recipe makes it best with powdered sugar as it absorbs extra moisture from the other ingredients, giving the nankhatai a tender and flaky texture. As it melts, the granulated sugar encourages the nankhatais to spread, take a deeper tinge, and also have a crispier texture; therefore, it should be avoided. Likewise, brown sugar should also be avoided in this recipe.
Do not add any liquid to the mixture — These are low-moisture shortbread cookies, meaning they do not need any added moisture. Most of its moisture and softness are rendered by the ghee. If the mixture doesn’t seem to bind well, feel free to add some more ghee but refrain from adding any liquid to the dough as this may spoil the recipe.

Line the baking tray — Lining the baking tray with parchment paper when baking the nankhatais will ensure easy removal of the nankhatais when baked, and an easy clean-up to follow.
Chill the Nankhatai dough before baking — Refrigerating the dough before baking will provide the dough more stability (the ghee solidifies and takes time to melt when baked) and prevent the nankhatais from spreading in the oven while baking without chilling the dough will otherwise result in the flattened nankhatais. The chilling time also allows the flavors to meld well and come out ideally.
Leave space for spreading — The nankhatais will need space to spread when they are being baked. Therefore, leave enough space between nankhatais when placing them on the baking tray. They may turn out to be sticky and under-baked if placed too close.
Do not over-bake — Overbaking may result in dry and browned nankhatais, so avoid over-baking. Just bake them for 14- 16 minutes or until you see a slightly golden brown on the edges.
For easy lifting — Let the nankhatais sit in the baking tray for 5 – 10 minutes before removing them. Use a very thin spatula to lift them up and immediately transfer them onto a wire cooling rack. Leave them there to cool completely.
To prevent continued cooking — Remove the nankhatais from the baking tray after 5- 10 minutes to prevent continued cooking. They will continue to bake on the hot baking tray if not removed.
Adding a festive vibe — Sprinkle slivered almonds and pistachios on top to render a festive vibe to the freshly prepared nankhatais.
Variations — This is a basic nankhatai recipe. Feel free to improvise and add various flavors to it, like saffron or rose flavor for rose-flavored Nankhatai. Or add some Thandai mix for a Thandai nankhatai recipe.
Go creative with shapes — You can cut the dough into different shapes to make them more appealing to kids.
Do not replace all-purpose four — Replacing all-purpose flour with self-rising flour will not yield significant results because the latter contains baking powder, and the nankhatai recipe doesn’t need any leavening agents!
Confirm doneness — You can know if the nankhatais are done by looking at the edges. If you see the light golden brown rim around the edges, this shows the nankhatais are done. However, the center will still be soft and pale to the touch.
Crumbly Nankhatai — Because they were removed from the tray too soon, Nankhatais are still soft when they come out of the oven, so please resist the urge to touch the nankhatais until they have cooled entirely; otherwise, they will crumble and fall apart. This is extremely important to let the nankhatai sit for 5-10 minutes on the baking tray before lifting them.

LET ME KNOW WHAT YOU THINK!
Can you resist these gorgeous-looking Eggless Buttery Indian Cookies (Nankhatais)? I am sure you can’t!
Neither can I! So, let’s dive straight into the recipe instructions and bake a lovely batch of these adorably delicious Nankhatais that just take a few minutes from the oven to your palate!
Let us begin!
Should you make this Khasta Nankhatai recipe, please let me know your thoughts by sharing your comment below.
And don’t forget to share it with your family and friends.
CRAVING FOR MORE, TRY SOME OTHER Eggless bakes!
| This recipe post has been updated from the archives, first published on August 15, 2015 |
Follow the step-by-step instructions to make the best Nankhatai recipe

Nan Khatai Recipe
INGREDIENTS
FOR NANKHATAI
- 1 cup All purpose flour
- ¼ cup Wheat flour
- ¼ cup Chickpea flour besan
- 2 tablespoons Sooji (Semolina)
- ½ cup Powdered Sugar + 2 tablespoons extra sugar
- ½ teaspoon Cardamom Powder
- – – A pinch of salt
- ½ cup Ghee Semi-solid stage
- 2½ tablespoons Ghee melted
GARNISHES
- – – Slivered Almonds and Pistachios
- – – Cardamom Powder sprinkle on top
INSTRUCTIONS
- Combine all-purpose flour, salt, wheat flour, semolina, chickpea flour (besan), eliachi powder, and powdered sugar in a large mixing bowl.

- Mix until all the ingredients are well blended.

- Add ghee.

- With your fingers, work the ghee into the flour mix.
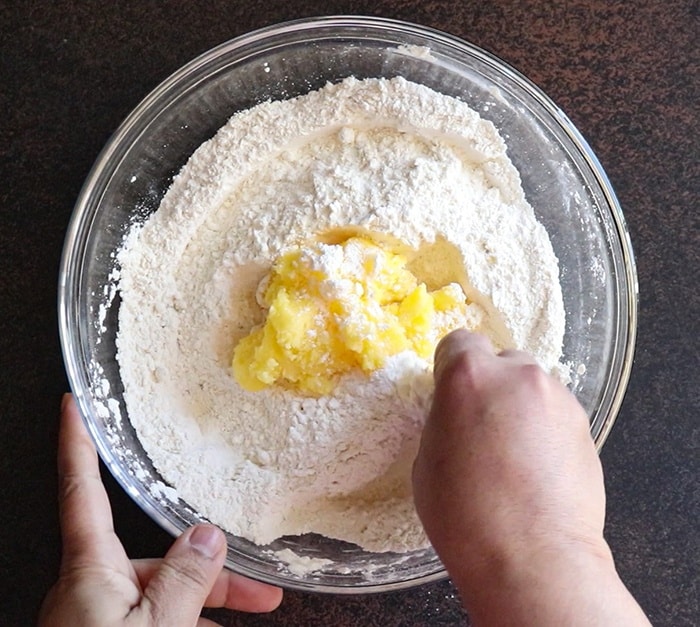
- Mix until the mixture becomes crumbly.

- Add melted ghee to this flour mix and mix until it forms a soft, pliable dough. Add ghee one spoonful at a time, as you may not need the recommended quantity. Tip — When you add melted ghee, the nankhatai dough will be extremely smooth and soft but not sticky.

- Take some dough in your hand, and roll it between your palms to finish rounding it like a ball. Form a crack-free, smooth round ball.

- Flatten the ball slightly in the palm of your hand and use your fingertips to smooth out the edges of your nankhatai.

- Repeat this process until all the dough is shaped.

- Place them on a baking tray.

- Gently make a small cut on top of each nankhatai.Tip — This indent or cross on top will ensure that the nankhatais have room to expand and will develop beautiful cracks during baking.

- Sprinkle eliachi powder. Cover and chill the unbaked nankhatai in the refrigerator for 30 minutes to an hour. Tip — This is an important step, and it will prevent over-spreading. When these chilled cookies are baked, the solidified fat/ghee takes time to melt, and during baking, whatever the steam is released, it puffs up the dough, and the cookie spreads out less and becomes flaky. And if we start baking the dough without chilling, the fat (ghee) will melt immediately, resulting in flat-out, greasy cookies.

- Preheat the oven to 350°F. After the desired time is over, bake the chilled nankhatai in a preheated oven for 14-16 minutes.

- Once the cooking time is done, remove the nankhatai from the oven.

- The center of nankhatai will still be very pale and soft when fresh out of the oven. This is important – let them cool slightly in the tray for 4-5 minutes. As they cool, the nankhatai will continue to firm up.
- Here is what the nankhatai should look like right as they cool.

- Garnish with slivered nuts and store it in an airtight container at room temperature.

VIDEO
RECIPE NOTES
Frequently Asked Questions
Can I skip the cardamom powder? Of course, you can skip the cardamom powder entirely if you don’t have a liking for it, or you can even replace it with vanilla extract or some other flavoring. How can I get perfectly shaped and consistently sized nankhatais? You can use a cookie scooper to form a ball and enjoy the perfectly sized nankhatais! Can I use maple syrup or honey as a replacement for sugar? I would not suggest you add any liquid ingredients as the dough will lose its consistency, and the runny dough will not make the best nankhatais. Can I bake these nankhatais in a pressure cooker? Sure you can. To bake these delicious Nakhatais in a pressure cooker –- Layer the bottom of the pressure cooker with sand or salt.
- Close the lid and heat the cooker on a low flame for 7-8 minutes.
- Arrange a stand in the cooker and place nankhatais over it.
- Bake/cook nankhatais for 5-6 minutes on a medium-low flame.
- Allow the nankhatais to rest for 4-5 minutes, and then gently remove it from the pressure cooker.
- Remember, the nankhatis will be soft at this point. So remove carefully with a spoon.
Just made them. They are perfect and smells so good. Thanks so much Ruchi. You are the best and your step photography is bang on 😉 🙂
Pleasure is all mine Muskaan. 🙂 Thanks for sharing your experience with me.
Hello, Can I try recipe without sugar? I have diabetics in family.
Hina, I have not tried this recipe without sugar so can’t comment on the end result. Substituting it with any diabetic sugar like ‘sweet n low’ or ‘splenda’ may result into dense and not so flaky nankhatais. Hope this helps!
Hi
Is it possible to use self-raising flour instead of all purpose flour?
Sobha, this recipe is made without leavening agent and self rising flour contains a leavening agent (baking powder). So, I wouldn’t recommend that.
Hello ruchi can you tell me the measurment for powdered sugar ..and can i powder the sugar in the grinder and then add..if yes what will be the measurment fir this and one more thing shall i sieve the flour or let it be like that itself
Shaza, please use superfine sugar. For superfine sugar, pulse/blend the granulated sugar for few seconds and it will become fine in texture.
Shifting the dry ingredients is not required but feel free to do so. There is no harm in that as it will aerate the dry ingredients.
Thanks a ton for your reply dear!!! And one more thing 1 – 1/4 cup of flour means one full cup and another 1/4 cup.. sorry for the silly question but I’m new into baking so that’s the reason I’m not sure …
No it’s okay. It better to be sure before you begin. 🙂
It’s 1 and 1/4 cup. Happy Baking!
Hi Ruchi,
Please let me know at what temp oven has to be pre-heated and temperature details for baking this sweet.
Thanks for stopping by Rashmi. Oven temperature is mentioned in the recipe – “Preheat oven at 350 degree F”.
Happy Baking!
Hi Ruchi. I was wondering if i can sgape the nasn cookies first , then refrgerate them. After an hour put them.into the oven straight from the fridge. Will that be ok
Oh yes, that’s absolutely fine. Go for it.
hey dear i followed the recipe exactly the way u told buy my naan khatai are firm but soft from inside. not crispy like the storebouught ones
Najia, for how long did you bake the nankhatais for? They become firm once removed from oven.
Hi Ruchi! I attempted these last night, but they came out a little hard (after cooling), I think it maybe because I kept adding flour as I couldn’t get all the ingredients to a dough (it was way to soft!) or it could be because I used semi solidified ghee (does it have to be liquid ghee?)
Priti please clarify what do you mean by – way to soft dough? Didn’t the dough bind well for you?
Soften butter is all you need for this recipe.
Adding extra dough will mess up the recipe.
The dough did not bind, hence addition of more flour. I am planning on baking another batch this weekend 🙂
Add soften butter and you should be good. Happy Baking!!
Keep me posted. 🙂
Hi Ruchi, I re-attempted the nan khatai & it came out perfectly! I used soften ghee & kept the dough in the fridge for about 45 minutes prior to baking. All my family & friends loved it 🙂
Thanks for trying Priti. Happy to hear that you got perfect results. 😍 😍
I am trying your recipe as the result of reading a book with my boys, “Save Me a Seat”. There is a recipe in the back of the book for Naan Khatais which is very different, using almost no sugar (only 1 1/2 Tbsp) and using cumin & cumin seed. I chose your recipe because it seems it would be more of a cookie, but I’m wondering if the recipe using cumin would be because of originating from a different region? I may try both just to see the difference, but hoping you can give me insight as most of the recipes I searched all use cardamom, not cumin. And as much as I love cumin, I think of it as more of a savory spice.
Yes, cumin is a savory spice.
Nankhatai is a combo of sugar and cardamom along with other ingredients. The recipe you are referring to must be savory cumin cookies. At times, puffed cumin cookies are referred to as cumin nankhatais. Hope this answers your query. 🙂
Hello Ma’am, Thank you so much for the recipe. I just had a question that why is my batter too sticky and not a little firm like yours before putting in the fridge? My butter was at room temperature (not melted, not very hard) but the dough is too sticky to handle. I have put the batter in the fridge and i am hoping that it might solidify a bit in there. But why is it so different than your batter? Thank you once again!
The only reason for sticky dough could be the butter. Dusting the dough with some extra flour could have solved the issue.
Hi is it ok if I do not add semolina to the recipe,then should I increase the whole wheat flour please do let me know
Anju, have not tried Nankhatai with wheat flour, so can’t comment on the end result. And semolina is added for extra crunch. Hope that helps!
Hi Ruchi, thanks so much for the recipe:) I made nankhatai’s for this Diwali and they turned out delicious!
Awesome!
Thanks for sharing your feedback with me. 🙂 Happy Diwali!!
Hey Ruchi, do we need to grease the baking tray? and I am in US, so on which rack I should be placing the baking tray. I have a kenmore brand oven here.
Yes, please grease the baking tray.
Place baking tray at the center rack and bake.
hi ruchi
tried out nankhatai..i am happy with the end result..texture wise they look good also..but my mother says they are a bit hard..not much, just a tiny bit…just 2 points to tell you..i cut out amount of sugar..and i was not sure how to measure ghee in cups..i used 8 Tbsp ghee…because at that point the dough was soft and smooth..what can be done to get a soft nankhatai?..anyways thank you ruchi..the recipe is good and i am going to keep it..
Thanks for trying the recipe Archana!
8 tablespoon ghee is less for this recipe. 3/4 cup butter or ghee equals 12 tablespoons. So that was comparatively less and that’s what resulted in dense nankhatais.
Hi nice to read all details you have given. I have tried nankhatai (diff. recipe) before and output wasnt good. so I started looking for recipes again and saw your blog.
I wan give a try ..please wish me luck.
I’d appreciate if you could clarify few of my doubts :
1. Do I have to mix the butter + sugar first (until it becomes light in color) and then other ingredients? If I do so what would go wrong?
2. Please confirm that we do not need to add any of these -> Salt, backing soda, backing powder.
3. How to confirm that nankhatai is backed and ready to take out of oven?
4. And stupid question 😀 when we say : fridge it’s not a freezer. right?
thanks in advance!!!
Welcome to the blog Madhavi. Just follow the steps and you will get it right. All the best!!
Onto your questions –
1. Do I have to mix the butter + sugar first (until it becomes light in color) and then other ingredients? If I do so what would go wrong?
That’s not a required step but you can surely do that.
2. Please confirm that we do not need to add any of these -> Salt, backing soda, backing powder.
For this recipe, no.
3. How to confirm that nankhatai is backed and ready to take out of oven?
They will puff up the way it is shown in pic 18. Cracks will open and Nankhatai will have a khasta look.
4. And stupid question 😀 when we say : fridge it’s not a freezer. right?
Yes, 🙂 it’s your refrigerator not freezer.
Hope this answers your queries. Feel free to email me if you have any other questions.
Happy Baking!!
oh one more question
can I add chickpea flour? if yes then how much?
I haven’t tried this recipe with chickpea flour. 🙂
Hi Ruchi
I tried this recipe which sounds simple for naive person like me! All went well except end… They are perfectly burnt! No one can eat? I preheated oven to 400 f. Was that the mistake? I am going to try again tmrw, just want to avoid same mistake again.. Feeling sad
Yes that’s the mistake.
Sonali, the baking temperature is 350 degree F. Why did you bake @400 degree F?
Thanks Ruchi! I will go with 350 today. Silly q: should I preheat oven or directly turn on to 350 n put the tray?
Please preheat oven @350 degree F for 10-15 minutes and then bake the cookies as directed.
Thank you Ruchi for Guida nice! This time I got it right.. N my kids loved it!
Awesome Sonali!
Happy to hear that, if possible share some yummy pics with at [email protected]
I have recently been introduced to Indian food by some coworkers. I love to bake, and thought it might be fun to add a new cookie to my usual favorites that I share with coworkers. These wee simple enough to make. Texture and flavor was good (not too sweet, which is a nice change). I baked for 15 minutes, and once cooled, they were firm, but not crispy like a shortbread cookie I am used to. Mine also did not brown on the bottom as much as your photo. Should I have baked longer? I baked on parchment paper, perhaps that was the reason? All in all, a nice addition to my recipe box.
Thanks for sharing your experience with me Robin. I am glad that you liked the recipe.
I don’t think parchment paper was an issue. Every oven is different and cooking temperatures vary. Maybe try baking it a little longer but keep an eye on them.
Hi Ruchi.i tried out these today and these r good. After they r cooled. Can I keep them in fridge in an airtight container.. Because I need to serve this to someone after 4 days. Pls reply. Thanks in advance.
Thanks Jac for trying the recipe. Glad you liked it.
They stay good at room temperature for 2 weeks. Have never refrigerated them.
HI
My cookies got burnt from bottom, and after 18 min they were still wet from top, I kept it on 180 c for 18 min. My oven is Morphy richards 1500 watt. any temperature adjustments have to be done? plz reply
Sorry to hear about that Deepsi.
Oven temperature is too high. I would suggest lower the temperature setting to 150 degree C and bake at the middle rack until done.