


If you are looking for warm, fluffy, and perfectly-proofed Homemade Ladi Pav and Buns, then this is THE recipe for you!
These eggless ladi pavs are surprisingly simple to make and tastes so much better than the store-bought ones. These golden pavs make a perfect meal when paired with bhaji.
Now let’s be honest, who doesn’t love a moist homemade bread? When it comes to baking, there’s nothing quite like the smell and taste of freshly-baked bread out of your oven.
It’s one of the easiest things to make and looks so elegant and tastes amazingly delicious!
What is Ladi pav?
Pav is, (as you may have already guessed, thanks to the pictures) a type of bread and ladi means a line or block of dough stuck together. Combined, it signifies a chunk of bread dough joined together.
Ladi Pav is a very popular recipe from Mumbai, which, over time, has become a real staple bread in the Maharashtrian cuisine.
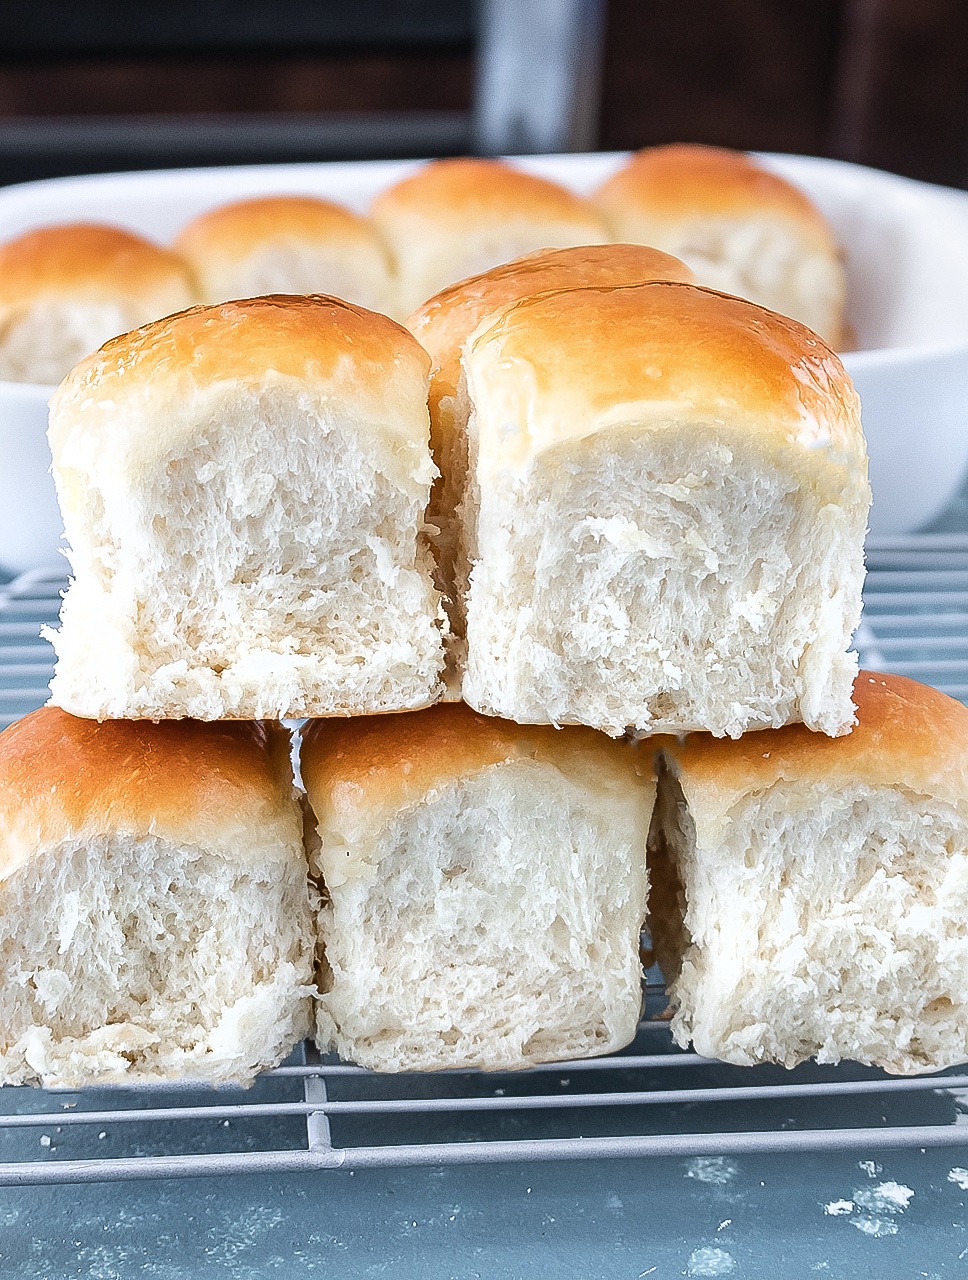
This bread is also known as the Mumbai ladi pavs – which are soft, spongy, and fluffy with a good flavor and hearty texture.
The recipe that I am sharing with you today is that homemade ladi pavs have the same taste and smell as store-baked pavs.
So consider yourself warned; these Mumbai Ladi Pav and Buns are hard to resist!!
Ingredients required to make Homemade Ladi Pav and Buns!
» All-Purpose flour – the base for this recipe.
» Salt – let’s flavor the pavs.
» Butter + oil – for extra richness
» Yeast – Use active dry yeast for this recipe. Please make sure the yeast is not expired.
» Sugar – adding sugar will speed up the yeast activation process. Yeast will bloom faster if it has sugar.
» Milk or Water – the most important ingredient. Make sure your liquid is lukewarm and not hot. If the liquid is too hot, it will kill the yeast.
» Baking Powder – makes a huge difference. Homemade Ladi pavs are baked with some baking powder to achieve a soft, amazing texture.
WHY ADD BAKING POWDER to Homemade Ladi Pav and Buns?
Some of you may wonder why add baking powder when there is yeast already present in the recipe?
The answer is simple; baking powder makes the pavs feather-light and remarkably soft.
I have been using baking powder in my pavs for quite a while now, and what I found is that with yeast alone, I couldn’t get that lighter consistency, but the addition of a little baking powder: changes the whole game.
Yeast makes the ladi pav dough to rise, whereas baking powder gives the pavs light and fluffy texture!
However, I don’t recommend using the combo of yeast+baking powder in all situations because some bread recipes are better off without baking powder.
But if you prefer, a beautiful light, softer white textured pavs, then a teaspoon of baking powder will make a huge difference.

How to make the Mumbai Famous Homemade Ladi Pav and Buns at home?
1. Activate the yeast!
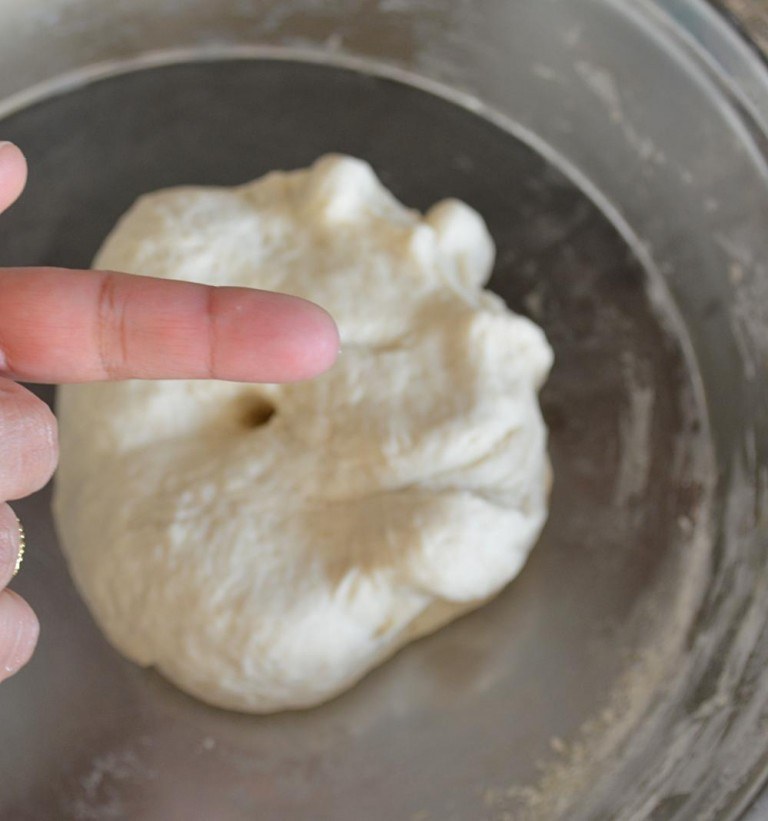
Begin the recipe by activating the yeast. Combine yeast with milk +water + sugar and let it stand for 5-10 minutes until it becomes thick, foamy, and bubbly.
This proofing procedure shows that yeast is alive and active. Yeast needs to foam up (become frothy and bubbly). If it doesn’t then discard and start all over again.
DO NOT proceed with the recipe, as the flat yeast will result in dense and sticky pav.

2. Prepare the dough
Combine yeast with butter, oil, flour, and milk in a large mixing bowl. Knead a soft, pliable dough. Once the dough is blended, cover and set it aside in a warm place to rise.
Let the dough rise undisturbed for an hour.
In the given time, the dough will double in size.
Water ratio in the recipe
This recipe uses 3 cups of flour vs. 1.56 cups of liquid (water + milk + oil + butter), and that balances this recipe pretty well.
The extra 3 tablespoons of water are ONLY TO BE ADDED if the dough doesn’t bind.
Do not add all the water at once. Add water as needed, you might not need all the water.

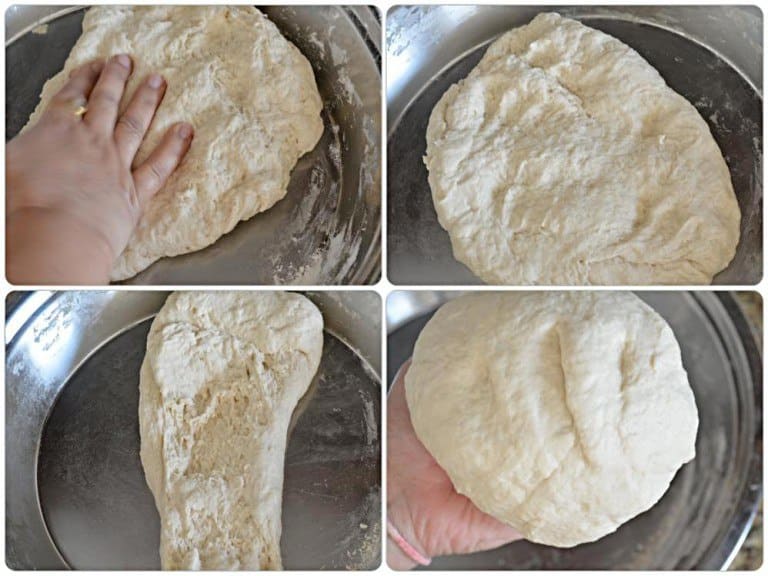
3. Knead the dough!
Once the dough has risen, remove it from the bowl and knead it for another 5- 10 minutes.
This step is essential for lighter pavs.

4.Time for the second rise!
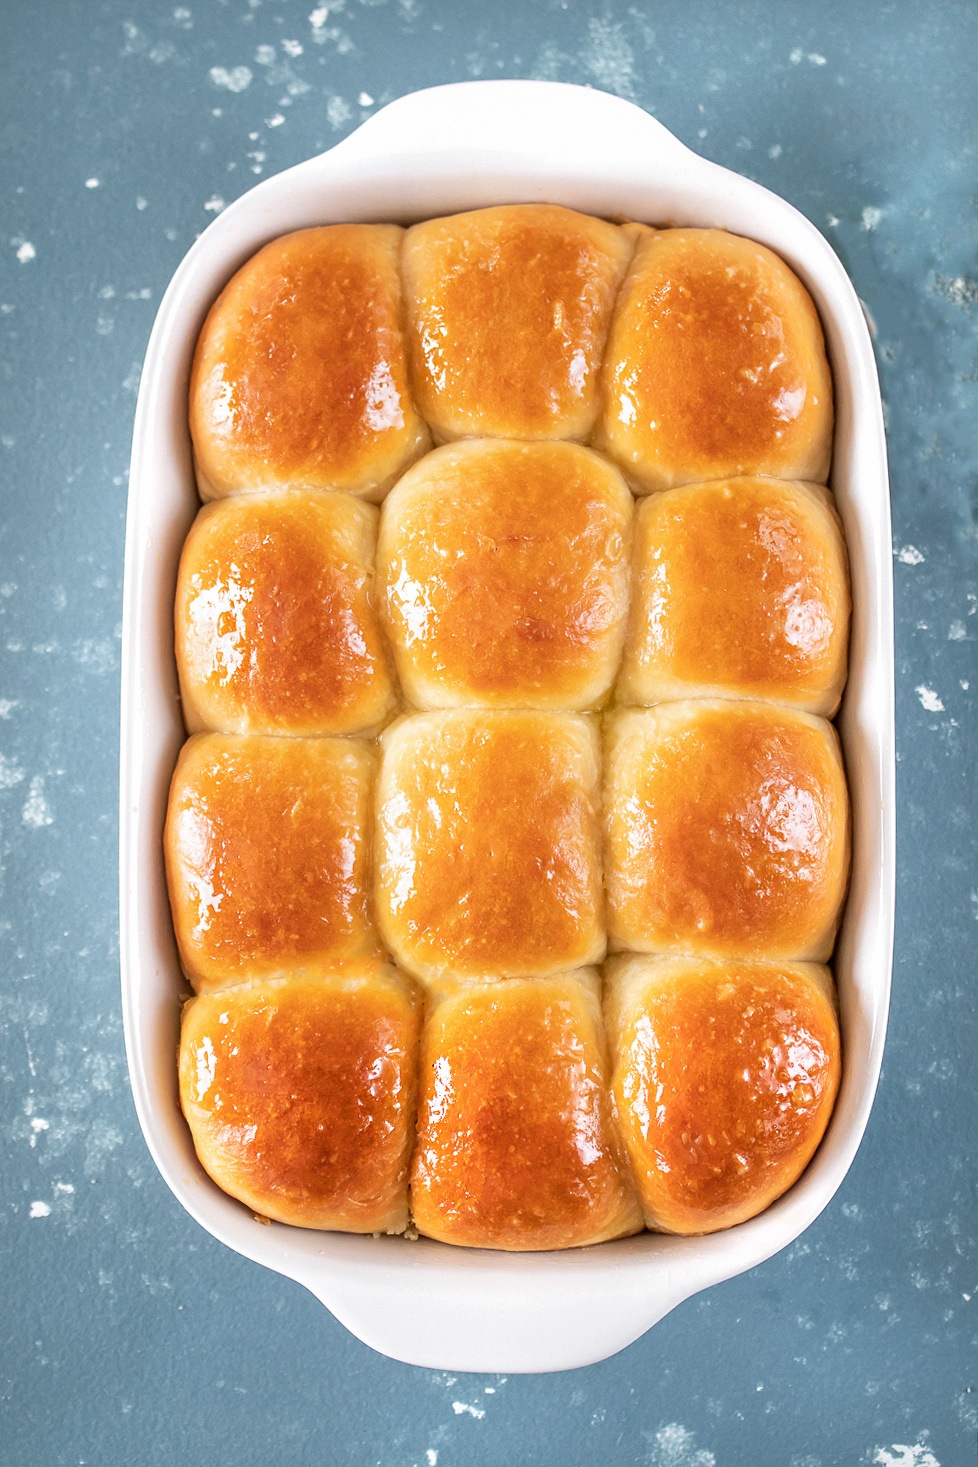
Divide the pav dough into equal parts and shape them. Arrange the pavs in a greased tray.
Leave some space between each dough ball and provide them some room to spread as they rise.
Cover the pavs with a wet towel and set it in a warm place. Let the buns rise for 30 minutes.
After the rise period, the buns will expand and fill up all the empty save. They are now ready for baking.


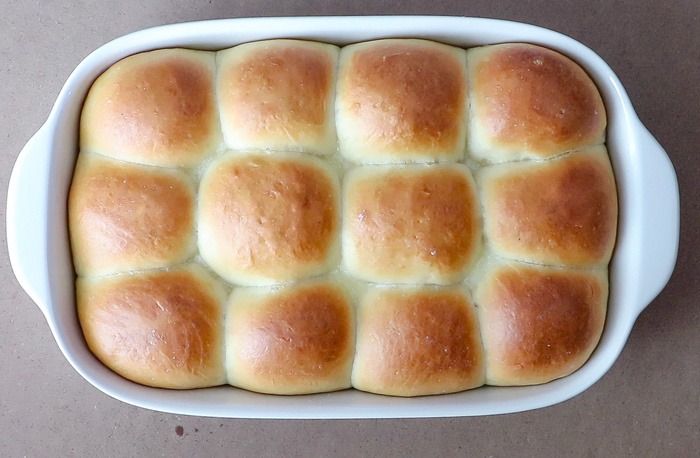
5. Bake the Pav
Brush the top of the pavs with milk.
If you like a brown crust just like the store-bought ones, then you can brush the top with an egg wash. Bake Homemade Ladi Pav and Buns in a preheated oven until they are evenly brown from top.
If you prefer a darker shade, place them closer to the heating element for a few seconds until the top gets darker.
But keep a watchful eye as they will get burned quickly.
The same recipe can be used to make homemade burger buns!
Instead of using a square pan, place the shaped pav balls on a baking sheet. The only difference, these rolls will not be placed firmly like the pavs; they will be freely arranged on the baking tray.
Bake the dough for 18 – 20 minutes. This way, these buns will bake into crispier rolls with an even all around crust.
Brush these homemade buns with butter and sprinkled some sesame seeds – soft and tender homemade buns are ready to enjoy!

Tips to consider while making Homemade Ladi Pav and Buns –
What could possibly go wrong at each step –
Please follow the exact ladi pav recipe, and you can’t go wrong with this one. This recipe has been tested and tried many times in my kitchen, and every time it’s a winner.
Step 1- Activating yeast – Yeast is the backbone in bread baking. Many things can go wrong at this step. Let’s look at them in detail.
- Yeast SHOULD activate before you progress with the recipe. This is a step where most people rush through, and the whole recipe falls apart.
- Be patient. Let the yeast rest undisturbed. Let it do its work.
- Make sure your yeast has not expired. Always use fresh yeast every time. Old yeast will fail to rise, resulting in dense pavs.
- Use lukewarm water. A water temperature between 105° F and 110° F. Too hot of water will kill the yeast, and it will fail to rise.
- Sugar is an essential ingredient. Trust me; your pavs will not turn sweet. Yeast feeds on sugar, and sugar helps the yeast to become bubbly and frothy.

Step 2- Proofing the dough -Equally important step in bread making.
- After the dough is kneaded, ladi pav dough will be just like any other dough – flat and smooth. It needs proper proofing/rise time.
- Now, it’s our duty to give the dough a warm, humid environment. Trust me; yeast loves that.
- And what could that be – it could be the top of your refrigerator, your Instant Pot, or your oven.
- Warm the oven to 200 degrees F. Once it reaches that mark, turn the oven off. Place the Ladi pav dough in the warm oven.
- Let it rest. Please do not open the oven to check how it is doing.
- Remember, temperature plays a crucial role in bread rise.

How can you proof the dough in the Instant Pot?
Instant Pot is an excellent option if you need the bread dough quickly. It provides an excellent, consistent warm place for your dough to proof, which yeast loves.
1. Grease the Instant Pot insert. Transfer the dough to the Instant Pot.
2. Cover it with a glass lid.
3. Turn the Instant pot on by pressing the ‘Yogurt’ button. Adjust the pressure to ‘Less.’ Set the timer to 30 minutes.
4. After 30 minutes, the dough will expand and double in size.
NOTE – If your Instant Pot doesn’t have a ‘yogurt setting,’ you must ferment it naturally in a warm oven.
Step 3- Knead the dough. Often overlooked, but this is an essential step in bread making.
Punch down and knead the proofed dough.
But why knead the dough? Dough elasticity and gluten formation are enhanced by kneading. Kneading the dough for a good 4-5 minutes will help release additional air bubbles.
Kneading-
- It helps produce a beautiful texture of the ladi pav.
- It redistributes the yeast and moisture evenly in the dough, which helps the dough to rise well during the second proofing.
Step 4- Select the right baking pan for the pav. I have received many emails regarding Ladi pavs not retaining their shape.
If your yeast was well activated and you had an excellent first and second rise, then your Ladi pav recipe can’t go wrong. Now, why didn’t they retain their shape?
It’s because of the pan.
Your pavs did what they could do – they expanded during baking. But instead of rising upward, they spread in the pan because there was too much distance between each pav.
So, if you prefer your pavs to be squared and uniformly shaped pull-apart rolls, just like the store-bought ones?
Then bake them in the right pan. The best pans to bake are –
This way, you will end up with perfect pull-apart pavs.

Step 5- Baking Ladi pavs – By this stage, everything is set. If your pavs had an excellent second rise then nothing can go wrong at this point.
Just bake as directed. When the baked Ladi pavs will come out of they will be hard on top. Don’t worry.
Just brush with butter and your pavs will turn soft.
For softer pavs – Preheat oven for 15- 20 minutes before placing pavs. Bake them for 10-12 minutes. If pavs are not brown in the given time frame, put them closer to the heating element or BROIL for FEW SECONDS until the top browns up and remove them immediately.
Remember, overcooking will result in hard pavs.
Now for some Faq’s related to Homemade Ladi Pav and Buns
» What kind of yeast to use?
I have used active dry yeast for this recipe. If using Instant yeast – that needs to be added to the recipe directly. No proofing is required. If using Instant yeast – use 1¾ teaspoons of instant dry yeast.
If using Instant yeast, you may have to adjust the liquid content in the recipe.
Role of Sugar in bread baking!
If using Instant yeast or Active dry yeast, or fresh yeast, do not skip on sugar!
– Sugar is added to the dough for taste. The sugar balances the bitterness produced by the leavening agents or whole wheat flour and lends a sweet taste to the finished product.
– Sugar helps make bread soft and tender by absorbing some of the liquid. Without sugar, the moisture will evaporate from the dough during baking, resulting in a dense loaf.
– By absorbing the dough’s moisture, sugar prevents gluten formation, which gives your bread a delicate crumb texture.
– Sugar aids in the browning and caramelizing of the crust.
– Sugar acts as a preservative and helps to keep the bread fresh for a long.
– The addition of sugar gives a boost to the yeast, and the yeast expands and multiplies, producing more carbon dioxide.
– The carbon dioxide forms little gas pockets in the dough, making it rise. During baking, this gas expands, and that causes the bread to rise.
» On which rack should you bake these Ladi pavs?
The tray should be kept at the middle rack for brown pavs.
» What can you use to bake homemade Ladi pavs?
Any oven resistant dish or baking tray is suitable for baking pavs. You can even use glass baking trays and foil trays.
» Why is my Pavs moist at the base?
Once pav bread is out of the oven, remove the pav from the baking tray and allow them to cool down on a wire rack. If allowed to sit too long in the baking dish, pavs will turn moist and remain wet at the base due to heat condensation.

My family has enjoyed homemade pavs for years now, and I hope it becomes your family favorite too. Follow the step by step guide below to your very own homemade light and soft pavs.
These pavs will melt in your mouth, and trust me, they won’t last long around the dinner table – my family devours these pavs in minutes with homemade bhaji.
Let me know in the comments if you try this recipe. Feel free to contact me with any questions or inquiries, and I would be happy to answer them.
CRAVING FOR MORE, TRY MY OTHER FLAVOR-PACKED bread –

Homemade Ladi Pav and Buns
INGREDIENTS
YEAST PREPARATION
- 1 packet Active dry yeast (2-1/4 teaspoon)
- 2½ tablespoons Sugar
- 3 tablespoons Water
- 3 teaspoons Milk
PAV DOUGH – THIS RECIPE YIELDS 12 PAVS
- 3 cups All purpose flour
- 1 teaspoon Baking powder
- 1½ teaspoons Salt
- 3 tablespoons Butter
- 2 tablespoons Oil
- 1 cup Water or Milk
- 1 tablespoon Butter (for basting)
BRUSH UNCOOKED PAVS WITH
- 2-3 tablespoons Milk
INSTRUCTIONS
YEAST PREPARATION
- Assemble: all the ingredients. For few seconds warm up milk, water, and sugar. Milk and water should be LUKEWARM and not warm. Take it off the flame and mix in the yeast.

- Whisk it well.

- Let it sit for 10 minutes. After 10 minutes it will look like a thick creamy paste. This proofing procedure shows that yeast is alive and active.

- If the yeast doesn't foam or bubble as shown in the pic, please discard the yeast and start over Do not continue with flat yeast as it will result in dense and sticky pav.

KNEAD THE DOUGH
- In a bowl combine flour with salt and baking powder. Mix it well. Slowly and gradually add water/milk. PROTIP – Do not add all the water at once. Add water as needed, you might not need all the water. If the dough doesn't bind, add an extra tablespoon of water.

- Time to add yeast.

- Add yeast and mix until combined.

- Add butter and oil to the flour. Mix until fully incoprporated.

- Knead the dough for 5-10 minutes.

- The dough should be smooth. Not sticky.
- Transfer the dough to a bowl. Cover the dough with a wet towel.

- And set it in a warm place for at least 1- 2 hours. The dough will double in size. The dough should be all airy and puffed up.

- Remove the dough from the bowl, dust it with some flour and start kneading the dough. This step is necessary – if the dough is not kneaded well, pav will turn out dense. Dough elasticity and gluten formation are enhanced by kneading.
ASSEMBLE PAV
- Divide the dough into equal parts. Form the dough into smooth circular shape. Arrange the pavs in a greased tray.Leave some space between each dough ball and provide them some room to spread as they rise.

- Cover them with a wet towel and set it in a warm place for at least 30 minutes. Lift the wet towel to see them doubled in size.

- The pav will double in size. If they are not doubled in the desired time- let the pav rise for another 30 minutes. Preheat oven at 400 degrees F.

- Brush pavs with milk and… Bake them in a preheated oven (400 degrees F) for 10 -15 minutes or until light brown from the top. It took me 12 minutes to lightly brown the pavs and a minute on BROIL 9which was closely monitored).

- Apply butter to the freshly baked pavs and it will soften the top.
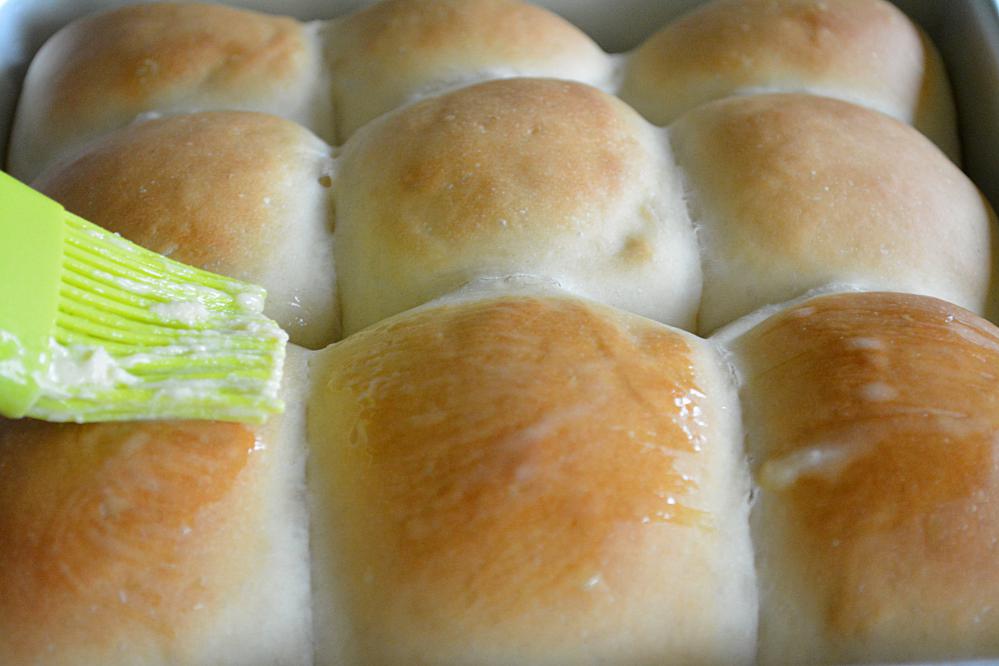
- Run a butter knife around the edges to loosen up the pavs. Run the knife a couple of times and make sure no sides are attached to the baking pan. This way, the pav will toss right out of the baking pan when inverted.

- If the pavs are allowed to sit for long in the baking tray they will turn moist at the base due to heat condensation.

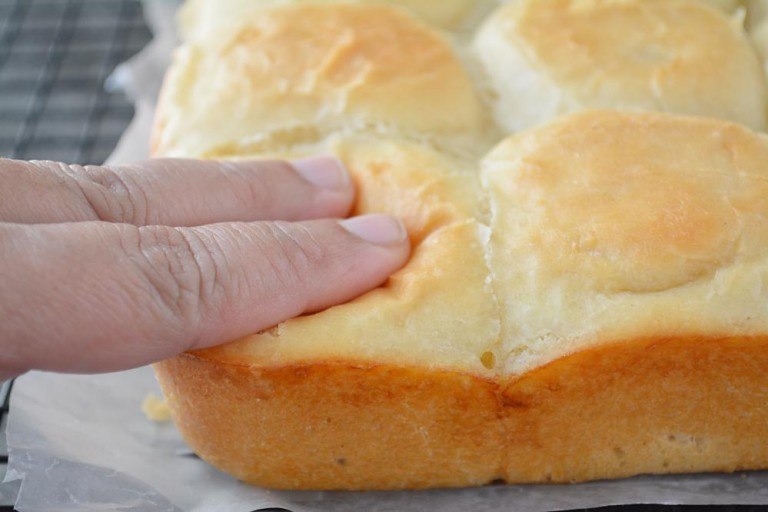
- When pressed, the pavs will spring right back into it's shape.
- Once you start making this recipe at home you will stop buying market buns – easiest and tastiest bun recipe ever!!

- Using the same recipe you can make homemade buns – baking time will vary 18-20 minutes. Sprinkle them with sesame seeds.
PAV WITHOUT OVEN
- Add 1½ cups of sand at the bottom of a pan or pressure cooker. Place a strainer over the sand.

- Grease a steel container. Arrange pavs in the greased container. Place pavs over the strainer…

- Cover it with the lid. Maintain the heat – it should be medium. If using a pressure cooker, then remove the rubber gasket from the lid and close the cooker.

- After 30 minutes of total cooking – well-cooked pavs. Carefully remove them from the pan.

- Let it cool down completely and then run a knife across the pan to loosen the pavs. Flip it over. Brush with melted butter. Enjoy!! Beautifully crusted at the bottom and soft and velvety at the top.

VIDEO
RECIPE NOTES
 Pavs made in 2016-
 Pavs made in 2017 –
 Pavs made in 2018-
 Pavs made in 2019-
Pavs made in 2020 –
Pavs made in 2019-
Pavs made in 2020 –
Hi Ruchi , I want your advice. I read your recipe of pavs after I made the dough for pavs with dry yeast only. Can I add baking powder now. I made the dough of five cups. If yes how much baking powder I should add to it. Please advice
Hello Manjit,
After you have kneaded the dough you cannot add the baking powder.Dry ingredients needs to be mixed up first before adding yeast. Hope that helps!
Thanks!
Ruchi
Superb recipe!! My pavs were better than market ones and had no after smell. They were so moist and fluffy that we ate it next day by applying butter. My place is known for breads but your pavs made me look like a professional cook. Thanks!
Thanks Pasanna! Glad you liked the recipe. 🙂
I just love all your recipes, they are clear and easy to follow. Awesome work done by you. I tried many of ur recipes and they turned out really good, all credits to you. Your pav buns are a hit in my house. I have made them many times and always a success. Never knew could make pav buns at home and the leftovers are used as burgers or eaten just like that. I get lot of appreciation on my cooking nowadays, all thanks to you.Bless you!
You are very welcome Mala. Glad you liked my Ladi Pav recipe. They too are my family favorite! 🙂
Tried many pav recipe but every time my recipe was not to good. sometimes the crust was hard, sometimes they were under cooked. Your pictures gave me hope and I tried it once again and they were just perfect. So soft and spongy. Very very impressed. I feel like I have conquered a fort. Thanks so much Ruchi. Your recipes are amazing and something very very different.
You are welcome Jyoti! Glad to hear that you nailed it this time. 🙂
Hi ruchi i will try this recepie today need guidiance my otg have 300f max and otg have option of top bottom amd both so for how many minutes i have to bake on 300f and which option shall i use both or
Poonam, what’s the broil temperature in your OTG?
Please refer to your appliance manual for this.
Sorry, I have no experience with OTG baking. So to guide you further, I need to know if the temperature is in Fahrenheit or Celsius.
Had visited this recipe couple of times and finally I made it last weekend. AMAZING results! So fluffy and bouncy, better than the market bought pavs.No more market ones which has a peculiar smell in them, homemade is the best. My kids took it to school the next day.All thanks to you. Have saved this recipe and will be making it again and again.
Thanks for your feedback Supriti! I’m so happy to hear that you liked this recipe. 🙂
Wow Ruchi! Great recipe.My paavs were super soft and very very tasty. Please post your version of pav bhaji recipe. Would love to try that one out with your paavs. I am so happy, for the first time I baked a bread and that too so perfectly done. Thanks dear!
You are welcome Jeevika! Thanks for trying out the recipe, glad you liked it! I am working on that and will be posting Bhaji recipe soon. 🙂
Yum and delicious. Your recipes end up with great results. I tried this and was jumping in joy when they were puffing up. They smell so great and taste yummy. Thanks for sharing Ruchi. Pictures speak for themselves and I was so tempted to try this one.
You are welcome Shilpa! Thanks for trying out my recipe. Glad you liked it. 🙂
Hi Ruchi,
You don’t have pav bhaji post on your blog?
I would love to see your way of making bhaji….tried onion tomato masala for freeze and later use. Used in rajma later…not only it reduced loads of work but tasted great..
Thanks for stopping by Deepshikha! I am working on Bhaji recipe and you will see it pretty soon on the blog! Indeed, tomato-onion masala is a great help and I always have that in my freezer. 🙂
Hi Ruchi, for the first time I tried making this ladi pav recipe of yours yesterday to the T. All was good except that instead of soft pavs, it turned hard on the top too. Also the centre part wasn’t that soft feathery type like yours.
Would you know the reason where I went wrong with this recipe.
I want to try again to get a perfect pav.
Thanks in advance for your help 🙂
Hello Cynthia,
Feel so bad about that. I would like to check few things with you.
1. Was the oven preheated to 400 degree F? And what oven rack did you place your pavs? Keeping them too close to the heating rods will result in hard top, as high temperatures lead to crusty pavs. Also baking them for a longer time will make them hard.
2. Did the dough doubled in size when kept for the first time?
3. After shaping the pavs, were they allowed to sit covered for 30 minutes? As this second rise is essential and results in softer pavs.
Please do give them a try again as I have personally made these pavs many times, without fail. Feel free to message me with your questions.
Thanks!
Ruchi
Hi Ruchi,
Thanks for your prompt reply.
1. Yes I pre-heated the oven to 200 C. I placed the pavs in the middle rack.
2. Yes the dough doubled in size at both the proofings.
3. Yes after shaping the pavs I kept them for 2nd proofing for almost 1 hour. And it did rise in the 2nd proofing too.
You’ve mentioned to bake for 10-15 mins or until the top is lightly brown. But after 15 mins I noticed it still didn’t turn light brown too inspite of pre-heating for 10 mins.
So I kept it for another 15-20 mins until the top got browned. Then I guess it was too hard by then,
I felt this might be the reason for becoming hard 🙁
That is the ONLY reason why they turned hard. If you scroll down to the end of the recipe, you will find that I made buns with the same batch. They were perfectly browned and hard from top,soft from inside but not airy and light like pavs. Reason being that I kept them for longer time (18-20 minutes).
Give them a try again and I would suggest preheating oven for 15- 20 minutes before placing them in the hot oven. Also if they are not brown in the given time frame, place them close to the heating element for FEW SECONDS until the top browns up and remove them immediately. Hope that helps.
-Ruchi
Yes I will definitely try again. Thanks for the tips…will follow them in my next batch.
You are welcome Cynthia! Keep me posted. 🙂
Hi ..
Can i use glass pan for making these pav in OTG?
I am so excited to try this recipe and i dont have a aluminum pan
Thanks for stopping by Chandani. Make sure the glass pan you are using for baking is compatible with OTG. Happy cooking. 🙂
Perfect rolls. Followed your recipe to the T and these pavs came out soft and fluffy. Thank you for a super easy recipe, soon will be trying out your wheat buns. For now I am all set for my vada pav recipe.
Thanks for trying out the recipe Shonali. Glad you liked it. 🙂
Can’t believe this I made these pavs. Ruchi they are so fluffy and light. Can’t wait to surprise my family tonight with homemade pavs. Thank you so much. Will surely try the wheat ones too. So loving it.
Thanks for trying out the recipe Renuka. Glad to hear that it turned out great for you. I am sure your family must have relished your hard work. 🙂
I have tried couple of times but I am not successful in making pav. my pavs are becoming hard and not getting color on top of it. I am not knowing where I am getting wrong. I have a confusion whether oven should be pre heated to 400 c or 200 c and it should be switch off before placing the pavs in oven? please advise me.
Hi… I tried yesterday step by step… Pavs turned out good but not as soft as shown in your pics description…
I used Eno instead of Baking Powder and kneaded flour with water only… Will this may be the reason for pavs not turning out as shown in your pics…
Help
Yes that’s the reason. Please use the combo of yeast and baking powder for great results.
Mouneshwari, oven temperature as stated in the recipe should be at 400 degree F i.e. 200 degree C. Oven needs to stay on during baking period. Pavs are to be baked at 400 degree F for 10 – 15 minutes. Baking pav for long will result in hard pavs. Like I have done with the burger I made at the last. I baked this one for 18 – 20 minutes and the outer crust is hard and dark brown and inner layer is soft but not as fluffy like pavs. Hope I have answered all your questions. Feel free to contact me if you have any other queries.
thank you I will try and get back to you..
Sure!!
I tried once again the pavs are soft but no color, I kept for few more minutes also but I didn’t get color.
Mouneshwari, oven temperatures vary. Also if they are not brown in the given time frame, I would suggest placing them close to the heating element for FEW SECONDS until the top browns up and remove them immediately.Do not bake them for more than 10 – 15 minutes or they will become firm and hard.
Followed your recipe and made a huge batch (2 trays) of pavs. They came out so well. Spongy and light. Thanks a ton! Ruchi I have tried many of your recipes and I have to say that they are a keeper. All of them turned out great except the salt part.
Thanks for wonderful feedback, Vanisha! Glad to hear that you are enjoying my collection. Thanks for trying out the recipe and I am happy to hear that it turned out great for you!!
Wonderful recipe. I am ecstatic after seeing my baked ladi pavs. We get pavs in our area but they have egg and many other unwanted stuff in it. Feeling delightful after making my own paavs. They smell and feel like store bought ones. Thanks Ruchi. One last thing I would add is I had to keep paavs close to the heating rod to get color just like store bought pavs. Next I am looking forward to make homemade buns with your pav recipe.
Thanks for trying out the recipe. Glad you liked it!! Yes, keeping it close to the heating element will result in perfectly browned pavs.
Followed your recipe and got beautifully brown pavs. Made two trays and I agree it needs to be broiled for additional color but no complaints a first time hit recipe. Will try it again and again
Welcome to the blog Savita! Glad to hear that you got great results. Thanks for sharing your experience with me. 🙂
Gorgeous! Can’t wait to make my own! I have a doubt about the yeast proofing method you’ve shared please. Should we not wait for the frothing of the yeast mixture? Is thickening alone enough? Tia
Yes, yeast needs to be frothy and bubbly before adding it to the dough. I have mentioned this part clearly in my post but missed adding the same to the recipe. Thanks for pointing that out to me Nit, correction done.
This is my second time trying your recipe and this time too it turns nice. I see you have added a Q&A section, thanks for doing that. Making pavs at home is my new hobby now. Have bookmarked your site and follow your step by step guidance.
You are welcome Alpana and thanks for sharing your experience with me. 🙂
Hi Ruchi, loved ur blog!! I wanted to ask you if I can knead the dough for Pav in any other way? As I want to make 50pcs and more of Pav together. It is very difficult to do it by hands. And also how can I store the dough ? So that I can bake it the other day or as when required. Thanks 🙂
Thanks Ami and welcome to the blog!! Here are the answers to your queries –
1. Kneading the dough for 50 pavs by hand, can be exhausting. If you have a food processor or standing mixer than use that to knead the dough. The other way would be to knead it in batches.
2. I am afraid that freezing the dough before baking will kill most of the yeast action and during baking yeast will be inactive and pav will not rise. Other way would be to bake the pav, remove them from the baking tray, line a airtight container with wax paper and store the baked pavs in the refrigerator for 2-3 days. Hope that helps!!
That is not true, you can freeze bread dough and thaw and it will rise again, yeast will not be kill by freeze, it will only go into hibernation. only Heat kills yeast.
Thanks for stopping by EL. Yes, you are correct, we can freeze the bread dough. I recently experimented with this recipe and learned that we can freeze the unbaked bread dough and it will revive again.
In my personal experience, the only thing that to remember is to follow certain guidelines for it to rise properly again.
1. Let the dough rise through it’s first step. (as stated in the recipe).
2. After the first rise, knead, punch and shape the dough. If making pav, shape like small buns. If making bread shape like loaves.
3. Place the shaped dough into a greased baking tray, seal it with plastic wrap (prevent sticking) and freeze.
4. Such elaborate step is done to make sure the dough retains its shape during freezing.
5. When ready to bake,thaw the dough in the refrigerator over night and then give the dough sufficient time to fully rise again (it’s second rise).
6. Bake and enjoy!!
Thanks for pointing that out. 🙂
Hi ruchi superb ur patience abt replying àll.
I was considering that u explain me what if i make dough in nite and bake them in morning fresh for brkfast. I m very new nto bread baking. So did not undersatnd thawing stuff.
Just simply tell me as how shud i keep my dough overnight to bake them next day??
Thanks for stopping by Binny! Yes, you can refrigerate the dough overnight. Follow these steps –
1.Lightly brush the dough with oil and store in large Ziploc bags (give the dough some room to rise).
2. Refrigeration will slow down the yeast action, but for the first few hours, yeast will be active and dough may show some sign of rising in the refrigerator, no worries just press it down. Once the dough is cooled, you will be good.
3. When ready to bake, knead the dough again, shape and allow it to rise again. The second rise will take longer for the refrigerated dough because it is not at the room temperature. 4. Once you see the rise in the shaped dough, bake as stated in the recipe.
Happy Baking! 🙂