


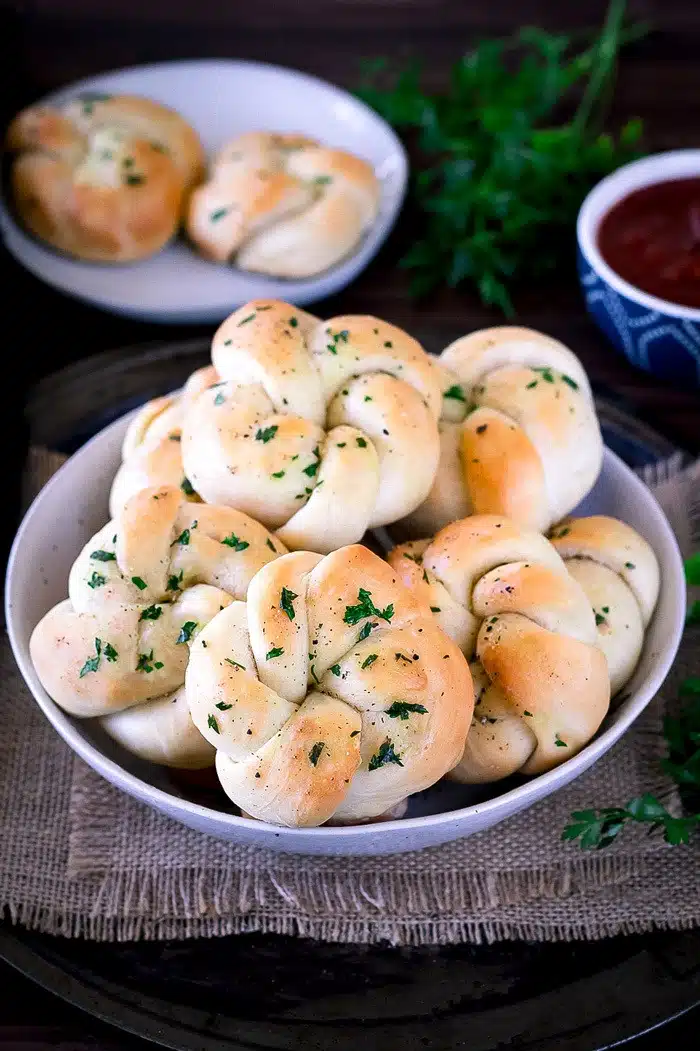
If you have been waiting to prepare an Easy Garlic Knots recipe at home that taste and smells its best, baking this recipe will be an ideal venture! These insanely delicious, superbly soft, and utterly irresistible Garlic Knots are made from a few essential ingredients and are hearty, filling, and flavorsome!
Bake these easy garlic knots and pair them with a hot bowl of soup for the most comforting and wholesome meal.
A word about the Easy Garlic Knots Recipe
This recipe of feathery-light Garlic Knots slathered with flavored butter is a treat to the taste buds. Made with the all-purpose flour, a few choicest herbs, and topped with a generous amount of butter, this recipe is sheer blissfulness!
These easy-to-prepare and nutritious garlic knots are egg-free and do not contain preservatives or unhealthy additives, making them healthy.
Not to mention, the mesmerizing aroma and the unbeatable excitement baking this bread brings are extremely delightful.
A must-try recipe that your family will love to savor takes no time to bake and turns out perfectly. Serve these to your family or guests at a house party or a get-together, and watch them disappear in a snap.
Reasons You’ll ♡ this Easy Garlic Knots Recipe
These delicious Garlic Knots are perfect accompaniments to soups and make the ideal addition to your meals. These are loved for their texture and luxurious softness.
Here is what makes this a knockout recipe —
- Pillowy-soft and blissfully buttery
- Made with readily available ingredients
- Can be prepared in advance
- Scalable recipe
- Fun recipe for kids too!

Easy Garlic Knots Recipe Ingredient List
All-purpose flour — The star ingredient of this recipe, all-purpose flour renders structure and texture to the Garlic Knots.
Yeast —This is added to the dry ingredients when preparing the dough for making the knots. Active dry yeast is used for this recipe. Make sure it is not expired. You can also use instant yeast for this recipe which ensures a quick prep.
Sugar — It helps in the quick activation of the yeast. Yeast blooms faster with the presence of yeast in the dough.
Baking Powder — Used as a leavening agent, baking powder renders softness and fluffiness to the Garlic Knots.
Olive oil — This is used for brushing the knots when readying them for baking. It also adds flavor to the end product.
Water — A critical ingredient used for kneading the dough. We use lukewarm water for kneading the dough. Ensure the water is not too hot; otherwise, it will destroy the yeast and hamper the activation process.
Salt — Lifts the overall flavor of the recipe.

Easy Garlic knots recipe tips and Variations
Fixing the sticky dough — Your dough may feel a little sticky sometimes, and all you have to do is to add a little extra flour and knead it again. However, add up to one tablespoon at a time because more flour will make the rolls dense.
For a quick recipe — To save time, you can also use biscuit dough, crescent dough, or pizza dough. If you use biscuit dough, split it in half, roll it into ropes and then twist it into a knot. Likewise, if using crescent dough, remove it from the can, slice it into equal strips, roll it into ropes and then twist it into a knot. Bake them as directed for the beautiful Garlic Knots.
Variations with herbs — This recipe uses parsley but can be substituted with other dried herbs like sage, rosemary, and basil for flavorsome and aromatic knots.
Can’t shape them like knots? No worries! You can easily roll them into regular dinner rolls and bake them as directed.
The easy, cheesy treat! If you like your knots to be cheesy, use freshly grated Parmesan Cheese for baking the gorgeously delicious Cheesy Garlic Rolls.
Alternative for oil — Butter is an ideal replacement for oil. Use the same quantity of butter when using it in place of oil. However, remember to add ¼ teaspoon of salt to balance the salt content in the recipe.
Bake in the center/middle rack — Always bake the knots in the center/middle rack to prevent over-browning of the knots from the bottom. Additionally, use heavy-duty baking trays as the thinner aluminum trays will make the knots darker at the base and then at the top.

Quick modifications — This recipe of Garlic Knots is made from scratch, but these can be made with:
- Frozen pizza dough
- Frozen dinner rolls
- Even buttermilk biscuits
- Thaw the frozen dough and roll it out into knots. The rest of the recipe remains the same.
Make ahead recipe — This recipe of Garlic knots can be prepared in advance and saved for later use.
Scalable recipe — This awesomely delicious recipe for Garlic Knots is easily scalable and can be prepared in a big batch to serve a crowd.
Importance of Baking Powder in this recipe — This recipe already uses yeast which helps it to rise. But you need to add baking powder to create feathery-light and super soft Garlic Knots that taste magically delicious. Yeast alone does not make the knots airy, but adding baking powder makes the Garlic Knots lighter in consistency and super soft in texture.
The advantage of proofing the dough in Instant Pot — Proofing the dough in the Instant Pot saves a lot of time and makes the entire process of dough prep more straightforward and fun. It provides a warm and ideal place for the yeast to help fermentation.
The bread dough generally takes 60-90 minutes to proof, but with an Instant Pot’ ‘yogurt-setting,’ the process speeds up, and your dough is ready for baking in 30-40 minutes. If your Instant Pot doesn’t have a ‘yogurt setting,’ you must ferment it naturally in a warm oven.
Punching down the dough — Punching the dough is essential in preparing the bread dough. During the resting period, gas bubbles are formed and are released during the process of punching. This step helps reinvigorate the yeast cells, which results in a more tender and delicate crumb. Punching also enhances the flavor of the finished bread.
Serving Suggestions!
You can pair the freshly baked Garlic Knots with a bowl of warm, comforting soup or with your favorite pasta or dip and enjoy. Or serve them as the accompaniment to the main course lunch or dinner and indulge in the ambrosial meal.
Some of my favorite soups are —

Let me know what you think!
These flavorful and aromatic Garlic Knots with a crispy, buttery exterior and soft interior take no time to disappear from the table.
So, you will need to bake multiple batches to meet the demand. If you are ready with the ingredients, let’s begin with the preparation.
Should you make this Easy garlic knots recipe, please let me know your thoughts by sharing your comment below.
And don’t forget to share it with your family and friends.
CRAVING FOR MORE? TRY THESE OTHER bread recipes –
Follow the step-by-step instructions to make the best Garlic knots recipe

Easy Garlic Knots Recipe
EQUIPMENT
INGREDIENTS
YEAST PREPARATION
- 2¼ teaspoons Active dry yeast
- 1 tablespoon Sugar
- ¼ cup Lukewarm water
FOR THE KNOTS
- 3 cups All purpose flour
- 1 teaspoon Baking powder
- 1 teaspoon Salt
- 3 tablespoons Olive oil or butter
- ¾ cup Lukewarm water
GARLIC BUTTER SPREAD- MIX EVERYTHING TOGETHER
- ¼ cup Melted butter vegan butter
- 3 cloves of Garlic, minced
- 1 tablespoons Fresh Parsley Leaves
- Salt to taste
INSTRUCTIONS
ACTIVATE THE YEAST
- Combine yeast, sugar, and lukewarm water in a mixing bowl. Mix to combine. Let the yeast rest for 5 minutes.


- After 5-10 minutes, the yeast should begin to form a creamy foam on the water's surface. That means your yeast is alive and has bloomed well.This proofing procedure shows that yeast is alive and active. If your yeast has not become frothy by now, please discard it and start over.


PREPARE THE GARLIC KNOTS DOUGH
- Add all-purpose flour, baking powder, and salt to a large mixing bowl. Add in the activated yeast. Add olive oil and the remaining ¾ cup of water.


- Mix all the ingredients for 3-5 minutes until it forms a soft, pliable dough.Tip — If the dough is stiff, add an extra 2-3 tablespoons of water and knead the dough. A little extra water will not harm the recipe.


PROOFING THE DOUGH IN THE INSTANT POT
- Grease the Instant Pot insert. Transfer the dough to the Instant Pot. Cover it with a glass lid.Turn the Instant pot on by pressing the ‘Yogurt’ button. Adjust the pressure to ‘Less.’ Set the timer to 30 minutes.

- After 30 minutes, the dough will expand and double in size.


KNEAD AND SHAPE THE DOUGH
- Preheat oven to 375 degrees F. While the oven is heating, prepare the knots. Dust the surface with flour and transfer the kneaded dough onto the dusted surface. Punch down the dough and knead it for 2-3 minutes. Using a rolling pin, roll and flatten the dough. Cut the rolled dough into long strips.

- Roll the dough strips like logs. If the dough feels sticky, dust it with extra flour, and let’s make some garlic knots.


- Take a dough log. Fold and make it look like a horseshoe. We will work with the right end of the dough – Take the right end of the dough and lap it over the left end.


- It will form a loop. Now pass the right end of the dough through it. Make a loose knot. Tighten it to form the knot. You will still have dough left at both ends.Take one end of the dough, wrap it over the knot, and into the hole (where you see my finger). Gently press it down. Repeat the same with the right end -wrap it over the knot and into the hole.

- Press and secure both ends. Your garlic knots are ready.


- Repeat the process with the rest of the dough. Tip — These rolls bake 15 large knots but can be adjusted to make 24 small garlic knots.

- Spread the garlic knots on the baking tray. Brush each roll with garlic-parsley butter spread.Tip — Garlic herb butter takes this recipe to another level.

- Bake garlic knots in a preheated oven for 12-15 minutes (@375 degrees F).


- Once baked, just smear an extra layer of garlic butter over the knots, and you are ready with a much better homemade bread than its store-bought counterpart.


Is it ok to use maida instead of all purpose flour?
Thanks for stopping by Jeyalakshmi!! Maida is all purpose flour.
Thank u. Gonna try it today 😊
Mouthwatering&looking daleciou
Thanks Nishi. 🙂
Hi Ruchi, i tried the knots and though they taste really great , they get very hard once cool. Any tips on that?
Thanks for trying the recipe Nisha! Perhaps your oven is too hot, lower the temperature to 350 degree F and then bake. Also, butter the garlic knots as it comes out of the oven. This will soften the top and provide a nice shine.
great………
Thanks!!
Hello Ruchi,
I have instant yeast instead of active dry yeast. Is it same …can I use it? then what’s the procedure??
Thanks for stopping by Kavita!! Instant yeast and dry active yeast are not the same. Unlike active dry yeast, instant yeast doesn’t have to be proofed; it can be added straight to the dry ingredients. Result will be the same. Use 2 teaspoon of Instant yeast for this recipe.
This looks so delicious. I am soon going to try this. Thanks for sharing.
You are welcome Hetal!!
Hi Ruchi, first of all thank you for the gorgeous rolls, I tried them , to my surprise , I was asked by my biggest critics , these are from market, I said no I made them , they were surprised as well. That is that. Have a question about the ingredients, I was trying just 6-7 rolls, so I took half the quantity of all the ingredients, though I achieved the look, but slightly unsure of if they completely cooked or not. Has the cooking through something to do with yeast as I put 1 and 3/4 th tsp of yeast and 1/2 tsp baking powder. And my dough did not raise as high as shown in the picture. Could these two ingredients be the factor but should have I kept in the oven for a bit longer,I took them out when they were the max brown colour, further would have burnt them. I am going in so much detail coz I really want to get this absolutely rocking. Please suggest.Thank you
Thanks for trying the recipe Aarti and sharing your wonderful feedback with me. I know how it feels when the biggest critics are happy. 😉 Coming to your query, if you followed the recipe step by step and as mentioned they were baked to perfection, then they were cooked through.
Wow! Ok, but like I said , it felt just a bit under done, should I have used entire 2and1/4 teaspoon of yeast and 1 teaspoon of baking powder in 1.5 cups of flour(to make half the quantity) of rolls(6-7rolls).Thanks
No Aarti, that would be too much. Your garlic knots will have a strong taste of yeast.
Okay! Thank You Ruchi 😊
Can I use whole wheat flour for this recipe n if yes than any changes in the quantity. Thank you in advance
Thanks for stopping by Sneha. I personally have not experimented with wheat flour but I would suggest do half and half – half of wheat flour and half of all purpose flour.
Hello 😀…
I am not sure if I missed it, but step 5 requires butter (under ingredients it is not mentioned ) please advise on the quantity of butter required
Thanks for sharing the awesome recipe.
My apologies for a delayed response. It’s 3 tablespoon olive oil or butter. Will fix that, thanks for pointing that out Kayleigh!
Oh my my! This looks so yummy! I love garlic breads and this seems like the perfect garlic snack! I am trying this for sure. Also, many thnanks for the step-by-step pictures. I anyway face problems cookign with yeast 🙁
Pleasure is all mine, Sheenam. I’m pleased you found my step-by-step tutorial helpful. 🙂
Made these: Simple and just great as dinner rolls. But why do we add baking powder? I find a yeast dough will be just as good without the baking powder that is why I asked.
Thank you so much Tanu for your lovely words of appreciation ! Means a lot! I am glad you liked the recipe.
Baking powder makes a bread feather light and extremely soft.
I prepared Garlic knot today and it was really good. My husband and kids liked it. Thanks for nice recipe
Pleasure is all mine. Thanks for your lovely feedback. 🙂
These garlic knots are delicious!!! I made them a couple weeks ago and I am making them again tonight. the dough is so soft and the finished knots are soft and light. I’m drooling thinking about them. Thank you for this recipe!!!!!
Pleasure is all mine Jenn. 💕
Glad you liked the recipe. 🙂
these instructions really need to be revised… my first time trying it out and i was rather confused at how to manage things.. 1/4 c of water + yeast + sugar? and in the pictures posted it has almost 1 1/2 cup with all of that? oh boy
Juli, please follow the instructions and you will get great results. Have updated the right pic.
Thanks for pointing that out. 🙂