


As the festive season is here, these adorable Chocolate Swirled Peda will entice every chocolate lover! Loaded with the deliciousness of chocolate and milk flavors in a single bite, this milk, and chocolate fudge is any sweet lover’s dream recipe!
Made with just a few ingredients, these pedas are irresistibly delicious mithai (Indian sweets), served during festivals and special occasions to delight family and guests. These sweet delicacies are gluten-free, perfectly portioned, and portable too!

If you are regular on my blog, you must be aware of my affinity for bite-sized desserts. Whether it be Instant Mango peda, Moong dal ladoo, or Baked Shahi tudka cannoli, these perfectly delectable mini treats make ideal pick-me-up party treats any time of the year.
And the new one to join the pick-me-up dessert club is Chocolate Swirled Peda!
These utterly delightful chocolate peda bites are so appealing; they completely entrance one and all!
Plus, you get to relish the creamy, luxurious milk powder flavor and the yummy chocolate flavor in the same bite! So, who would want to settle for just one flavor?
The best part is even a novice would feel comfortable curating these easy-to-make pedas and rejoice in their triumph!
As these delicacies are easy to make and look gorgeously beautiful, you can use them as a great gift option during festivals like Diwali, Holi, Christmas, etc.
Simply arrange the chocolate swirled peda in decorative boxes and gift a batch to friends and loved ones to entice them and spread joy and happiness!
What is Chocolate Swirled Peda
Peda is a sweet Indian dessert made with milk solids, sugar, added nuts, and delicate flavorings like cardamom powder, saffron (Kesar), or rose water.
A classic dessert of North India, pedas are shaped into flattened spheres or round. This recipe of Chocolate Swirled Peda is a dual-flavored delicacy, which is the fusion of chocolate and milk solids in a magical combination!
Milk powder is blended with cocoa powder’s richness and swirled together perfectly to prepare this sinfully delicious dessert!
These chocolate marble pedas are subtly flavored with rose water and enriched with the richness of milk powder which renders a smooth texture and irresistible flavor to the recipe.
Traditionally, these chocolate pedas are prepared with mawa (milk solids), which lends its unique texture and deliciousness. But this instant version recipe uses milk powder instead of mawa.

Reasons You’ll ♡ Marbled Chocolate Peda
These absolutely delightful bites are delicious and fun to serve at festivities! Here are other reasons why you would fall for these stunning Chocolate Swirled Peda —
- Easy and quick to make
- Rich, smooth, and luxuriously delicious
- Chocolate and milk flavors in one
- Perfectly portioned for a guilt-free indulgence
- Look completely drool-worthy
- Great as a gifting option
- Make ahead and scalable recipe!

Chocolate Marble Peda Ingredient List
Milk Powder — The primary ingredient that contributes to the structure, texture, and flavor of this marbled chocolate recipe, milk powder also lends loads of creaminess and smoothness to the pedas. Please use full-fat milk powder here, as it creates the most luscious and super smooth pedas.
Cocoa Powder — The chocolate-y fun comes from the added cocoa powder, a must-have ingredient for our Chocolate Swirl Pedas. I have used Dutch-processed unsweetened cocoa powder for the best results.
Sugar — It is added as the sweetening agent that lends soul to this flavorsome chocolate peda recipe.
Ghee — Ghee, or clarified butter, is primarily used to add a nutty and caramel taste, a defining characteristic of any Indian mithai. It is noted for giving the pedas their rich flavor and deliciousness.
Rose water — This adds a fascinating subtle flavor and a seductive aroma that takes the recipe a notch up.

How to get perfect swirls- My experiments?
The trick to perfect swirls lies in the size of dough balls: The more the chocolate – the darker the streaks. To get the perfect chocolate swirled peda –
- Shape the white dough balls larger than the chocolate ball and give the dough circle a light swirl if you prefer less chocolate.
- If you prefer dark streaks of chocolate – Shape both the dough balls of equal size and give the peda a nice swirl.
In the below pic —
Peda #1 — has less chocolate in it. Because the cocoa dough balls were more petite in size.
Peda #2 — has more chocolate. Because the cocoa dough balls were equal in size.
Peda #3 — has the perfect swirl because the white dough ball was more significant than the cocoa balls.

Expert tips & Variations
A lot of perseverance and a little attention to detail is all that is required in the kitchen to transform your efforts into rewarding ventures! The below-mentioned tips and tricks may be helpful in the long run.
Use a heavy-bottomed pan — Using a heavy-bottomed, wide pan will ensure that the ingredients do not get burnt during cooking. This is a prerequisite for a winning chocolate marbled peda recipe that is pure indulgence!
Maintain the temperature — Do not cook the recipe in a hurry or at a high temperature, as there is an increased risk of burning the mixture and spoiling the recipe. To cook evenly, maintain a moderate heat that doesn’t burn, and keep patience while cooking.
For even roasting — Do not leave the mixture unattended while cooking, as this may burn the peda mixture and spoil the preparation. Keep stirring the mixture constantly for even roasting.
Removing from the heat on time — The mixture begins to gather up and leave the pan when it is cooked thoroughly. This is the right time to remove it from the heat; otherwise, the mixture will turn dry. The mixture that is devoid of moisture will form hard pedas.
Firming the mix for better shaping — It is essential to cool the mixture thoroughly before shaping the pedas as it is easier to shape into smooth pedas once the mixture is cool and firm. The hot mixture is sticky, fragile, and, therefore, difficult to shape.
Choice of milk powder — It is best to use unsweetened milk powder to achieve the desired results when preparing this wonderful recipe. However, when using sweetened milk powder, reduce or completely omit adding the sweetener (sugar) to the swirled peda recipe.
For the traditional touch — This recipe uses full-fat milk powder as the prime ingredient, but you may use homemade khoya instead of the milk powder when making these marbled chocolate pedas.
To get the rich brown chocolate-y color — Always use good quality cocoa powder that promises to deliver a rich chocolate brown color to the swirls and make this recipe stunningly beautiful.
Adding extra sweetener — You may want to add an extra teaspoon of sweetener to the choco pedas if they taste slightly bitter.

Avoid over-cooking — Over-cooking the mixture will make the pedas chewy and dry. So take care not to overcook the mix, as it also tends to harden on cooling.
Making the mix lump-free — Lumps in the chocolate swirled peda mixture will spoil the smooth texture of the pedas. Ensure that the mixture is lump-free to get the desired consistency.
Garnishing that leaves you drooling — Garnish your Chocolate Swirled pedas with saffron strands for an exquisite presentation. You may reduce or omit them if you are allergic to the nuts.
Set as burfi and enjoy — For some of you, Burfi may be more appealing. You can set the mixture as Burfi instead of pedas and relish these delightful little bites.
Rose or kewra flavorings — Rose water renders a subtle flavor that entices the taste buds. But if you do not want the rose flavoring, feel free to add kewra essence for flavoring the peda recipe.
A nutritional boost — To take the recipe to the next level, add some almond meal, crushed cashews, and milk powder to upscale the recipe’s nutritional value.
Shaping the pedas perfectly — You may shape this chocolate swirled peda perfectly into medium-sized balls and enjoy the process as it is fun and easy. While shaping, apply a little ghee to your palms for the easy process of shaping. You can then flatten the balls between your palms and turn them into pedas.
Cooling the mix for better shaping — Let the peda mixture cool evenly; otherwise, it will not hold its structure. By cool evenly, I mean comfortable enough to touch. Do not let it cool completely. Pedas take the perfect shape when slightly warm. So before the mixture cools down completely, make sure to roll them into pedas.
Fixing the grainy mix — These chocolate mawa pedas taste and look their best when they have a smooth and beautiful texture. If you notice the mixture is coarse, you can knead it slightly (when cooked) to acquire a smooth consistency. You can then make pedas out of the smooth mixture.
Exciting variations — This peda recipe is easily adaptable using different flavors. Try Rooh afza instead of chocolate, and you will be amazed!
Scale the recipe accordingly — If you need to cater to a large gathering, you can increase the quantity of ingredients in the same ratio. Check out the recipe card for the directions for scaling the swirled chocolate peda recipe.

LET ME KNOW WHAT YOU THINK!
Indian festivals are noted for their grand celebrations and lavishly prepared meals! So, there is no reason that this recipe is left out of your festive menu.
Whether you are planning a weekend gathering or a grand affair, this chocolate mawa peda recipe will steal the show when served to your guests.
These pedas are unbelievably easy to make and indeed a must-try recipe. Trust me; these will be the highlight of your festive menu.
Should you make this Chocolate swirled peda, please let me know your thoughts by sharing your comment below.
And don’t forget to share it with your family and friends.
MORE LIP-SMACKING DESSERTS THAT YOU’LL LOVE!
Readers Testimonials

Follow the step-by-step recipe instructions to make the best Chocolate Swirled Peda Recipe
Chocolate Swirled Peda
EQUIPMENT
INGREDIENTS
- 1 cup Sugar
- 1 tablespoon Ghee
- 1 cup Water
- 1 teaspoon Rosewater
- 3¾ cups Milk Powder
- 2 tablespoons Unsweetened cocoa powder
INSTRUCTIONS
- In a heavy saucepan, combine sugar, water, and rose water.


- Heat the mixture over medium heat, constantly stirring with a spoon, until the sugar is dissolved.


- Stir gently and make sure the sugar granules are completely dissolved. We need a smooth mixture; therefore, rub a drop of the warm sugar mixture between your fingertips, and if it feels smooth with no trace of sugar granules, proceed to the next step. If it feels gritty, continue warming and stirring until the mixture is smooth.

- Turn the heat to low and add milk powder to the sugar mixture.


- Stir constantly until the milk powder dissolves entirely and there are no more visible streaks of dry milk powder and no lumps in the mix. Add melted ghee to the mix.


- The mixture will be grainy but lump-free. Do not cook after this point, as the pedas will become chewy.


- Transfer 3/4 peda mixture to a bowl and set aside.

- Add cocoa powder and mix it well until the cocoa powder dissolves entirely and there are no more visible streaks of dry cocoa and no lumps in the mix.


- The mixture will be grainy but lump-free. Take the pan off the heat. Do not cook after this point, as the pedas will become chewy.


- Allow both the mixtures to rest for 20 minutes. Keep mixing the peda mix as it cools. Depending on the quality of milk powder, the peda mixture may feel dry, add 2 teaspoons of melted ghee and knead the dough.


- When comfortable enough to touch, knead the dough until smooth. The mixture will thicken as it cools.


- Repeat the same process with the cocoa mix as well.


- Roll each dough into small balls.


- The white balls should weigh about 13 grams each.


- Likewise, roll the chocolate dough into small balls, about 5-6 grams each.

- Now, take three balls of each color ( white and chocolate) and arrange them in a circle, alternating white, cocoa, and white cocoa.


- Gently press the ball inwards until it forms a circle.


- Lift the ball and roll it in a rotating movement between your hands until it forms a swirl (just like a roti peda). Press the peda ball a little to flatten and run your fingers around the peda to smoothen the edges.


- Your Chocolate swirled pedas are ready. Repeat the process with the rest of the dough until all the mixture is shaped.

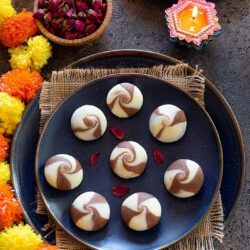
- Arrange them on a platter and serve.

VIDEO
RECIPE NOTES
Frequently Asked Questions
Can I use ricotta cheese in place of milk powder? Yes, sure you can. Use unsalted ricotta cheese as an excellent substitute for milk powder. Replace the milk powder with the same quantity of whole milk ricotta cheese; your pedas will come out just as perfect! A slowly simmered ricotta cheese yields a creamy mix of dehydrated milk solids, which is an excellent ingredient for making mithai (Indian sweets). Can I make chocolate pedas in advance? Yes, you can make these chocolate pedas in advance as these pedas stay perfect for 4 to 5 days at room temperature. Make them 2 days before your gatherings or celebrations and enjoy them when required. Why are my pedas dry? Over-cooking is the reason for the dry pedas. Overcooking eliminates the moisture from the peda mixture, which is essential for retaining the shape of the pedas. If your mixture feels dry, you can sprinkle some milk, add a little ghee, and knead it for a while. This loosens the mix and makes it easy to shape. Why are my pedas chewy? The chocolate pedas turn chewy because the dough is cooked for too long on heat after adding sugar. Prolonged cooking makes the pedas chewy; therefore, remove the mixture from the heat as soon as it begins to leave the pan. To fix the chewy mix, please follow the below guidelines –- Add anything course in texture like – an almond meal or grated paneer to the peda mix, which will take care of the chewy part.
- Cashew powder would be another great option.
- Desiccated unsweetened coconut.
I thought the water was less for the pedas. I sprinkled some milk to knead the dough but pedas are chewy ? Why is that ?
Khush, did you overcook the peda mixture because that is the possible reason pedas will become chewy and hard?
What quantity of khoya/mawa be used if not making the pedas with the milk powder. Thank you!
Rashmi, this recipe hasn’t been experimented with mawa in my kitchen; therefore, it’s difficult for me to say about the quantity. I am sorry dear. Wish I could help you more.