


Are you looking for homemade mawa? Your search ends here. Step up your festive mood and browse our easy guide on how to make mawa – 5 ways of making mawa.
With our step-by-step tutorial and a little effort, anyone can create rich and creamy mawa at home- the same taste and texture. Plus, each recipe is irresistibly good and mostly all done in 10-15 minutes of prep – it doesn’t get much better than that!

Khoya or mawa plays a significant role in Indian cooking. But for many of my readers, finding mawa at their supermarkets is extremely difficult. I have received multiple queries regarding how to make mawa at home?
Therefore, to help you better, I have added 6 techniques in this post on – how to make mawa – 5 ways of making mawa.
Although making mawa at home doesn’t require too many ingredients, the right ingredients and blending them in the accurate quantity is what creates that smooth and velvety textured mawa.
What is Mawa?
Mawa or Khoya literally translates to curd in English.
Mawa is a coagulated milk solid that is widely used in Indian cooking. It is the base for many Indian/South Asian recipes ranging from sweets to savory dishes.
Traditionally khoya/mawa is prepared by simmering full-fat milk for hours over a medium flame. Milk is reduced to one-fifth of its volume by removing its moisture content through a slow cooking process.
Ater this evaporation, milk reaches its semi-solid stage, and all that is left behind is a creamy, nutty-flavored dough-like milk solid, and that is Mawa/khoya/Kharra.

The traditional way of making mawa is undoubtedly the best, but with a busy day-to-day schedule, this process is tedious and time-consuming for me. How to make mawa – 5 ways of making mawa
Therefore, I have come up with simple methods to prepare mawa at home without compromising authenticity or taste. The richness and texture of homemade mawa is far better than the store brought one.
All the techniques shown below are pretty straightforward, and you can have instant khoya ready in minutes.
So if you have busy schedules like me yet want to enjoy homemade mawa, you will surely love all my ways to make mawa at home.
Follow the step-by-step guide below on how to make dense yet moist, decadent mawa at home.

Different kinds of Mawa or Khoya!
The quality of khoya is listed based on its moisture content and texture.
» Hard Khoya- Also known as batti khoya. Batti means brick in English; therefore, this is a very firm and rock-solid kind of khoya. In this process, milk is reduced to 1/5th of its volume by removing its moisture content through a slow cooking process.
Batti khoya can be crumbled or grated like cheese and is used to prepare pedas, burfis, and ladoos.
» Soft Khoya – Also known as Chikna Khoya, Hariyali khoya, or Daab ka khoya. This mawa is soft and squishy in texture and contains plenty of moisture. It’s cooking process is stopped a little earlier than the normal mawa.
This mawa is an excellent addition to rich gravies like shahi paneer, shahi kofta and can also be added to sweets like Gulab Jamuns and Gajar ka halwa. How to make mawa – 5 ways of making mawa
» Granular Khoya – Also known as danedar Khoya. It’s grainy in texture and is soft and looks like curdled milk. Its moisture content is in between the hard mawa and soft mawa.
It is soft and grainy in texture and is used to make kalakand and granular burfi.
Ingredients required to make Mawa at home
You need just six common pantry staples to put together this homemade mawa recipe, and they are –
» Milk powder – Since milk powder is the building block to a creamy mawa, I recommend using the best quality milk powder. I have used NOW Foods, Organic Non-Fat Dry Milk Powder for this recipe. Use this wherever the recipe calls for milk powder. The other best option is Nestle Nido Instant Dry Whole Milk Powder.
» Heavy whipping cream – Ensure the cream you use has at least 35% of the fat; otherwise, our mawa will not attain a rich and creamy texture.
» Ghee – a little goes a long way. A tablespoon of ghee is all you need in most of the techniques to create creamy mawa.
» Yogurt – Use plain greek yogurt or thick curd. How to make mawa – 5 ways of making mawa
» Ricotta cheese – Use whole milk ricotta cheese for the richest and creamiest homemade mawa. Do not substitute it with low-fat ricotta cheese. Ho
» Sweetened condensed milk – required only in sweet-tasting mawa. Mawa #1 and Mawa #4 uses condensed milk.

Recipe tips to make the best homemade mawa
» The secret to best mawa is to keep stirring. Do not leave cooking mawa unattended at any time, as it may burn the mixture in the microwave.
» All the below-mentioned recipes are made in the microwave (except mawa#5); however, all the microwavable techniques can easily be adapted to the stovetop version. Cooking time may vary.
» The below-mentioned recipes can be scaled up or down to suit your preference. However, if you decide to double the recipe, the cooking time may vary. Refer to each stage’s visuals to attain the right texture.
» If you plan to make mawa #1 or Mawa #4, you will end with a beautiful dark tone mawa because sweetened condensed milk lends a darker shade to the mawa. This mawa has a slightly granular texture and has a rich nutty flavor.

Is Mawa and Paneer the same?
Mawa and paneer both are milk derivatives, but they are two different things.
Paneer also referred to as Cheena, is an Indian cottage cheese made by curdling milk with an acid like lemon juice or vinegar. The curdled milk solids are drained through a double layer of cheesecloth, then allowed to set by weighing it down with a heavy pot until all the liquid is drained and it becomes firm.
On the other hand, khoya is prepared by simmering full-fat milk for hours over a medium flame. Milk is reduced to one-fifth of its volume by removing its moisture content through a slow cooking process.
How to store mawa?
If you are not planning to use all the mawa at once, you can store it in the refrigerator for later use, and it does freeze well. To store, allow the mawa to cool completely. How to make mawa – 5 ways of making mawa
Transfer the cooled mawa to an airtight container and store it in the fridge for 3-4 days. Mawa can store in the freezer for up to 2 months.
When ready to use, thaw mawa/khoya overnight in the refrigerator. The next day, crumble the softened mawa and use it as directed in the recipe.

Especially around special occasions like Indian festivals, weddings, birthdays, baby shower mawa/khoya can be used to make many Indian dishes ranging from sweet dishes to savory gravies and curries.
A few of my favorites where I use mawa are-
Should you make any of the methods below, please leave me a comment below, and don’t forget to share it with your family and friends.

How to make Mawa at home – MAWA #1 – SWEETENED MAWA
EQUIPMENT
INSTRUCTIONS
- Combine all the ingredients in a microwave-safe bowl.


- Whisk it well until combined.


- Place this mixture in the microwave. Set the cooking time to 3 minutes and start the microwave. Do not step away. Watch the mixture as it may boil over.


- After 3 minutes, remove the bowl from the microwave. Remember, the bowl will be hot, so take precautions.


- Use a spatula to mix the ingredients. Return this mawa mix to the microwave and cook for another 1 minute.


- Stop the microwave every 1 minute and continue stirring the mawa mixture with a spatula. Stop cooking the mixture and remove it from the microwave once the mawa looks dark and crumbly. Mawa will still be sticky and gooey at this point. Allow it to rest overnight, and it will thicken.


- This is a granular or danedar kind of Khoya – it is used to make kalakand and halwa.


NUTRITION

How to make Mawa at home – MAWA – 2 – UNSWEETENED MAWA
EQUIPMENT
INSTRUCTIONS
- Combine all the ingredients in a microwave-safe bowl.

- Knead the mixture until it forms a soft dough.

- Place this mixture in the microwave. Set the cooking time to 2 minutes and start the microwave. Do not step away.


- After 2 minutes, remove the bowl from the microwave. Remember, the bowl will be hot, so take precautions.


- Use a spatula to mix the ingredients. Return this mawa mix to the microwave and cook for another 1 minute. Mix it well. From hereon, stop the microwave every 30 seconds and continue stirring the mawa mixture with a spatula. Cook for an additional 1 minute in increments.

- Do not cook for long, or else it will burn. You may see slightly darker chunks of mawa at the bottom of the bowl. Don't worry, just break those chunks with the spatula, and you should be good.


- This mawa will have a sticky consistency and therefore is called chikna khoya. Used for making halwa.

NUTRITION

How to make Mawa at home – MAWA #3 – UNSWEETENED MAWA
EQUIPMENT
INGREDIENTS
- 1½ cups Milk Powder
- ⅓ cup Heavy whipping cream
- 1 tablespoon Heavy whipping cream
INSTRUCTIONS
- Combine all the ingredients in a large bowl.


- Mix until it forms a dough.


- Add 2 cups of water to the Instant Pot insert. Place a trivet at the bottom of the insert.


- Transfer the mawa to a small bowl. Place this bowl on the trivet. The pan must fit in the insert.


- Seal the Instant pot with its lid and set the valve to SEALING. Press pressure cook/Manual on the front panel and adjust the time to 8 minutes on HIGH pressure. The display will read as ON until the IP comes to pressure. This will take about 10-12 minutes.


- Once the cooking time has elapsed, your Instant Pot will beep; turn the valve to VENTING, and quickly release the steam. Carefully open the lid, and the steamed mawa is ready.


- The color of the mawa may change to a slightly pale yellow in color because of the steam. That's absolutely fine.
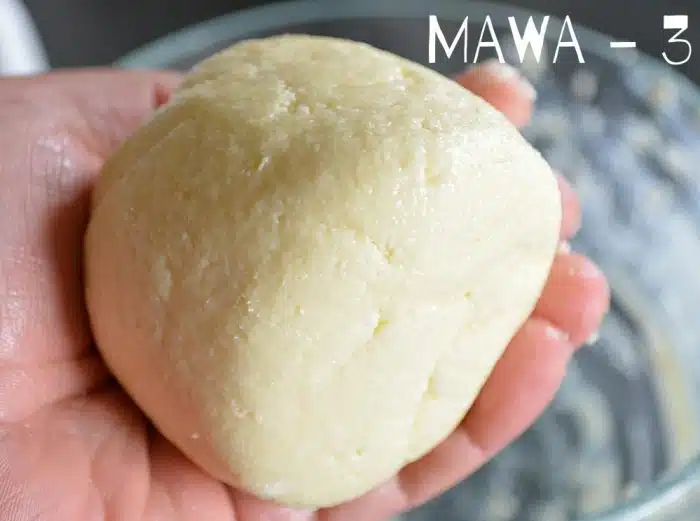

- This is close to batti ka khoya. Crumble it and use it to make gujiyas.


- You can use it to make burfi too.


- And yummy ladoos too!

NUTRITION

How to make Mawa at home – MAWA #4 – SWEETENED MAWA
INGREDIENTS
- 1 cup Milk Powder
- ½ cup Sweetened Condensed milk
- 1 tablespoon Ghee
- ⅓ cup Heavy whipping cream
- 1 tablespoon Heavy whipping cream
INSTRUCTIONS
- Combine all the ingredients in a microwave-safe bowl.


- Wisk until well blended.


- Place this mixture in the microwave. Set the cooking time to 3 minutes and start the microwave. After 3 minutes, remove the bowl from the microwave. Remember, the bowl will be hot, so take precautions. Use a spatula to mix the ingredients.

- Return this mawa mix to the microwave and cook for another 1 minute. Mix it well. From hereon, stop the microwave every 30 seconds and continue stirring the mawa mixture with a spatula. Cook for an additional 1 minute in increments.

- Stop cooking the mixture and remove it from the microwave once the mawa looks dark and crumbly.


- This is a granular or danedar kind of Khoya. It is used to make Rabdi.

NUTRITION

How to make Mawa at home – MAWA #5- RICOTTA CHEESE MAWA ON COOK TOP
INGREDIENTS
- 30 oz Ricotta cheese
- 1 tablespoon Ghee
INSTRUCTIONS
- Heat ricotta cheese over medium-heat in a heavy-bottomed pan .


- Stir continuously. Soon the cheese will start to melt and spread. Use a big spoon because the cheese will start to splatter as it starts to bubble.

- Do not leave ricotta cheese unattended at any time as it burn quickly. Keep stirring until the moisture starts to evaporate.


- Now add ghee to the pan and stir to combine. Soon the mixture will start to thicken and start to leave the sides of the pan.

- Stir constantly, and soon the cheese will come together like dough. Take the mawa off the heat and transfer it to a clean bowl.


- This unsweetened mawa can be used in just about any recipe ranging from sweet to savory.


NUTRITION

How to make mawa – 5 ways of making mawa – MAWA#6
EQUIPMENT
INGREDIENTS
- 15 0z Ricotta Cheese
- 1 tablespoon Ghee
INSTRUCTIONS
MAKING MAWA – 6 – RICOTTA CHEESE MAWA IN MICROWAVE
- Grease a microwavable bowl. Add ricotta cheese to it.


- Microwave the cheese for 2 minutes on HIGH.


- Remove from the microwave. Ricotta cheese will look like a wet mix. Give it a good mix.

- Place the bowl back into the microwave and cook for another 2 minutes. Remove and stir.

- Repeat this process 3 more times, microwaving the cheese mixture for a total of 6 additonal minutes. Keep stirring at all times in between.

- By this time, all the moisture from the cheese should have evaporated, and the cheese inside the bowl will appear to resemble crumbs yet moist and soft to touch.

- Allow the mixture to cool comfortably. Now knead the mawa until smooth. You can use this danedar mawa in just about anything that calls for mawa.

Very well explained and never knew their were 3 types of mawa. Thank you very much for the recipe….god bless you for all that you do. Will try it soon in festive months. Thnks.
You are welcome Kavita. Glad you liked it and thanks for stopping by!
Ruchi, this is such a lovely and informative post . Very well documented and depicted .
I just had one question – for Mawa #3 is it 11/2 cups of Mawa and 1/3 cup cream ? If so then which kind of Mawa should we use ?
Thanks for your kind comments Debbie!! Glad you liked it!! For Mawa #3 use 1 1/2 cup of Milk powder and 1/3 cup cream. So..sorry forgot to mention that in the post. Fixed it!!
My mava turned brown. Is it still good. I tried #4
Hello
For mawa No.3
You mention 1/3 cup heavy whipping cream and 1 Tbsp heavy whipping cream.
So total is 1/3 cup and 1 Tbsp heavy whipping cream?
Yes, that’s correct. It’s 1/3 cup + 1 tablespoon of whipping cream.
If it doesn’t have a burning smell then it’s absolutely fine to cook with.
I like the way you go about explaining each and every process. Extremely helpful post. I am linking this article in a halwa recipe for my blog readers: andcakestoo. Keep up the good work.
Thanks for providing the link back Shreyashi!!
thanks a lot for sharing
You are welcome Dr. San Myint!!
vere nice
Thanks!
If i want to make gujiya which method should i use?
Thanks for stopping by Beena! Use Mawa #3 prepared with milk powder and cream. Happy Cooking!!
Very nice recipe..really liked it. its easy to prepare. May I know where to purchase cream? there are 2 types heavy cream & heavy whipping cream.
Thanks for your feedback Kavy!! You can find cream in any supermarket or local grocery store. I have used Heavy whipping cream.
thank you for all the methods..can please tell me which milk power do you use? I have only seen non-fat dry milk powder in stores. Is it the same one?
You are welcome Bin. Yes. that’s the one.
Wow, great way of explaining each and every step. Though I choose mawa 3 for my recipe. Thanks for sharing this great method and I love all your collection.
You are welcome Mragha!! Thanks for your kind words!!
Ruchi, this is superb. Each step is explained perfectly!! Thanks for sharing. Just one question please.. Which type of mawa is best suited for making ras malai? Many thanks
Thanks for stopping by Upasana! Batti Khoya/ mawa will be good for making Ras malai – check out Mawa #3 unsweetend mawa.