
Rasmalai Recipe
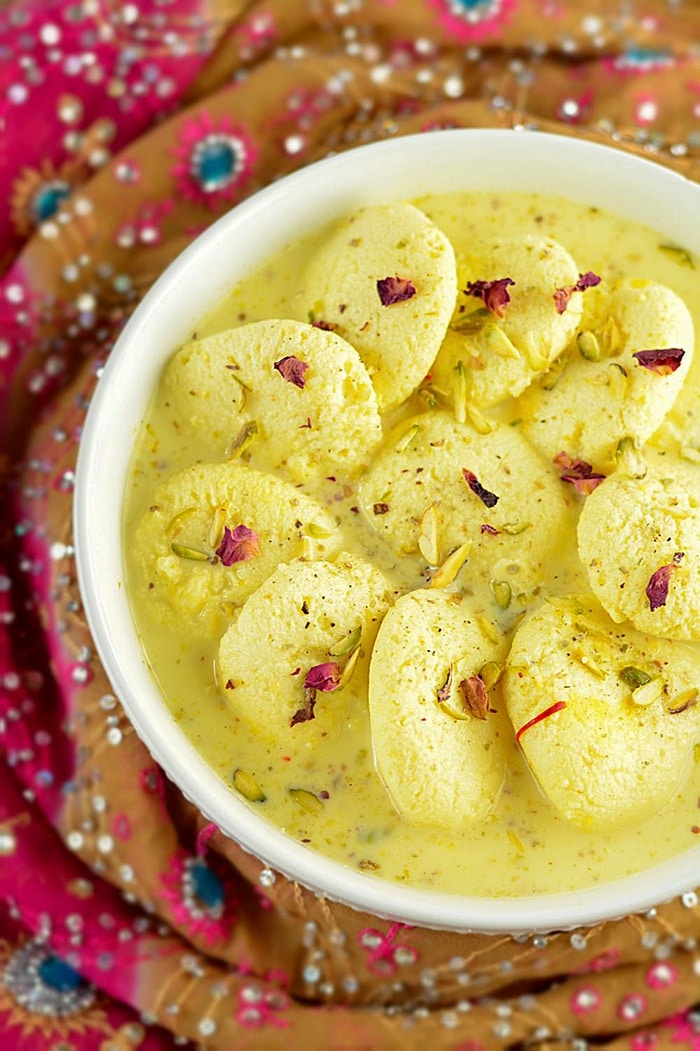
Imagine biting into the soft and delicately spongy balls of chenna/ cottage cheese that melt into the mouth effortlessly, and the saffron-infused thickened milk makes this recipe a sheer indulgence! A treasured Indian sweet, this Rasmalai recipe is an exquisitely flavored sweet delicacy that is super addictive and will make your festive season more enjoyable.
With its incredible melt-in-your-mouth texture, it will leave you craving for more!

What is Rasmalai Recipe
The creamy Rasmalai, or Rassomalai, is a cherished Bengali sweet delicacy famous for its incredible melt-in-mouth texture and addictive deliciousness.
This term, Rasmalai, is a conjunction of two words, ‘ras’ meaning juice or syrup and ‘malai’ meaning cream. This mouth-watering dessert, made from chenna (homemade paneer or cottage cheese), is decadent in flavors and textures.
The chenna, prepared from full-fat milk, is kneaded until smooth and divided into small balls or disc-shaped rasmalais. These balls/ discs (patties) are then boiled in the sugar syrup for sweetness and soaked in thickened saffron and cardamom-saffron-flavored milk.
The essence of cardamom and saffron infuses the dish with a fragrant charm, making this dish an irresistible treat that captivates the taste buds with every bite.
This rasmalai recipe does not use any additional ingredient or raising agent. Still, when boiled in the sugar syrup, the chenna balls/ discs inflate to double their original size and take on a puffy, spongy texture.
They take up the flavor when soaked in sweet masala milk.
Reasons You’ll ♡ Rasmalai Recipe
This super yummy sweet treat is adored for its irresistible combination of soft chenna balls soaked in saffron flavored milk. Here are some other reasons you will love this rasmalai recipe for —
- Super easy to make
- Infused with irresistible flavors
- Made with simple and readily available ingredients
- Gluten-free and 100% vegetarian
- No artificial ingredients used
- Can be made in advance and stored for later
- Can be scaled to please a large gathering!
Our step-by-step guide is here to help you create the most luscious Rasmalai recipe ever!
Serve this delicacy as a showstopper dish to your guests on your next celebration, or relish it as a sweet ending to your everyday meals; it is a guaranteed pleasure to indulge.

Rasmalai Recipe Ingredient List
Milk — Full-fat milk is used in this rasmalai recipe to make paneer/ chenna, a prime ingredient in making this rasmalai recipe. Full-fat milk yields creamy and smooth textured chenna balls/ patties that make this recipe delectable.
Lemon juice or vinegar — This is used for curdling the milk when making fresh paneer/ chenna for the rasmalai recipe.
Milk powder — Added to the flavored milk to render the rasmalai recipe more creamy and luscious.
Sugar — Used for sweetening and flavoring our sweet delicacy. The confectioner’s sugar is used for this recipe.
Nuts — Slivered nuts garnish this recipe to enhance its esthetics.
Saffron — A few strands add a lovely hue and a beautiful subtle flavor that makes this recipe irresistible.
Elaichi/ Cardamom Powder — Gives the rasmalai recipe an authentic flavor and aroma.
Rose water/ Kewra essence — This adds a subtle flavor and aroma that makes the recipe more enticing and takes the overall deliciousness up a notch.

Rasmalai Recipe Tips and Variations
Selection of milk for this dessert — Preparing chenna for this Rasmalai recipe plays a crucial part in the dessert-making process. Using whole milk or full-fat cow’s milk, ideally organic, with a fat content of at least 4% is the best. Avoid low-fat, 2%, or skimmed milk as it lacks the fat content for properly binding the chenna.
Using low-fat alternatives can compromise the texture, resulting in the hard and crumbly rasmalai instead of the desired soft and creamy dessert. The luscious and decadent quality of the dessert is achieved by the richness of full-fat milk, which is the integral part.
This recipe is not meant to be vegan — Please note that this rasmalai recipe is not suitable for ingredient substitutions with vegan alternatives. I haven’t experimented with plant-based milk such as soy or nut milk in this recipe, so I can’t provide any guidance on their effectiveness.
Given the distinctive properties of the plant-based ingredients, creating a vegan version of Rasmalai recipe would require an entirely different set of ingredients and possibly additional instructions, too.
Preparing the best quality chenna — Preparing quality chenna for this recipe is paramount in creating a soft and delectable dessert, and therefore, careful attention to the chenna-making process will ensure a delightful treat true to its traditional form.
When preparing chenna, do not overheat the milk after adding the lemon juice or vinegar, as this will result in tougher and chewy-textured rasmalai rather than the desired soft and melt-in-mouth texture.
Avoid store-bought paneer altogether — This recipe calls for freshly prepared paneer, which is necessary to achieve the signature soft and melt-in-mouth texture of Rasmalai; therefore, I would not recommend using the store-bought paneer.
Making the paneer from scratch is imperative, so it is best to stick to the traditional method, which involves boiling full-fat milk, separating it with an acid like lemon juice or vinegar, and then carefully straining and kneading the chenna.
Removing the lemony taste — Removing the residual lemony or vinegary taste is a critical step in the Rasmalai recipe-making process, as this could adversely affect the flavor of the dessert. Rinse the chenna nicely to eliminate the acidic undertones after the curds have separated from the whey. Allow the water to run freely, and wash the chenna thoroughly using your fingers.
Drain the water well from chenna — Draining the water from chenna is a crucial step when making this delicious dessert. Well-drained chenna allows better kneading and shaping of the cheese/ Rasmalai balls. Ideally, the Rasmalai chenna should be crumbly and slightly dry, retaining a little moisture for a creamy texture.
If the chenna mixture is overly dry, it may cause the rasmalai to become dry, while the wet chenna can result in the rasmalai disintegrating in the syrup. I usually hang chenna in cheesecloth for at least 2 to 3 hours to achieve a balance, ensuring it is perfectly prepared.

Kneading the chenna is a vital step — In rasmalai recipe preparation, kneading the chenna is essential as this determines the right texture of the cheese balls. Use fingers and heels of the palm to knead the chenna until you get a smooth, non-sticky dough-like consistency.
As you knead the dough, you should notice the chenna releasing some ghee or fat and then finally coming together as a smooth dough ball, which is neither too hard nor too soft. This makes a perfect texture for shaping the chenna into soft cheese balls.
Stick to manual kneading — Please refrain from using the food processor as it can lead to overworking of the chenna, which causes excessive release of fat. At this point, the chenna will become extremely greasy and challenging to work with.
Once the fat is released, the chenna becomes unsuitable for making this recipe as the desired texture will not be achieved. Therefore, stick to the manual kneading method that ensures the chenna’s perfect texture.
Do not use the greasy chenna — If your chenna ends up greasy for any reason, it is advisable to restart the entire process all over again. Proceeding with greasy chenna will ruin the recipe; therefore, it should be completely avoided. However, don’t worry about the greasy chenna as it can be used to prepare other delicious dishes, such as malai kofta, Mughlai dishes, or rabdi, where the high-fat content is desirable and enhances the flavor.
For the dry chenna — Likewise, if the chenna turns out dry and crumbly, adding a few drops of water and kneading it again will do the trick.
For the right amount of sweetness — Water to sugar ratio is essential to get the right amount of sweetness. I prefer 1 cup of sugar to 3 cups of water, which results in moderately sweet rasmalais. During soaking, the rasmalai balls will absorb some sweetness; therefore, consider keeping the sugar content slightly lower in the syrup.
Assorted flavors are possible — You can flavor the sugar syrup as you please and enjoy the dessert the way you want. The most loved flavors are cardamom and rose water. You can also use kewara essence, saffron, or rasmalai essence, as you like.
The right consistency of the sugar syrup — Maintaining the right consistency of the sugar syrup is essential for achieving the desired round and soft-textured rasmalai. So, ensure that the syrup is not too thick, which may result in irregularly shaped rasmalai.
When the water comes to a boil, and you see bubbles in the water, gently add the rasmalai balls/ dumplings to the syrup.
Are Chenna balls not doubling in size? Well, there could be many reasons for the Chenna balls not doubling in size. If the sugar syrup is too concentrated, the chenna balls will have difficulty soaking, and they will not puff up. In this case, dilute the sugar syrup and try again.
Another reason could be that the chenna is not kneaded correctly. Further, when boiling the syrup, ensure that you use a tight-fitted lid to cover the pan and that the syrup is boiling well. Why? A tight-fitted glass lid helps trap the required heat and pressure during cooking, and the rasmalai turns out soft and well-puffed.
But if the rasmalai comes in contact with the air during cooking, it will shrink and result in chewy rasmalais.
Rasmalai Troubleshooting — Disintegrating chenna- causes and solution — One of the probable reasons for the chenna balls breaking in the syrup while boiling is because of the excess moisture present in them. Although you cannot proceed with this chenna anymore, do not get disheartened because you can still put your chenna to better use.
Prepare another batch of chenna for this recipe and save this deformed chenna from the syrup to make rabdi out of it!
Checking the doneness of the chenna — Once the chenna is cooked, it is time to check the doneness. Remove it from the syrup and drop a rasmalai ball in a water bowl. If it sinks, it indicates that it is cooked. But if it floats, you need to boil them for a few more minutes.

Let me know what you think!
Every bite of this delicious Rasmalai takes you on an instant journey to a dessert paradise that is hard to resist. If you are ready to savor this sweet ambrosia, join me on this culinary journey to the heavenly deliciousness.
Should you make this Rasmalai recipe, please let me know your thoughts by sharing your comment below.
And don’t forget to share it with your family and friends.
MORE LIP-SMACKINGLY DELICIOUS DESSERTS THAT YOU’LL LOVE!
Follow the step-by-step instructions below to make the best Rasmalai Recipe
Step by Step Rasmalai Recipe
INGREDIENTS
INGREDIENTS FOR PANEER
- 2 Litres Full cream milk
- ¼ cup Lemon Juice or vinegar
RASMALAI SYRUP
- 2½ cups Full cream milk
- 1¼ cups Milk Powder
- ⅓ cup Sugar
- 3 tablespoon Thinly sliced dry nuts (almonds,pistachios)
- ⅛ teaspoon Saffron strands
- ½ teaspoon Elaichi Powder (Cardamon Powder)
SUGAR SYRUP
- 2 cups Water
- 1 cup Sugar
- 1 teaspoon Rose water or Kewra essence
INSTRUCTIONS
MAKING PANEER
- Add whole milk to a heavy-bottomed pan and bring it to a boil over medium heat. Keep stirring the milk at regular intervals.Tip — Full-fat milk produces the best chenna (paneer); therefore, I highly recommend using whole-fat dairy. Low-fat milk can be used, but you must compromise with the result.

- When the milk becomes frothy and bubbles start to form on top, that's the time to add vinegar/lemon juice.

- Pour in vinegar/lemon juice.Tip — Wait for the milk to get bubbly before adding the acid. This will result in perfect Chenna/paneer.

- Slowly mix vinegar/lemon juice in the milk, and the milk will curdle.

- When the whey/liquid in curdle milk turns to a lime-colored liquid. The milk has separated, and you can progress to the next step. Take the pan off the flame.

- Line a strainer with muslin cloth.

- Quickly strain paneer. Tip — Letting it sit will result in hard and chewy rasmalai.

- Wash the paneer under cold water to eliminate the vinegar/lemon juice taste. Tip — This will wash away all the flavor of acid from the paneer.

- Squeeze the paneer and allow the water to drain.

- You can also hang paneer/chenna for 20- 30 minutes until the water stops dripping. Tip — This step is important. If water is not drained well from the paneer, rasmalai pieces will start to disintegrate in sugar syrup.

- Remove the paneer from the cloth. The paneer should feel crumbly but moist. Moist chenna is preferred for soft and spongy Rasmalai.

KNEADING AND SHAPING PANEER
- Start kneading the paneer like a dough.

- Kneading with patience yields smooth cheese balls that ensure the desirable texture of your rasmalai. Knead the chenna for about 10- 15 minutes on a clean surface using the heels of your palm until smooth-textured dough is prepared with no cracks. Tip — This step is non-negotiable and has no shortcuts, so resist the urge to rush through it. Take your time to get it just right for the best result. I have tried kneading it in a food processor, but the result was unsatisfactory.

- Take the paneer dough in your hand. Squeeze it tight. It should not feel sticky at all. It should feel creamy and roll smoothly in between your palms.

- Squeeze and press between your palms a couple of times before rolling it like a ball. This will prevent cracks.

- Gently press in between your palms and flatten the balls. Set it aside and repeat the process with the rest of the paneer.The flexibility of shape — You want the rasmalai balls to be big or small, round or disc-shaped; deciding the shape and size is entirely up to you! However, remember that they double in size when boiled in the hot syrup, so decide the size accordingly.

- Combine water and sugar in a pan. Add the essence of your choice. Bring it to a boil.

- Slowly add flattened paneer pieces to the syrup. Reduce the flame to MEDIUM LOW and allow it to boil. When boiling, the rasmalai balls need plenty of space in the pan to expand and puff up. Therefore, use a wide pan that allows the rasmalais to float and expand freely in size.

- Slowly, the pieces will start to float up.Tip — Avoid overcrowding the pan to help the rasmalai to breathe; otherwise, they may turn out flat and chewy. Boiling the rasmalais in batches will be a great idea, though. Also, ensure the pan has a tight-fitted lid to cover, which helps maintain the heat and pressure inside the pan when boiling.

- When all the pieces float to the surface.

- Cover the pan with the lid and let it simmer for 3-4 minutes on a medium-low flame.

- Flatten paneer pieces will swell in size. Take it off the flame and allow it to cool.

- When comfortable to touch, take a flattened paneer piece and squeeze out all the syrup. Press gently.

- When all the syrup is pressed out, paneer pieces will come back to their original shape. Set it aside.

PREPARING THE SYRUP
- In a heavy-bottomed pan, add milk and bring it to a boil. Add in sugar, saffron strands, and milk powder.

- Whisk until well blended.

- Continue boiling at a medium flame, stirring continuously. Stir in thinly sliced nuts and mix. Keep stirring and boil the milk for 20-25 minutes. Milk will thicken to a desired consistency - neither too thick nor too liquidy.

- Carefully drop in flattened paneer balls.

- Allow the flattened paneer balls to simmer in hot syrup for 1-2 minutes.

- Take it off the flame, cover and let the paneer pieces soak in the syrup.

- Transfer it to a big bowl and allow it to chill. Tastes better when chilled.

Never thought to make rasmalai was this easy n sooo delicious... I run a small sweet treat from home.. N this is at the top of my menu... Ppl r enjoying it... N will b njoying it throughout fasting...
Thank u so much ma'am😊🙏
Thank you, Mahek, for your kind words.
So glad you and your guests enjoyed the recipe. 😊
I followed this recipe and it turned out so good. My rasmalai patty turned out really spongy and so soft. Take you so much for all the tips and step by step pictures. They are so helpful. 🙏🙏
I had flavored my syrup with rose and kesar and it tastes superb!
So glad you liked the recipe, Roshni. 😊
I am glad you found the steps helpful. Thank you for sharing your lovely feedback.
Hello Mam,
Can I know the perfect measurements for this recipe.. want to know the milk powder, sugar n milk measurements.. For milk what size of cup should we use?? Am confused..
Pls reply me at the earliest.. thanking u.
Hello Roshni,
The measurements are listed in the post. Please scroll down to the ingredient list. If you are looking for the recipe in gms/ml, then press the metric link at the bottom of the ingredient list, and it will calculate the recipe for you.
Hi, thanks for the very detailed recipe. I tried making it three times- all the three times it has come out hard and rubbery and didn't absorb the milk at all. I had kneaded the chena till it was smooth- around 5 mins. The balls increased in size when I put it into sugar syrup, but when I removed it and tried to squeeze out hardly any syrup was there. I tasted it also, was not very sweet. Since overcooking, I read , was one of the reasons for hard balls this time I cooked for only 5-6 minutes and they were done. What else can go wrong?
Hello Sharada, thanks for your kind words.
To avoid chewy and hard Rasmalai, follow these simple tricks-
1. Always cover the rasmalai with a lid when they are boiling. If the rasmalai comes in contact with air while cooking, they will reduce in size and become chewy and hard.
2. Use full cream milk too make rasmalai. Skim milk or 2% milk will result in harder rasmalai.
3. Lastly, the sugar syrup should be of the right consistency. Thick sugar syrup will lead to chewy and distorted rasmalai.
Your second query - Rasmalai didn't absorb any syrup
Possible reason - The milk syrup was not of the right consistency. The thicker syrup will not seep in Rasmalai.
I hope this helps!
thank you for sharing this info
My pleasure. 😊
My chena become too soft. Is there any way to fix it?
You can add 1-2 teaspoons of arrowroot powder and knead the dough.
It will absorb all the moisture from the paneer.
thank you for sharing this information
i tried ur rasamalai recipe for the first time really great the paneer was so soft.my family really enjoyed it.
Thank you so much for your kind words!
Hi Ruchi
You are amazing... just tried your rasmalai recipe n rasgullas made from homemade paneer... they are so soft n squeezy. Thanks a ton
Pleasure is all mine.
Thanks for sharing your feedback with me. 🙂
There is no problem if we do not use milk powder
Milk powder is added to thicken the syrup. Besides that, milk powder lends a rich and creamy texture to rasmalai.
The other option would be to boil the milk (double its quantity) until it is reduced by half. Rest of the steps remain the same.
Forgot to add... I tried the recipe and it came out very well.. i did some 10 pieces... Tasted grt...now wanted to do itfor a function
Awesome. 😍
Thanks Akila for sharing your experience with me.
Glad you liked the recipe. 🙂
I wanna make 30 to 40 pieces of rasamalai..I have doubt in cooking the paneer balls in sugar syrup.. do I have to make separate sugar syrup for each 10 paneer balls or the same syrup can be used?
Same syrup can be used.
It cam out perfect....Thank u
Glad you liked the recipe, thanks for sharing your feedback. 🙂
Hi, we did this, however the balls were hard. The end rasamalai was not soft and spongy. How do I do better next time?
Sorry to hear about that Ezhil. Couple of reasons why this happened -
1. If the freshly drained paneer was allowed to sit for a while then it will result in hard and chewy rasmalai.
2. Kneading paneer with hands make a huge difference. Was the paneer kneaded well?
Hi
I tried this recipe but all of my rasmalai balls disintegrated in sugar syrup. I may have not kneaded balls well or may have overcrowded the pan, I dont know the exact reason. But now I have this chhena cooked in sugar syrup. Is there any way I can fix it? Will adding will powder and kneading for some more time work?
Hi now only I did it very good it came.By comparing before this is nice🙂
Glad to hear that you got perfect results. Thanks for trying. 🙂
Hi ,in this little bit lemon taste is coming what should do?
Did you wash paneer under cold water?
Hi ruchi,
I am very excited to try your recipe. I had a question- is the milk powder called dry milk powder (such as the one from carnation)?
Yes, its the same. Thanks!
Hi Ruchi- Looks divine! Your tips are encouraging me to try this otherwise elusive recipe!!. Can u please share brands of some good pots that are thick bottomed? Did u find them in US or India?
Thank you! The dutch oven heavy bottomed pans are good. Mine is from Amazon.
Thank you 🙂
Pleasure is all mine. 🙂
Very nice ! I like the presentation and would definitely give this a try . A small question though , assuming you are in US what brand if milk have you used in the pictures ? It looks so creamy . Is it raw milk ?
Thanks Amrita!
I have used 'Land 'o' lakes whole milk to make this recipe. But any full fat milk would work for this recipe.