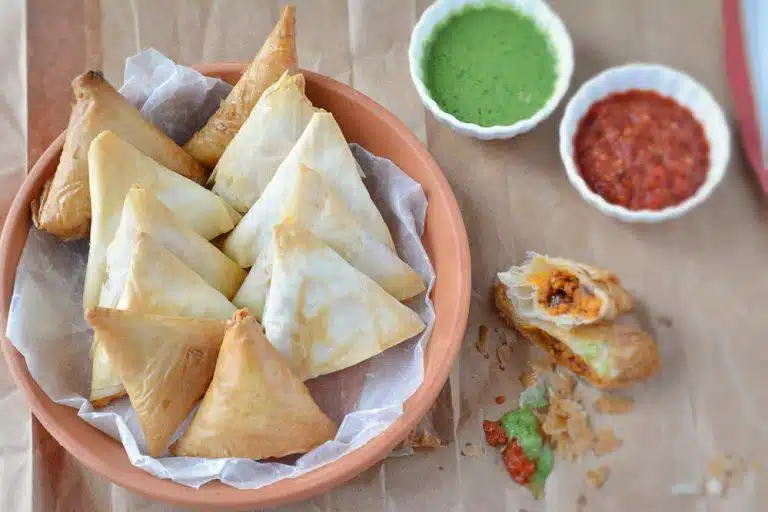
There is something truly special about biting into a hot, crispy Keema Samosa. The golden shell shatters lightly, revealing a savory minced meat filling that is spicy, aromatic, and full of flavor. Whether served during a festive gatherings, as an evening snack, or as a party appetizer, these samosas always disappear fast.

What is Keema Samosa?
Keema Samosa is a savory Indian-style pastry filled with spiced minced meat. “Keema” means minced or ground meat, and it can be made with chicken, lamb, goat, or turkey.
The cooked keema filling is wrapped in samosa pastry sheets, sealed into triangles, and fried until crisp and golden.
Unlike potato samosas, this recipe uses a well-seasoned keema filling made with minced meat, onions, ginger, garlic, green chilies, cilantro, and pantry spices. The key to a perfect keema samosa is a dry, flavorful filling and a tight seal, so the samosas stay crisp and do not burst while frying.
They are especially popular as appetizers, tea-time snacks, Eid starters, and party finger foods.
Why You’ll Love ♡ This Keema Samosa Recipe
This recipe gives you samosas that are crispy, flavorful, and freezer-friendly.
- The filling is cooked until all the moisture evaporates, helping the samosas stay crispy and crunchy after frying.
- The spices are well-balanced, giving the keema filling a warm, savory, and flavorful taste.
- Keema filling can be made ahead of time, making the samosas easier to assemble later.
- These samosas are easy to customize based on your taste.
- Make them mild for kids or extra spicy for those who enjoy heat.
The best part is that, use chicken keema for a lighter filling, lamb keema for a richer flavor, or even bake or air fry them for a lighter version.

Ingredient list for Keema Samosa
Minced meat — Use chicken, lamb, goat, or turkey keema. Chicken keema cooks quickly and gives a lighter filling, while lamb or goat keema gives a richer, more traditional flavor.
Oil — A little oil helps cook the onions and spices properly. Use any neutral oil such as canola oil, vegetable oil, avocado oil, or light olive oil. Avoid using too much oil, as excess oil can make the filling greasy.
Aromatics — Fresh ginger and garlic give the filling a bold, savory base. You can use freshly minced ginger and garlic or ginger-garlic paste. Fresh gives the best aroma.
Spices — The filling usually includes coriander powder, cumin seeds, Bay leaves, Black cardamom, red chili powder, and garam masala. These spices bring warmth, color, and classic Indian flavor to the minced meat. Salt enhances the flavor of the keema and spices. Adjust according to the type of meat and your taste.
Cilantro — Fresh cilantro adds brightness, while mint gives a refreshing flavor that balances the richness of the meat. Mint is optional but highly recommended.
Tomato — Using both fresh tomato and tomato puree gives the keema filling a balanced flavor. The fresh tomato adds brightness and freshness, while the puree adds depth, color, and a slightly saucy richness.
For the Samosa Wrapping
Filo Sheets — Filo sheets, also called phyllo sheets, are thin pastry sheets that create a light, crisp, and flaky outer layer for samosas. They are a convenient store-bought option and work beautifully for quick appetizer-style samosas.
Flour paste — A simple paste made with all-purpose flour and water acts like glue to seal the samosas. A good seal prevents the filling from leaking during frying.

Recipe Tips for Perfect Keema Samosa
Choice of meat — Finely minced Chicken works better than coarse ground meat because it creates a smoother filling. Large chunks can tear the pastry or make the samosas harder to fold. Choose finely minced meat so the filling stays compact and easy to wrap.
Cook the filling until dry — This is the most important tip. Keema naturally releases moisture while cooking. Keep cooking until the liquid evaporates and the filling looks slightly crumbly. A wet filling can make the samosa sheets soft and cause oil splattering.
Cool the filling completely — Never fill samosas with hot keema. Warm filling creates steam inside the pastry, which can make the sheets tear or become soggy.
Do not overfill — It is tempting to add extra filling, but overfilled samosas are harder to seal and can open while frying. Use just enough filling to create a plump triangle without stretching the sheet.
Keep the sheets covered — Phyllo Dough sheets dry quickly when exposed to air. Keep them covered with a slightly damp towel while you fold each samosa.
Fry in batches — Adding too many samosas at once lowers the oil temperature. This can make the samosas absorb more oil and become greasy. If Frying, fry in small batches for the crispiest result.
Rich and spicy keema samosa — For a deeper, more traditional flavor, use lamb or goat keema instead of chicken. Lamb adds richness, while goat keema gives the filling a hearty, classic taste. Cook the meat slowly until tender and completely dry, then enhance the flavor with a pinch of kasuri methi, extra garam masala, green chilies, red chili powder, crushed red pepper, or cayenne for a spicier version.
Baked or air fryer keema samosa — For a lighter version, brush or spray the samosas lightly with oil. Bake at 375°F until golden and crisp, flipping halfway through, or air fry at 360°F until evenly crisp and golden. The texture will be lighter than deep-fried samosas but still delicious and crunchy.
Keema Matar Samosa — Add green peas to the filling for a classic keema matar-style samosa. The peas add a mild sweetness and soft texture.
Mini Keema Samosa — Use smaller pastry strips and less filling to make bite-sized samosas. These are perfect for parties, lunchboxes, Ramadan iftar trays, and appetizer platters.

Serving Suggestions
Serve Keema Samosas with:
- Mint chutney
- Tamarind chutney
- Garlic yogurt dip
- Ketchup
- Masala chai
- Green salad
- Onion rings and lemon wedges
Homemade keema samosa also pair well with Eid spreads, game-day snacks, potluck appetizers, and Indian party menus.
Which meat is best for Keema Samosa?
Chicken, lamb, goat, and turkey all work well. Chicken gives a lighter filling, while lamb and goat give a richer, more traditional flavor.
How do you keep Keema Samosa crispy?
Cook the keema filling until completely dry, cool it before wrapping, seal the edges well, and fry the samosas on medium heat. Reheat leftovers in an oven or air fryer to restore crispiness.
Why did my samosas burst while frying?
Samosas can burst if the filling is —
- too wet,
- the edges are not sealed properly,
- the pastry is torn, or
- the oil is too hot. Make sure the filling is dry and the samosas are tightly sealed.
Can Keema Samosa be frozen?
Yes. Fold and seal the samosas, freeze them in a single layer, then store them in a freezer-safe bag. Fry the minced meat samosas directly from frozen on medium heat.
Can I bake Keema Samosa instead of frying?
Yes. Brush the samosas with oil and bake at 375°F until golden and crisp. Baked samosas are lighter, though fried samosas usually have the crispiest texture.

Let me know what you think!
These Keema Samosas are crisp, savory, and packed with comforting spice flavor in every bite. With a dry, well-seasoned filling and a properly sealed wrapper, you can make samosas at home that taste just as satisfying as your favorite bakery or restaurant version.
Serve them fresh with chutney, make them ahead for gatherings, or freeze a batch for quick snacks whenever the craving hits.
Should you make this Crispy keema samosa recipe, please let me know your thoughts by sharing your comment below.
And don’t forget to share it with your family and friends.
CRAVING FOR MORE, TRY SOME OTHER HOMEMADE CHICKEN RECIPES –

Keema Samosa
INGREDIENTS
KEEMA INGREDIENTS
- ½ kg Minced Keema
- 3 pieces of Bay leaves (Tej patta)
- 3 pieces of Moti Elaichi (Black cardamom)
- ½ teaspoon Cumin seeds (Jeera)
- ½ teaspoon Red chili powder
- 2 teaspoons Coriander powder (sukha dhaniya)
- 1½ teaspoon Garam Masala Powder
- 1 small onion chopped
- 1 small Tomato, chopped
- ¼ cup Homemade tomato puree
- 1 teaspoon Garlic paste, or chopped
- 1 teaspoon Ginger paste, or chopped
- 2 tablespoon Oil or Ghee
- 2 tablespoons Chopped cilantro leaves
- 1 tablespoon Mint Leaves
PASTRY INGREDIENTS
- 1 roll of Phyllo/Filo dough pastry sheets (Or puff pastry sheets)
- 2 tablespoons Butter (Just to brush pastry sheets)
- 2 tablespoons Flour Paste (To seal pastry)
- Oil for Frying
INSTRUCTIONS
MAKE THE FLOUR PASTE
- In a small bowl, mix all-purpose flour with enough water to form a smooth, thick paste. This paste will be used to seal the samosa edges. Keep it aside.


PHYLLO DOUGH SAMOSAS
- If using phyllo sheets, remove them from the freezer and let them thaw completely. Meanwhile, let’s start preparing the keema filling.


KEEMA FILLING
- Heat oil in a pan and add all the whole spices. When they start to sputter…


- Add the chopped onions, ginger-garlic paste, and sauté until soft and lightly golden. Tip — Use finely chopped onion as they adds sweetness, moisture, and depth to the filling.

- Sauté for 2-3 minutes on medium flame until the onions are translucent.Tip — The secret to the flavorful Keema filling is to sauté onions well, cook the ginger and garlic until aromatic. Do not rush this step because this aromatic squad builds the base flavor of the keema filling.

- Mix in chopped tomatoes, tomato puree and mix it well.After adding tomato and tomato puree, cook the masala until it becomes thick and almost dry before adding or finishing the keema. The filling should not be watery, because extra moisture can make the samosa wrappers soggy or cause them to open while frying.

- Add all the spices and cook for another 2–3 minutes over medium-low heat, stirring well to blend the flavors.

- Once the oil or ghee starts to separate, add the minced chicken and mix well. Chicken cooks quickly, so be careful not to overcook it.

- Cover and cook on low heat for 10–15 minutes. If the chicken releases liquid, continue sautéing until it evaporates and the keema looks dry. Adjust seasoning and let it cool completely before stuffing. The filling should be flavorful and moist-tasting, but dry enough to hold its shape for crisp, flaky samosas.Remove the keema from the heat and let it cool completely before filling the samosas. Warm filling can soften the pastry sheets and make wrapping difficult.

FOLD THE SAMOSAS
- Take out one roll from the box.Phyllo dough can feel a little tricky to work with, especially if you are using it for the first time. But don’t worry — once you follow the step-by-step tutorial below, you will quickly get comfortable with folding and shaping it.

- Roll out the sheets.

- Cut a rectangular piece out of the pastry sheets.

- Separate them..


- Since filo sheets are very delicate and dry out quickly, keep the unused sheets covered with a slightly damp kitchen towel while assembling. Brush or layer them carefully, then fold and seal well to hold the keema filling inside.

- I like to cover them by placing a wire rack on top, so the upper layer doesn’t stick to the damp cloth.

- Separate 3 sheets from the cut batch and cover the rest.

- Brush the sheets with butter.

- Add a spoonful of keema filling to one end of the rectangular phyllo sheet.

- Fold one corner over the filling to form the first triangle.

- Lift and fold it over again to create a half-triangle shape.

- Continue folding from side to side, keeping the triangle shape intact.

- Keep folding

- Until you reach the end of the sheet.

- Make one final fold at the end.

- Trim any excess phyllo with sharp scissors.

- Seal the edges with flour paste. Press gently but firmly so there are no open gaps. A weak seal can cause the filling to leak into the oil. Your samosa is ready to fry or bake.

- Preheat the oven to 350°F. Continue shaping the remaining samosas, then place them on a greased baking tray.

- Brush the samosas one final time with butter.

- Place them in the hot oven to bake. Bake @ 350°F for 20-25 minutes. Tip — Use medium heat on airfry — Medium heat allows the pastry to cook evenly. Air fry phyllo samosas at 350°F for 10–14 minutes, or until they are golden, crisp, and flaky.

- Flip them halfway through baking and brush lightly with butter again, if needed, for even browning.

- Bake until they turn golden, crisp, and flaky.

- If frying, heat oil in a kadhai or deep pan. Once the oil is hot, carefully add the samosas and fry until crisp and golden brown.

- Drain properly. Place fried samosas on a wire rack or paper towel-lined plate. A wire rack helps keep them crisp by allowing air to circulate.

- Samosas are ready enjoy them with chutney of your choice.


- Serve them fresh. Keema samosas taste best hot and crisp.

- If making ahead, reheat them in an oven or air fryer instead of microwaving.
Very soon this web page will be famous amid all blog people, due to it’s good recipes. Amazing recipe and a very long post but I like reading and seeing all your images. You have not even missed a single step. Have always been reluctant on trying out phyllo, but with your steps I have got the confidence to try it out. Thanks you really inspire me.
Glad to be of help Sydney! Give this recipe a try and if possible share your experience with me.Thanks for stopping by!!
Very neat blog post.Thanks for maintaining it. So nice of you to share lovely delicious, easy to understand detailed recipes with your viewers. Thank u soo much Ruchi, for this yummy samosa recipe, I made it today and its really gud and very simple to make…Just one query can I store the leftover filling mixture in the freezer for later use?
You are welcome Aisha! Glad you liked the recipe! Yes, you can freeze the leftover keema mixture in an airtight container for future use.
Followed a link from another site and landed on your site. Have been on your page for 40 minutes now and exploring your recipes and festival section. Pretty impressive work. Have saved it and I am going to try out this Keema samosa recipe of your. Looks tempting and well depicted. Thanks for sharing!
You are welcome Cassy! Thanks for your wonderful feedback. Sure give it a try and if possible share your experience with me. 🙂
Hey Ruchi! another great post thanks! I bought filo dough and just made this tonight for dinner and it is fabulous. The keema recipe itself is amazingly good – so fragrant and delicious! Steps are very very helpful. I am a frequent visitor of your site and your way of explaining and clarity in your every post is why I am drawn to your site every other day and that is why I love your blog so much!
Love from Brazil
That’s so sweet of you Roslyn. Thanks for trying out my recipe. Glad you liked it. Keep checking back for more. 🙂
Nicely made blog! Your pictures and very well versed. Thanks. Tried this recipe from your blog, skipped the tomatoes and followed the stuffing recipe. The covering itself was very crispy and flaky. Tasty ans super yummy. My friends and family raved about the stuffing. Thanks for sharing.
You are welcome Vannu! Thanks for trying it out, glad you liked it. 🙂
Perfect! this is what I was looking for and nicely explained. Will be trying out this recipe soon. Thnks for sharing.
You are welcome Monal. 🙂
Fab recipe. Made it with no tomatoes. In my vision tomatoes may have made filo difficult to work with, left them out and made the recipe with oregano, cayenne and garam masalu. It tasted yum. Wrapped it in Filo and baked. This appetizer was the heart of my party. Everyone just loved it. Bookmarked and will be making it again.
Thanks for trying out the recipe. What an excellent way to make keema – bet oregano and cayenne must have tasted great in the recipe.Glad to hear that you liked it. Keep checking back for updates!!
So yum and lip smacking appetizer. Made it for the game last night and it was gone in a minutes. My guests were craving for more. I had already prepared a big batch and it was all finished. Thanks for making me a rockstar of my party. Muah..love yah..
Thanks for sharing your wonderful feedback with me. Glad to hear that your game night was a hit. 🙂
Hi Ruch, wanted to know the exact quantity of 2 cups of flour in grams.
Bhavna, please use the ‘Metric’ conversion at the bottom of the ingredient list and it will convert the recipe for you in grams.