


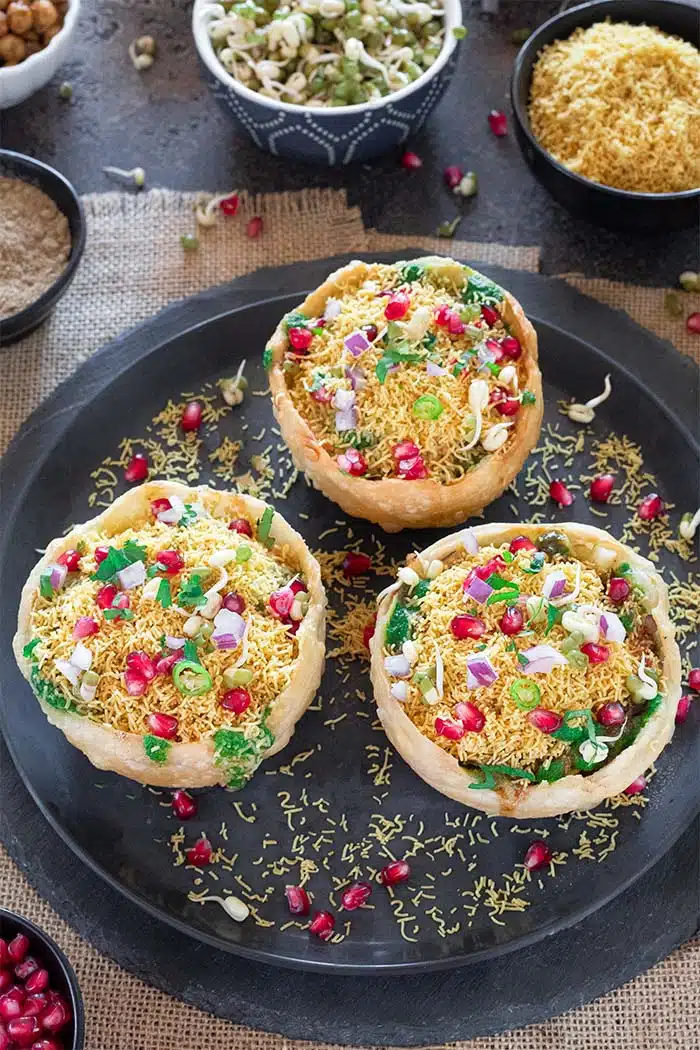
Everyone’s favorite chaat is molded into an artistic starter, Katori chaat, where a lip-smackingly delicious sweet and savory filling is nestled inside a flaky Katori (edible bowl). This crispy Katori chaat recipe is an excellent make-ahead appetizer, and you can easily switch up the fillings and have fun with your own toppings.
A perfect party or potluck food that is sure to please and probably won’t last very long on the dinner table!

At this time of the year, I get all excited about the festival food and family get-togethers. Whether it be Spicy paneer nuggets, Stuffed Aloo Tikki, Ragda pattice, or Achari paneer tikka, I am always on the hunt for easy and tempting recipes that make the festive celebration all the more yummylicious and fun.
So, today, I’d like to share with you one of my very old (college time) creations – the Katori chaat recipe or tokri chaat recipe.
Pretty much everyone in India loves a chaat recipe, and there are unaccountable varieties of chaat in India.
But, if it is served in individual portions, like this Katori chaat recipe, then trust me, it’s always a winner!
Reasons You’ll ♡ this Tokri Chaat
This katori chaat recipe s —
- Crispy and flaky
- Sweet, tangy, and spicy
- Packed with a gamut of flavors
- Make-ahead appetizer
- Insanely Addicting
- Pairs so well with chai, and
- Perfect for any occasion – get-togethers or house parties!
What can I say more? People of all ages love the Katori chaat recipe. Make a little customization for the little kids (at the spice level), and it will be an instant hit with them too.

What is Katori Chaat
Katori Chaat recipe is made up of 2 terms = Katori + chaat, and if we break the two terms —
Katori or tokri translates to a small basket or a bowl. In simple words, we are talking about deep-fried or baked golden crusty edible munching shells that make a lovely vehicle for filling and toppings that are not only tempting but are also very pleasing to your taste buds.
And chaat, on the other hand, is essentially an umbrella term used to define finger-licking savory snacks sold by small street vendors to big cafes and malls in India.
Making Katori chaat at home can sound like a lot of work, but it’s so much worth the effort. Plus, homemade is the best as you can be sure of the sanitation and quality of the ingredients.
As a bonus, you get to create your own version of Katori chaat and enjoy presenting your way-better-than-street vendor creation.
In addition, this easy and tempting recipe will make any festive celebration all the more yummylicious and fun.
It is an excellent make-ahead appetizer, and you can easily switch up the fillings and have fun with your own toppings.

Ingredients for Katori Chaat
These edible Katoris put a delicious spin on the famous Indian chaat that contains some favorite ingredients and fillings like —
Flours — The building block of this recipe. I have used a combination of all-purpose flour and wheat flour to form my katoris.
Oil — to knead the dough and fry the katoris. Any neutral oil will work.
Chickpeas — I didn’t want to keep my Katori chaat recipe all potato-oriented; therefore, I have used spiced chickpeas as a topping in my chaat. In addition to that, it adds a nice bite to the chaat.
Bean sprouts — This is optional, but I have added crunchy bean sprouts for an extra nutritional boost since I am a huge fan of bean sprouts. Feel free to skip if sprouts are unavailable.
Onions — Yes, of course, lots of it for added crunch.
Potatoes — I have used russet potatoes for the Katori chaat recipe. They are low in moisture, and they crisp up quickly in the airfryer.
Yogurt — Whisked yogurt is a must-have ingredient for all Indian chaats. You can use homemade yogurt or the store-bought one, both work for this recipe.
Substitute — You can easily substitute yogurt with dairy-free and vegan alternatives.
Cucumbers — They add a freshness and crunch to our favorite chaat. If you are not a fan of cucumbers in chaat, leave it out.
Spices & Herbs — To enhance the flavor more, I have used a combination of spices and herbs such as freshly roasted cumin powder, chana masala, chaat masala, salt, fresh green chilies, and cilantro to flavor my filling.
Substitute — Add or skip the spices or herbs to your liking.
Chutneys — Oh yes! The backbone of any Indian chaat is chutney. Lots of green chutney made up of mint and coriander. And tamarind chutney, also known as meethi chutney, drizzled all over and inside the katoris. Tamarind chutney’s sweet and tangy flavor counteracts the spicy flavor of the green chutney.
Garnishes — This Katori chaat recipe is finished with a generous sprinkle of sev, chaat masala (a key spice), and Kashmiri red chili powder (for a pop of color). In the end, a generous sprinkle of pomegranate seeds gives the rest of the ingredients some oomph with its sweet and tangy flavor.
Impressive isn’t it! This Katori chaat recipe is loaded with great flavors, and it’s quite a crowd-pleaser recipe!
How to make Katori Chaat
This section walks you through a detailed step-by-step recipe with pictures. For the FULL, printable recipe card, please scroll down to the bottom of this post.
Cook Chickpeas — Soak dried chickpeas overnight. In the morning, drain the water and transfer the chickpeas to an Instant Pot and add filtered water, salt, and a pinch of baking soda. Press the ‘Pressure cook button’ and cook on high pressure for 20 minutes.
Allow the pressure to release naturally for 10 minutes, then move the steam release handle on the lid to the venting position. Once the pin drops, carefully open the Instant Pot.
Substitute — You can use a can of chickpeas to save time. Drain the aquafaba (the brine water that preserves chickpeas) and use the chickpeas as stated below.

Sauté the chickpeas — Drain the boiled chickpeas. Heat oil in a pan and transfer the cooked chickpeas to the pan and season them with spices. Stir until combined.

Form the Dough — In a large mixing bowl, combine the flours, salt, and one tablespoon of oil. Gradually add water into the bowl and knead until it forms a soft, pliable dough. Cover the dough with a damp cloth and let it rest on the kitchen counter.
Crispy Potatoes — While the dough is resting, let’s work on the rest of the ingredients. Peel and rinse the potato. Cut the potato into smaller pieces. Soak them in hot water for 10-15 minutes.
After 15 minutes, drain the potatoes and pat them completely dry on a kitchen paper towel. Transfer the potatoes to a bowl, and drizzle them with oil.
Spread them in a single layer in the airfryer. Air fry the potatoes at 375°F for 15-20 minutes or until crisp. After the cooking time is over, remove it from the air fryer and set them aside.
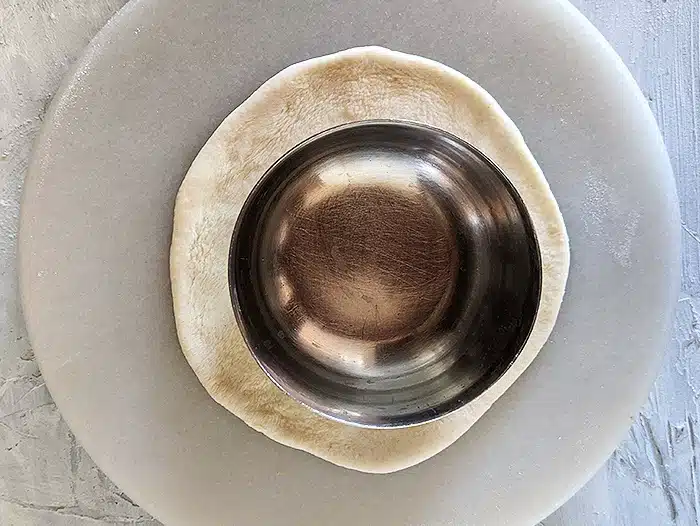
Fry the Katoris — Heat oil in a pan. Now, divide the dough into equal-sized round balls. Flatten the dough and roll the dough into a flat, round disc. Place a round Katori in the center of the rolled dough.
Wrap the Katori with the dough. Using the knife, carefully trim the extra dough from the top of the Katori.

Drop the dough-wrapped Katori in the oil. Allow it to cook from the bottom until golden. Now, flip and cook from the top until golden. Once evenly cooked, remove from the oil and drain it on a kitchen paper towel.
Carefully run a small knife around the edges of the Katori, and the fried dough Katori will come loose.
Set it aside. Repeat the process with the rest of the dough until all the dough is used up.
Substitute — Baked katori chaat version is explained below. Not in a mood want to make katoris at home, no worries. You have choices, my friend. You can buy these savory cups or Athen foods mini phyllo dough shells to speed up the process.

How to assemble Katori Chaat
Before we start assembling the katoris, gather all the ingredients. Ensure the yogurt is whisked for an easy drizzle.
Arrange a Katori on a plate. Start layering the katoris with —
- chickpeas,
- green chilies,
- moong bean sprouts,
- potatoes,
- lots of green chutney,
- tamarind chutney,
- roasted cumin powder, chaat masala,
- cucumber,
- onions, and
- a generous drizzle of chilled yogurt.
Protip — If your yogurt tastes sour, add a tablespoon of sugar to sweeten the yogurt and whisk until completely dissolved. Yogurt drizzled on top of tokri chaat should be of thin, batter-like consistency.

Finish off the Katori with a final drizzle of green chutney and meethi chutney. Add a layer of thin sev on top, sprinkle pomegranate seeds, and chopped cilantro leaves, and serve.
Protip — Katori chaat is a very adaptable recipe. Feel free to add or subtract whatever ingredients you like! The sky is the limit when it comes to filling; you can fill this katoris with whatever your heart desires.

You have to savor each bite. As you dig deep into the Katori, you will feel the crunchy texture of onions, spice from the green chilies, and the tangy flavor from the chutneys exploding in your mouth.
Frequently asked questions
Can I make the Katoris in advance?
Absolutely! These katoris can be made up to two days in advance and quickly assembled at the last minute.
Besides katoris, you can partially make this Katori chaat recipe in advance. As you must have noticed that there are various steps to this recipe. So instead of doing everything on the same day, you can —
- Cook the chickpeas and potatoes a day in advance.
- Prepare Moong bean sprouts – check out this link for making sprouts in Instant Pot.
- Prepare the chutneys beforehand and store them in an airtight container. In fact, you can make the chutneys months in advance and freeze them. Use as needed.
- Whisk the yogurt and refrigerate.
- Peel the pomegranate and store it in the fridge.
Can I make a Katori chaat recipe for a party?
You most certainly can! Act smart, and don’t tire yourself. Do some prep work in advance ( as explained above) and on the day of the party. Setup a chaat station with all the fillings and fixings lined around the katoris.
Allow the guests to fill and finish the katoris to their liking.
Can I make baked katori chaat?
You sure can! You can make it healthier by using Baking the katoris. I had tried it, and trust me; the taste is not at all compromised. The step-by-step instructions are given in the recipe card below.
How to store the cooked katoris?
You can store this katoris on the counter right at room temperature for 2–3 days. Place the cooled katoris on a plate and cover with a kitchen paper towel. The katoris will stay crisp for 2-3 days.
Heat the katoris in the air fryer for 2-4 minutes. That leftover katoris will become crunchy and delicious, just like they were freshly made.
Let me what you think!
So, my dear friends, if you are bored of a regular routine and mundane meals – same dal and roti and are looking for a creative appetizer this festive season, then this is your go-to recipe.
Roll up your sleeves to prepare the best chaat recipe that will surely make you feel proud to crown yourself as Chaat Queen today! Get set and hit the button below for the full recipe.
Trust me, once you bite into this ultimate indulgence – Katori chaat, it will make you feel like you’re eating at an authentic Indian joint on the streets of India.
Should you make this Katori chaat recipe, please let me know your thoughts by sharing your comment below.
And don’t forget to share it with your family and friends.
MORE COMFORTING APPETIZERS THAT YOU’LL LOVE!

Katori Chaat Recipe
EQUIPMENT
INGREDIENTS
FOR KATORIS
- 1 cup Wheat flour
- 1 cup All purpose flour
- ½ teaspoon Salt
- 2 tablespoons Oil
- – – Water to knead the dough
- Oil for Frying
BOIL AND SEAON CHICKPEAS
- 1 cup Chickpeas
- 1 teaspoon Salt
- ⅛ teaspoon Baking soda
- 2 cups Water to boil the chickpeas
- ½ teaspoon Cumin powder
- 1½ teaspoons Chana Masala
- 1 teaspoon Oil
OTHER KATORI CHAAT INGREDIENTS
- 1 cup Bean sprouts
- 1 medium Onion finely chopped
- 1 cup Yogurt whisked
- ¾ cup Cucumbers finely chopped
- 1 large Potato
- 2 medium Green Chilies finely chopped
- ½ cup Green Chutney
- ½ cup Tamarind Chutney
GARNISHES
- – – Sev
- – – Chaat Masala
- – – Coriander leaves
- – – Pomegranate seeds
- – – Kashmiri Red chili powder
INSTRUCTIONS
COOK CHICKPEAS
- Soak dried chickpeas overnight in 3 cups of water. In the morning, drain the water and rinse the chickpeas again. Transfer the chickpeas to an Instant Pot and add filtered water to the chickpeas. Add salt and a pinch of baking soda.


- Place the lid on the Instant Pot. Seal and secure. Press the ‘Pressure cook button’ and cook on high pressure for 20 minutes. Make sure the venting knob is in the sealing position.


- Allow the pressure to release naturally for 10 minutes, then move the steam release handle on the lid to the venting position. Once the pin drops, carefully open the Instant Pot. Drain the boiled chickpeas and separate the beans from the water. Tip — To check if the chickpeas/chole are done, take a bean in between your fingers and press. You should be able to press the boiled chickpeas easily with your fingers.

- Heat oil in a pan over medium heat. Transfer the cooked chickpeas to the pan and season them with salt, roasted cumin powder, and chaat masala. Stir until combined. Lower the heat to the low-medium setting. Cover, and allow the chickpeas to soak in all the flavors for about 4-5 minutes. After the cooking time has lapsed, removed the chickpeas from the heat and set them aside.

FORM THE DOUGH
- In a large mixing bowl, combine the flours, salt, and one tablespoon of oil.


- Gradually add water into the bowl and mix the ingredients until well incorporated. Knead until it forms a soft, pliable dough.

- Cover the dough with a damp cloth (to prevent drying out) and let it rest for 20-30 minutes on the kitchen counter.

FRY THE KATORIS
- Heat oil in a pan over medium heat. Take a medium-sized katori for making the katoris.


- Now, divide the dough into equal-sized round balls.

- Flatten the dough and roll out the dough into a flat, round disc around 3 inches wide.

- Place a round Katori in the center of the rolled dough.
- Wrap the Katori with the dough. Using the knife, carefully trim the extra dough from the top of the Katori.

- Drop the dough-wrapped Katori in the oil once the oil is medium-hot (not highly fuming hot).Tip — The right temperature of the oil is an essential step in this recipe.

- Allow it to cook from the bottom until golden. Now, flip and cook from the top until golden.

- Once evenly cooked, remove from oil and drain it on a kitchen paper towel. Carefully run a small knife around the edges of the Katori, and the fried dough Katori will come loose.

- Set it aside. Repeat the process with the rest of the dough until all the dough is used up.

ASSEMBLE KATORI CHAAT RECIPE
- Before we start assembling the katoris, gather all the ingredients. Ensure the yogurt is whisked and thinned out (with water or milk) for an easy drizzle. Refrigerate until ready to use.

- Arrange a Katori on a plate. Start layering the katoris.

- Chickpeas and green chilies.

- Bean Sprouts.

- Crispy potatoes.

- Green chutney, tamarind chutney, cumin powder, and chaat masala.

- Onions.

- A generous drizzle of yogurt.

- Finish off the Katori with a final drizzle of green chutney and meethi chutney.

- Add a layer of thin sev on top for an extra crunch.
- Sprinkle some pomegranate seeds, chopped cilantro leaves, and serve immediately. As a soggy Katori won't taste that good.
BAKED KATORI CHAAT
- Preheat the oven to 350°F. In a large mixing bowl, combine the flours, salt, 1 teaspoon of baking powder, and two tablespoons of oil. Gradually add yogurt into the bowl and mix the ingredients until well incorporated. Knead with lukewarm milk until it forms a soft, pliable dough.

- Cover the dough with a damp cloth (to prevent drying out) and let it rest for 20-30 minutes on the kitchen counter.
- Now, divide the dough into equal-sized round balls. Flatten the dough and roll out the dough into a flat, round disc around 3 inches wide.
- Spray the muffin pan with oil. Wrap the dough around the outer mold of the muffin pan.

- Repeat the process with the remaining dough.

- Bake the katoris in the preheated oven for 15-20 minutes or until golden.

- Remove the muffin tray from the oven and set aside to cool.

- Oven baked Katoris are ready for stuffing.


Hi im pooja i want to know if i will subscribe ur recipe it will b chargeable or free of cost.
Hello Pooja!! Everything is free on the website, subscribe, explore and enjoy 🙂
Hey Ruchi, thanks for sharing this wonderful recipe. Made a huge batch for my party last saturday and was all finished.Love your detailed step by step presentation. I know what step goes next but looking at your pictures brings a new confidence in me that I am doing all right. Thanks again.
You are very welcome Megha 🙂 Glad you liked it and thanks for the wonderful feedback!!
Hi dear,
this recipe is also blank for me. Am I doing something wrong or is there a glitch?
Hey Zenovia, you are not doing anything wrong it was an error on our part and it’s fixed now. Thanks for bringing up the issue.
thank you 🙂
Made these,great success.Thanks Ruchi, your recipes are tempting and different. By the way new look is way much much better.
You are welcome Deepshikha and thanks for stopping by 🙂
Hiii ruchi,
First of all huge thanks for these awesome recipes..im a teen n started cooking few months back..ur receipies were vry helpful to me…those fab pic even help me alot ..♥THANK U..
You are very welcome dear 🙂 Glad to be of help and thanks to YOU for such a sweet message!! Happy cooking!!
Hi. I look up often online for recipes but I have not seen a more detailed recipe with such clear steps. Hats off to you for the work and passion put in the site.
Thanks Tehseena for your lovely compliments! Really appreciate it!!
Unquestionably the best recipe. Just wow!! Made it for a large group and kept many toppings. People loved the concept and was thoroughly enjoyed by my friends. I fried half the batch and baked the half. Fried ones were liked more but as you said the baked ones stayed crisp for very long. Totally admire your pictures.
Thanks for sharing your experience with me Swati! Glad to hear that you and your guests liked the recipe. Keep checking back for more. 🙂
Hiii thanks for d recipe helped me alot… but only prob I had was… I fried d cups n all had bubbles n dey wer soft so while rerefrying dey got dark😠😂 however ate it n enjoyed wid d stuff in n curd
Thanks for trying out the recipe. Glad to hear that you liked it. Fried katoris will have bubbles here and there, mine too had some. Katoris need to be fried only once in hot oil until they are crispy. I think your oil was too hot when you re-fried them again, resulting in darker katoris.
Thanks for the recipe! Would you know how well in advance can I make the baked katoris? Will they stay for 2 weeks in the fridge?
Thanks for stopping by, Deeks! 2 weeks is a pretty long time. I have kept the baked katoris in the fridge for 3-4 days but not for that long. Keeping them for 2 weeks may affect the taste and appearance of the katoris.
Great Cooking IDEAS….!
Thanks Ajju. 🙂