


Breakfast made easy with air-fryer baked Vegan bread rolls. These Indian bread rolls are the perfect grab-n- go rolls that are healthy, filling, and outrageously delicious. It is a super simple recipe that uses minimal ingredients and is truly a hearty breakfast that the entire family will enjoy!

If you are looking for a recipe that fits your active morning routine, let me introduce you to these flavorful and savory bread rolls that are THE perfect breakfast for busy mornings and will save you some precious time too.
These bread rolls are a staple in my house – fried or not, we relish them anyhow. We love these vegan bread rolls, as they are reasonably portable, convenient to eat, and mess-free.
Simply, grab the rolls on your way out to work, or kids can eat them on their way to school. It’s that simple!
What are Indian Bread Rolls
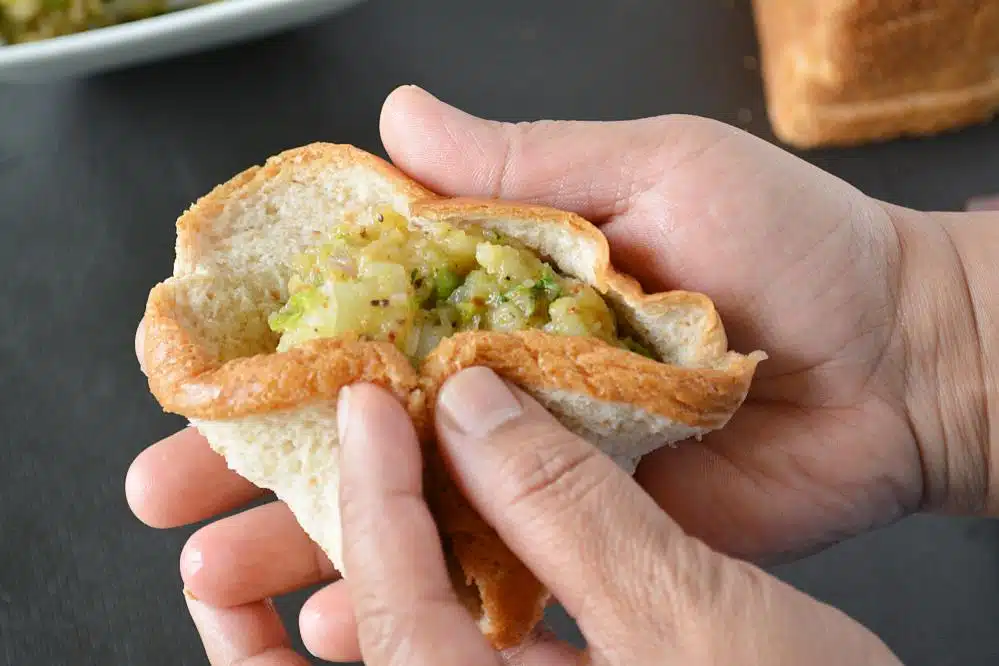
These Bread rolls, also known as Indian Potato Croquettes, are loved for their crispy texture outside and tangy, spicy stuffing inside.
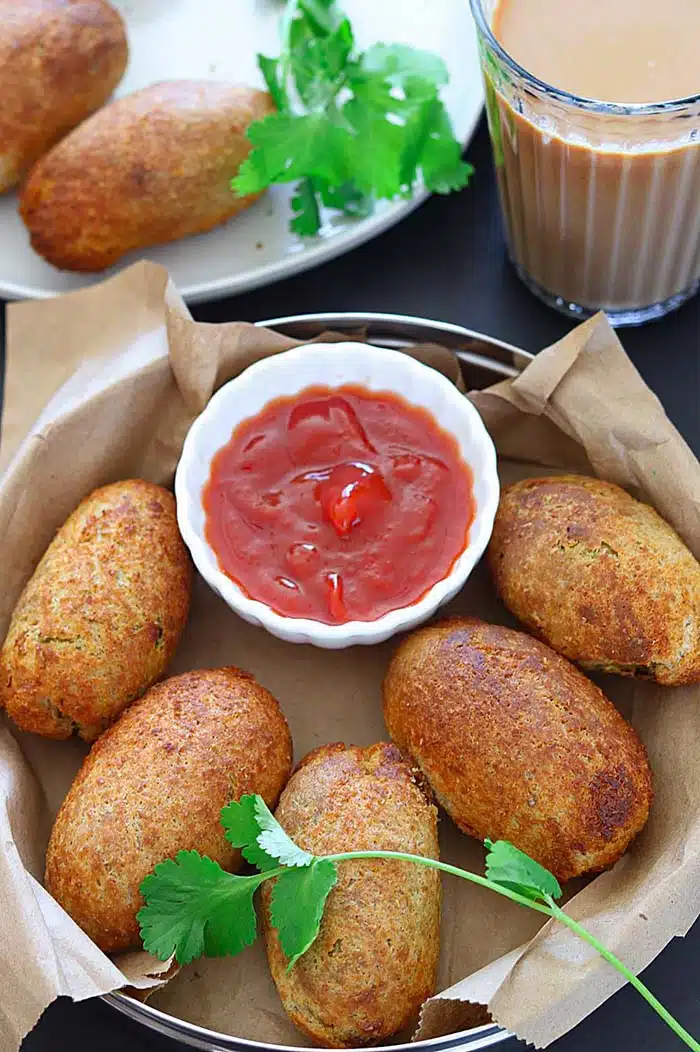
The stuffing is carefully sealed and wrapped in a damp slice of bread and shaped into a cylindrical roll. It is then deep-fried, baked or air-fried and served with mint or cilantro chutney or tomato sauce.
Traditionally bread rolls are pan-fried or deep-fried, but the contemporary version of airfrying is also an excellent option for those on the lookout for healthier cooking methods.

Reasons You’ll ♡ Bread Rolls
Our air-fried bread rolls come with their set of merits, as they’re —
- Easy to prepare,
- Entirely oil-free and mess-free,
- Highly customizable,
- Portable snack or breakfast
- Can be prepared in bulk and stored, and
- Kid-friendly, therefore, can be one of the best picks for the lunch box as well!
I can bet the kids, as well as the grown-ups, will love to delve into these hard-to-resist delicacies alike. Furthermore, This bread roll recipe is so simple; even the novice will get a chef kind-of of vibes when they cook something as easy as these rolls!
A healthy comparison- Airfryer v/s Deep Frying!
If you are baking in an airfryer, you resort to a much healthier option and can enjoy them guilt-free.
Air fryer — Pros
- Air fryer is known for its healthier cooking method as it involves cooking by circulating hot air around the food.
- Air fried bread rolls are made with a constrained amount of oil or no oil at all.
- Needs no supervision while cooking.
- It is entirely mess-free as you don’t have to worry about the crumbs in the oil or have to deal with the smoke or smell of the oil in the house.
- That makes it an excellent way to cut down on fat and calories that frying in oil can add.
Air fryer — Cons
- Air frying may take more time than deep frying.
Deep-frying — Pros
- Deep frying is a faster way to cook these yummy bread rolls.
- When deep-fried correctly, with a regulated temperature, they will result in crispier rolls with the bread not soaking too much oil to make them feel greasy or oily in taste.
Deep-frying — Cons
Oil temperature is teh biggest culprit. While frying in oil, keep a check on the temperature of the oil. Medium-hot oil is needed for frying. If the oil is not hot enough, the bread rolls will soak up the oil and become soggy, and if the oil is too hot, the bread covering will turn brown quickly, leaving the stuffing uncooked.
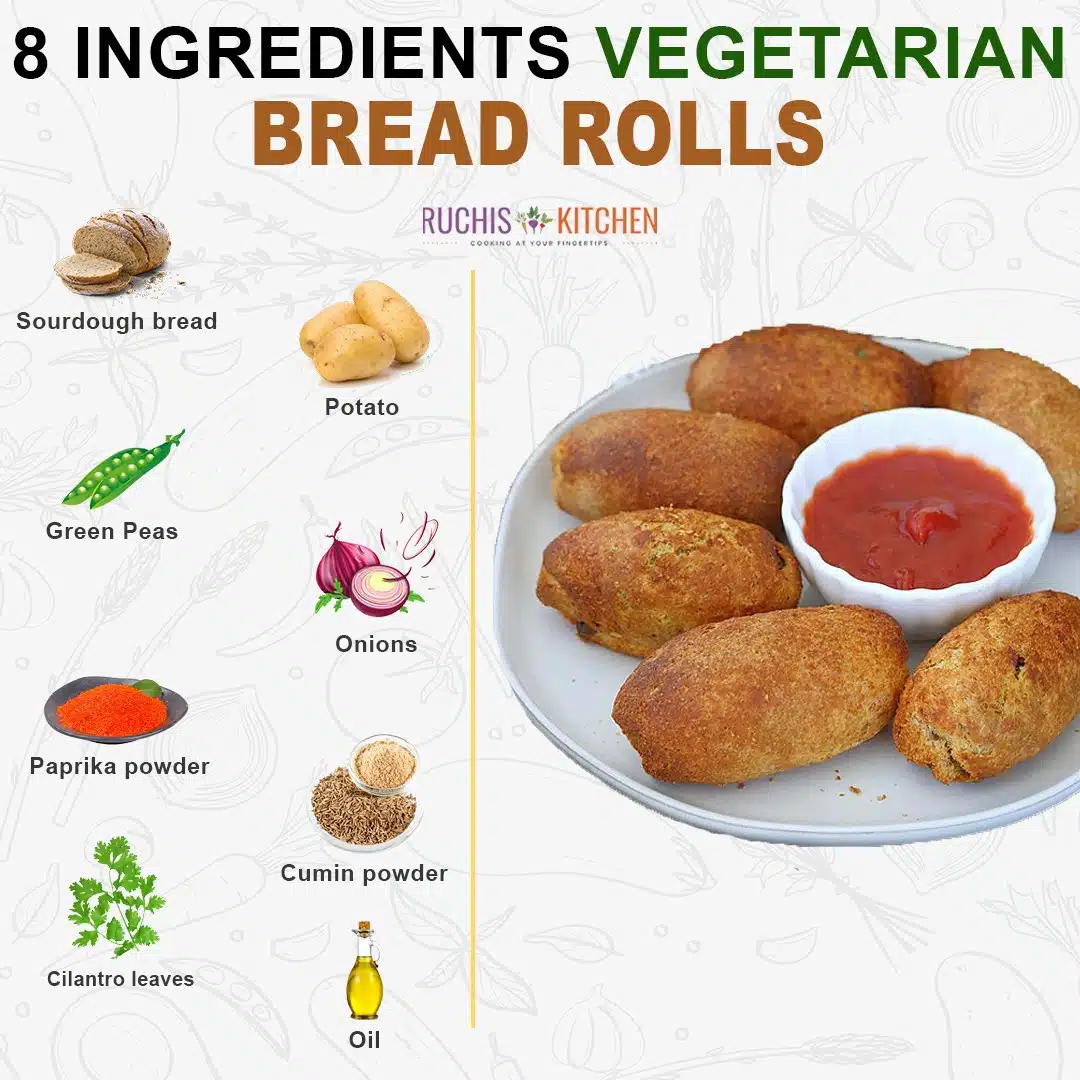
Bread Rolls Ingredient list
Vegan Bread — This is the essential component of the recipe that makes the covering of the rolls. I am using Vegan Sourdough Bread here, but you can also use white bread, brown bread, or multigrain bread.
Potato — Most of my recipes use russet potatoes as they are low in moisture and, hence, easier to bring together. They also crisp up faster in the airfryer.
Onions — They are added to bring flavor and crunch to the stuffing.
Green Peas — Added for taste and nutrition.
Paprika — Paprika adds a sweet-pepper flavor and color to the dish.
Cumin Powder — Freshly prepared cumin powder works the best as it is most flavorful and aromatic. However, you can use the store-bought too.
Cilantro leaves — For garnishing.
How to make Bread rolls
This is a popular Indian snack with a crispy-crunchy outer covering of bread wrapped over a flavorful savory potato stuffing inside is made in 3 simple steps —
Sauté — Heat oil in a large skillet or square pan. Add chopped onions and cook until the onion is translucent. Add boiled peas and cook for another 1-2 minutes. Stir in all the spices, mashed boiled potatoes, cilantro leaves, and stir everything together. Take it off the heat. Transfer the stuffing to a bowl and let it cool a bit.
Stuff the bread — Stuff the bread with potato and peas stuffing. Take water in a bowl. Partially dip bread in water. The main idea is to make bread flexible enough to roll. Remove the bread from the water and squeeze hard to drain the excess water.
Bread should not feel sticky in between your hands; if it does, press more to drain all the moisture. Place the cooled potato mixture in the center. Start rolling the bread inwards by bringing all the edges together. Keep rolling the bread until it forms a cylindrical shape.
Make sure it is sealed from all sides. Repeat the process with the rest of the mixture until all the bread rolls are formed.
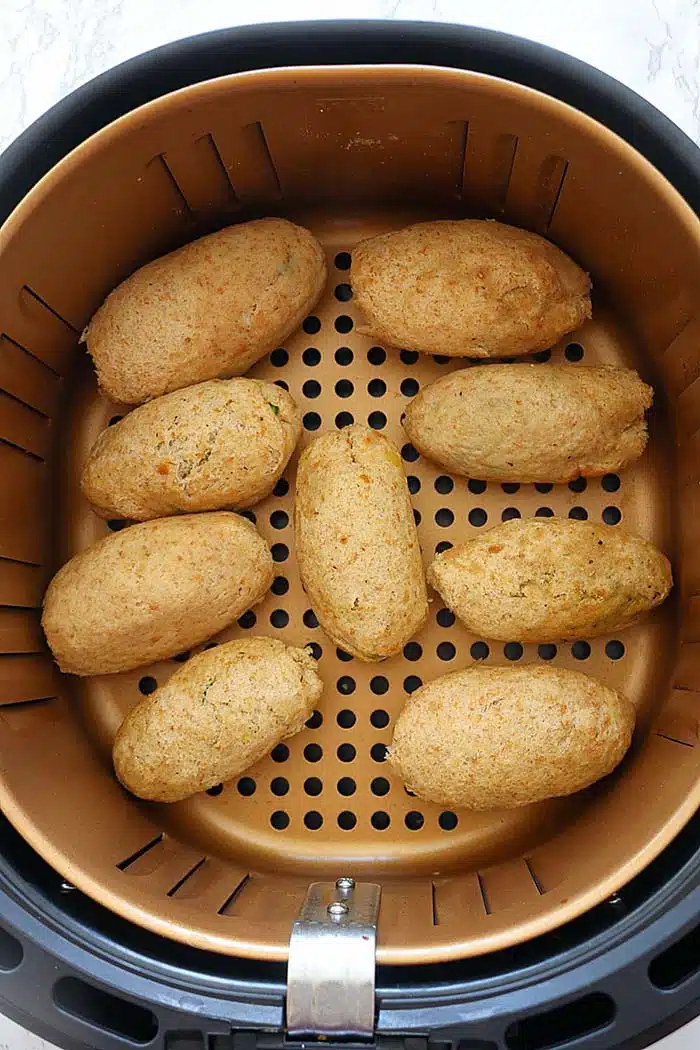
Air fry the bread rolls — Transfer the bread rolls to the airfryer insert. Brush the rolls with oil and cook for about 15-20 minutes, or until the bread rolls are crispy and brown. When baking in the airfryer, remember to flip them over halfway between the baking time. This ensures an even baking.
Once the cooking time is done, remove the rolls from the airfryer, set them on a plate, and serve warm with your favorite dipping sauce.
Make a few extra rolls; as I assure you, you will just love to watch them disappear!
Expert tips and Variations
You can comfortably bring variations to this recipe in the following ways —
Bread — You can use brown bread, white bread, or even multigrain bread for this recipe, and each will taste as good.
Dipping the water — Take care not to dip the bread for too long in the water. We just need to moisten it so that it takes shape easily. Instead of dipping in water, you may also sprinkle water, especially if your bread is fresh (fresh bread already has moisture in it).
Customizable — You can stuff these bread rolls with potatoes and veggies of your choice to make them healthier, as breakfast needs to be the best start of the day: healthy and filling! And when you are air frying them, you are self-assured for serving the best to your family.
Vegetables — To make it healthier, you may add grated or boiled/steamed veggies like beans, sweet-corn, beetroot, carrots, cabbage, etc. You can also add tofu or paneer (cottage cheese) to the stuffing.
Other protein — You may also make the stuffing with Keema (minced meat) if you prefer non-vegetarian. Ensure that the Keema mixture is dry and moisture-free.
Oven Baking — You can also cook the bread rolls in an OTG oven or a regular oven at 400° F for about 12 to 15 mins. Just brush some oil and place them on the baking sheet. Bake them until crispy and evenly brown.
Frying — When frying in oil, do not overcrowd the pan because you may break them while flipping.
Make ahead — You will love how convenient these bread rolls can be, especially when you can prepare them ahead of time and store them in the fridge. When needed, you can toss them into the heated pan or airfryer, and there you are…. the crispy, crunchy delicacy with the spicy stuffing is ready to be devoured.
Make a big batch — The recipe can be doubled or tripled by increasing the quantity of the ingredients.

Let me know what you think!
Make-ahead breakfast tends to make life much more comfortable, and recently, these Bread Rolls are one of the most sought-after insanely delicious snacks made in my house.
Give this quick recipe a try in your kitchen right away, and these airfryer-cooked bread rolls will keep you fueled up throughout your day of school, work, exercise, etc.
Should you make this Stuffed Indian bread rolls, please let me know your thoughts by sharing your comment below.
And don’t forget to share it with your family and friends.
SIMILAR INDIAN BREAKFAST RECIPES THAT YOU SHOULD TRY —

Bread Rolls
INGREDIENTS
- 2 tablespoons Oil to cook the stuffing
- 1 small Onion peeled and diced
- 1 cup Green Peas (boiled)
- ½ teaspoon Paprika ( or Red chili powder)
- ¾ teaspoon Cumin powder ( or Cumin seeds, crushed)
- – – Salt to taste
- 2 medium Potato boiled, peeled, and mashed
- 1 tablespoon Chopped cilantro leaves
- 6 slices of Vegan sourdough bread
- 3 teaspoon Oil to brush the bread rolls
INSTRUCTIONS
MAKING POTATO PEA STUFFING
- Heat oil in a large skillet. Add chopped onions and cook until the onion is translucent. Add boiled peas and cook for another 1-2 minutes.


- Stir in all the spices, mashed boiled potatoes, cilantro leaves, and stir everything together.

- Take it off the heat.
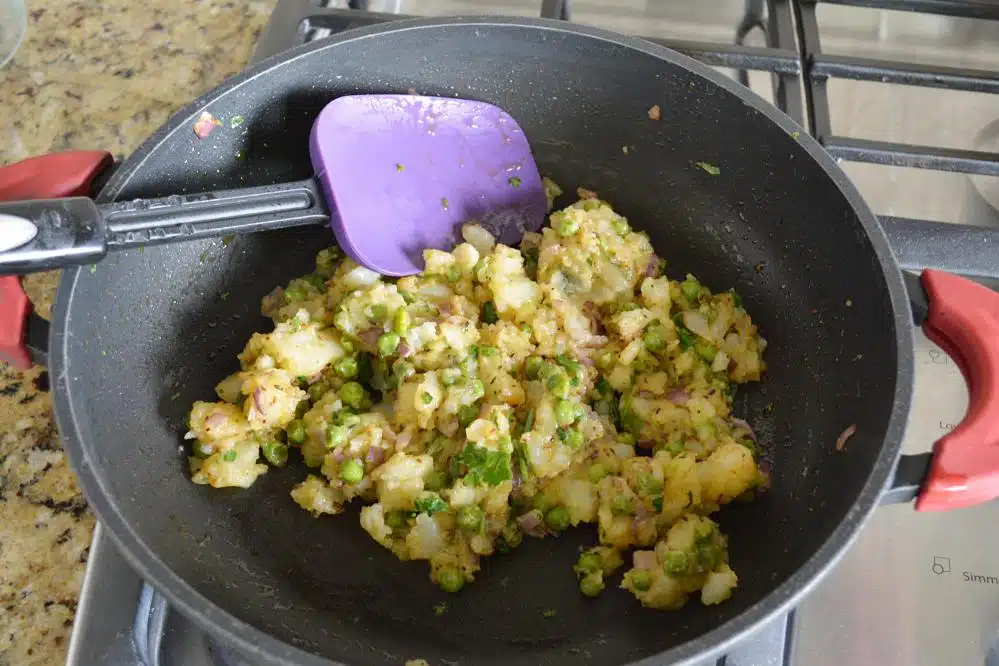

- Transfer the stuffing to a bowl and let it cool a bit.


STUFF THE BREAD
- Stuff the bread with potato and peas stuffing. Take water in a bowl. Partially dip bread in water. The main idea is to make bread flexible enough to roll.


- Remove the bread from the water and squeeze hard to drain the excess water. Bread should not feel sticky in between your hands; if it does, press more to drain all the moisture.


- Place the cooled potato mixture in the center.

- Start rolling the bread inwards by bringing all the edges together.

- Pinch both sides together.
- Bring in the other two sides.

- Start rolling the bread in between your palms.

- Keep rolling the bread until it forms a cylindrical shape.

- Make sure it is sealed from all sides.


- Repeat the process with the rest of the mixture until all the bread rolls are formed.


- Transfer the bread rolls to the airfryer insert and brush the rolls with oil.

- Cook 350°F for about 15-20 minutes, or until the bread rolls are crispy and brown.


- When baking in the airfryer, remember to flip them over halfway between the baking time. This ensures an even baking.

COOK-TOP METHOD
- Heat oil in a kadhai/pan and add bread rolls to the hot pan.

- Cook the rolls on medium-low flame until brown and crispy. This will take about 7-8 minutes on both sides.


- Keep brushing the rolls with oil if needed.


- Remove and serve hot with hot sauce or green chutney of your choice.

RECIPE NOTES
Frequently asked questions
Why do my rolls stick to the pan? The bread rolls stick to the pan because of the two main reasons —- The pan may be too hot. Try reducing the flame to low.
- The bread rolls may be having more moisture. The remedy is to toss them in wheat flour, dust the excess flour and then pan toast them. This ensures excellent cooking with a crispy brown covering.
Excellent way of explaining the steps. Every step is very visual. Will be trying out this weekend. One question can I stuff these with your minced keema recipe? Will it be soggy if I make them ahead of time? Thanks and beautifully maintained blog.
You are welcome Jerold and thanks for stopping by! Yes, you can stuff these bread rolls with keema recipe. Before filling bread rolls, make sure the keema mixture is dry and liquid free.
Thanks Ruchi for such an easy recipe…Mouth watering and yummy recipe. shallow fried the rolls and were equally good. please post some more.
Thanks for trying out the recipe Surbhi! Will surely look into your request. 🙂
Help! I tried this recipe, the filling is delicious, but I couldn’t keep the rolls from sticking to the pan and turning into a mess. I’d love to try this recipe again, so any tips would be greatly appreciated.
So sorry to hear about that Jen. The main reason bread rolls were sticking to the pan is – 1. pan too hot and 2. stuffed bread rolls were wet. For next time if the stuffed bread rolls feels damp and wet, toss them it wheat flour, dust the excess and pan toast them. This way they will stay crispy and will get a nice brown covering. Hope this answers your query. Feel free to email me if you have any other questions!!
Pls add me for ur delicious recipes
Done dear. Thanks!
These look delicious. I can’t wait to make them. Thank you for your very clear recipe@
Thanks for your lovely feedback Patty. Glad you liked. 🙂
I am recently married girl. I have never baked a cake or used oven. Kindly plz suggest me a good quality budget oven. Thankyou
Congratulations Khushi and thanks for stopping by.
Are you looking for a countertop oven or a built-in oven? Please visit your local electronics store and they will be able to help you more depending on your space availability and budget.
Hii this was amazing I also messed up at the first but later it was fine
Glad it worked for you. Thanks for trying the recipe Seena. 🙂
Perfect recipe, pan toasting seems to be a really good option. Would definitely like to try this one.
Thanks Rinku. 🙂
Really a mouth licking snack 👍
Thank you Dolly!
Will definitely try this step by step recipe, looks yummy
Thanks Parbati!
Hi,ruchi
I m olvayz admire your recipes.
Thanx for sharing😊
Pleasure is all mine. 🙂
Thanks!
what brand air fryer you have please let me know.
I have the Power XL air fryer.
Oh wow look at the color! It’s as good as the deep fried ones.. I am going to try these in air fryer
Thanks, Sonal. 😍😍
So yummy these rolls look. And I am loving the fact that these aren’t deep fried. <3
Thanks, Neha!
Which potato do you use Ruchi as there are so many types of potatoes here in the USA.
Geetu, I use Russet potatoes.
Great recipe …which bread should I use for this?i m in usa…wheat bread or white bread ?
Thank you, Rita!
You can use any kind – both will work great.
hi, thanks for the recipe. It came out so well.
I was making this for a party at home but only problem is how to reheat if i cook them few hr before(i am deepfrying them.
Thanks for your feedback, Ridhima!
Do you have an oven? Even if they are fried, these rolls will reheat well in the oven.
i tried that, but the bread shed oil outside and water inside while reheating in oven (175f for 20minutes) 🙁
am in usa used wonder bread, could you please suggest white bread little strong enough to get dipped in water.
Ridhima, instead of dipping the bread, sprinkle water on the bread to get it moist.
Hello Ruchi,
My Air fryer has max temperature of 200 degrees. Will that work as well ?
Thanks,
Neha
Neha, is it 200 degrees in Centigrade?
This recipe was so easy and yummy. I couldn’t set the shape like you but made it in rounds. They turned out beautifully with a crispy outer layer just the way I like. This will definitely be my go-to rolls. Liking the idea that I don’t have to fry them. Thank you so much, Ruchi ❤
Aww, that’s wonderful! So happy you love them, Lisa. 🙂
At times, I, too, shape the bread rolls as rounds. Either way, they taste delicious.
I’m making these as an appetizer and wonder what sauce should I serve with them? Thank you.
A spicy tomato ketchup would be great. Or you can make homemade green chutney to accompany these rolls.