


Making a firm, creamy, and luscious dahi (curd) at home from scratch with just two ingredients can be a satisfying experience. This traditional recipe of dahi (curd) provides tips and tricks for successfully preparing this essential dairy product of Indian cuisine. So, learn about how to set curd (dahi) in winters in this post.
Follow each step carefully, and you will have a bowlful of thick and well-set dahi to flaunt and relish!

Dahi is a much-loved Indian side dish that can be enjoyed all year round. Mostly every other household in India consumes this comfort food in one form or the other every day.
You can consume a store-bought dahi which is undoubtedly thicker and firmer, but I can assure you, there is nothing like a homemade thick dahi made from scratch……. the feeling is lovely!
What is Dahi
A meal comprising of hot stuffed paranthas, mango/ veg pickle, and a bowl of firmly set luscious dahi is a blissful experience.
Dahi is the Indian name for yogurt/curd. A homemade dahi requires warm milk and bacterial yogurt culture to prepare. In summer, setting dahi is easy as it takes fewer hours, and any corner of your kitchen counter where is left undisturbed.
The only major requirement for the dahi to best set is the ideal temperature which promotes the bacteria (lactobacillus- a prominent strain) to growth, which results in the fermentation and curdling of milk (formation of curd).
However, in winter, the cold weather can inhibit the growth of bacteria, which hampers the process of setting.

Perfect warm weather allows 7 to 8 hours for the dahi to set, but cold weather could make it slimy, runny, and even lacey and gooey textured.
But in this recipe, I share some hacks for a super smooth and thick-set dahi, even in winter!
And now, with these simple hacks, you can comfortably make a batch of well-set dahi at home in a few hours.
Reasons You’ll ♡ this method of how to set curd in winters
This dahi is lusciously textured and addictively delicious. Besides this, there are other reasons which will make you fall in love with this exquisite recipe —
- Super straightforward dahi recipe
- Comfort food loved by all ages
- Used for making various other recipes
- Known to be beneficial for gut health, and has
- Excellent coolant properties!
Especially in summer, it serves as an excellent coolant and can be enjoyed as lassi, raita, and chaas.
However, in winter, it is advisable to restrict the consumption of dahi as it promotes mucus secretion from the glands and causes related issues like colds and coughs.
Ingredient List
It requires just two ingredients – this probiotic wonder and a must-have dairy product, dahi/curd is made with warm milk and a bacterial starter.
Milk — Milk is this recipe’s primary ingredient, which delivers creaminess and structure to the curd. Full-fat milk or milk with at least 2% fat works best for the creamiest and well-set curd.
Bacteria (lactobacillus) — Curd needs a bacterial starter, known as culture, Jaamun or khatta in Hindi. It is usually taken from the previous batch of set curd/ dahi. The bacteria contained in the starter convert the milk’s lactose into lactic acid (by fermenting) and transform the milk into a pudding-like product called curd.
How to Set curd in winters Tips and Variations
Boiling the milk is essential — Boiling the milk is necessary for setting the creamiest and thick curd. Even if you use pasteurized milk that doesn’t need boiling, I recommend boiling it. Whether the milk is brought from the dairy in a milk packet or bottle or is purchased from your local milkman, boiling is a must. Ensure that the milk is boiled well; otherwise, you will end up with slimy/ lacey curd that is barely set and tastes unappetizing.
Full-fat milk for best results — Full-fat milk produces the creamiest and most delicious curd and is highly recommended for reaching the desired results. Low-fat milk or skimmed milk may result in slimy or lacey-textured curd.
Add the starter to warm milk — The right time to add the starter to the milk is when it is warm. Adding the starter when the milk is hot will cause the milk to coagulate and develop grainy strands in the set curd. Therefore, checking for warmth before adding the dahi culture is best.
Preventing the formation of whey (curd’s water) — The milk will coagulate and release water (whey) if the culture (jaamun) is introduced to the hot milk. Bring the milk to warm (right temperature), and then add a starter for the best-set dahi.
Avoid using a sour starter — Ensure that the starter being used is not sour. Sour culture/ starter will produce sour dahi/ curd that is not very delectable.

Cold temperature hampers the setting of curd in winters — If the surrounding temperature is too cold, milk will have trouble setting. This generally happens during the winter months. In this situation, you may have to change the spot or find a warmer place to set your dahi.
Warmth is an essential ingredient —Temperature plays a significant role in the setting of dahi, where a warm, cozy, and ambient environment is required for the bacteria to thrive. An incubation temperature of 37° – 43° is needed to convert milk into curd. If a similar or higher temperature is maintained, a firm dahi sets quickly.
A very old mom’s trick — To set a firm dahi quickly, add a teaspoon of sugar to the setting dahi. The bacteria will have something to feed on, and it will thrive well. This helps the dahi to set perfectly.
Seasonal alterations — Dahi sets faster in steel containers in winter, but ceramic or glass containers may take somewhat longer for the dahi to set. However, in summer, ceramic or glass containers are the most appropriate to set dahi. They help dahi to set quicker and prevent it from turning sour.
Quantity of the starter (Jaamun) required —The amount of starter needed for setting the dahi majorly depends on the season. Whereas a small amount of starter is necessary during the hot months, you will need to add more of it during winter.
Refrigerating dahi — While refrigerating the dahi, ensure that the lid of the container is sealed correctly. A loose cover will allow the fridge odors to penetrate and spoil the taste of the dahi.

Setting the dahi without starter/ jaamun — The other way to set dahi when you don’t have a starter is to use fresh green chilies with their stems intact. Do not pluck the stems. Just place the whole green chili in the warm milk, put on the lid, and keep the container in a warm place that facilitates the setting.
Green chilies are rich in lactobacilli bacteria that help the milk to ferment and aid in the formation of dahi. Once you get a batch of fresh dahi, you can use some of it as a starter for the next batch.
The dahi prepared this way is slightly lighter than the one that is prepared with the dahi culture, but after a few attempts, you will attain the desired firmness and thickness in the dahi.
Removing the taste of green chilies — You may feel a slight taste of chilies in dahi when using chilies to set the dahi. However, this taste vanishes after the first batch. The next batches prepared from this dahi used as a starter will not have any flavor of chilies.
Storing starter (jaamun) for a long — When traveling, you can store your starter/ jaamun by freezing it in the freezer. When required to set the dahi, thaw it overnight in the fridge. Next day, beat it well and add it to the warm milk. You will notice that the frozen dahi is grainy upon thawing. But there is nothing to worry about. Just beat it and use it as usual to set the warm milk.
Let me know what you think!
Setting thick, firm, and yummy dahi at home can be a breeze by following the steps in this quick and fun recipe below. Make a fresh batch of homemade dahi and dig into the bowl of health and deliciousness.
This recipe of firm set dahi is easy and comes with helpful troubleshooting tips, making the entire process easy.
So, if you are craving this creamy delight, let us begin with the process!
Should you follow any of the hacks on how to set curd in winters, please let me know your thoughts by sharing your comment below. And don’t forget to share it with your family and friends.
Recipes that use homemade dahi –
Follow these step-by-step instructions and learn how to set curd in winters

How to Set Curd in Winters
EQUIPMENT
INGREDIENTS
- 500 ml Milk Full Fat
- 1 teaspoon Starter Jaman/Jaag/Khatta
INSTRUCTIONS
- The first step involved in preparing curd is to heat and boil the milk under a low flame. So, add full fat milk to a heavy-bottomed pan.


- Keep stirring the milk to reduce the layers of the cream (malai) formation.
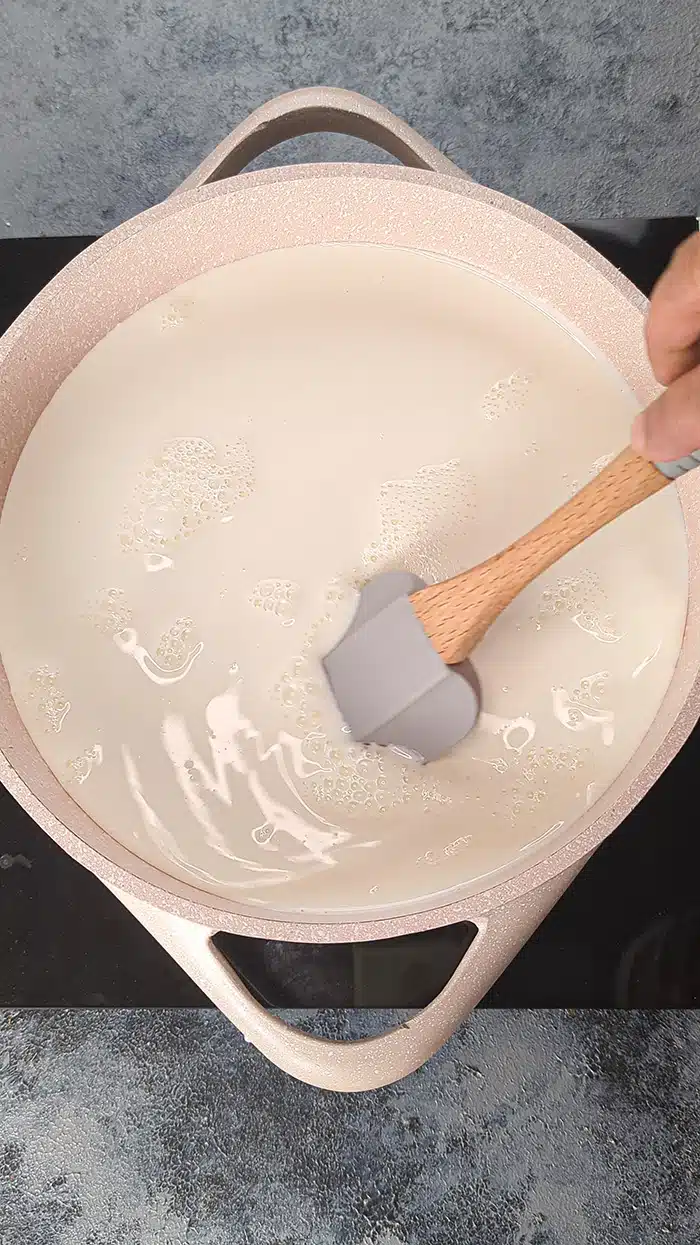
- Once it is boiled, lower the flame and let it simmer for a few minutes. After simmering the milk for a few minutes, let it cool down from hot to a little warm temperature.Tip — Ensure that the milk is boiled well; otherwise, you will end up with slimy/ lacey curd that is barely set and tastes unappetizing.


- You may check if the milk is at the right temperature before adding the culture by inserting a finger. If the milk feels comfortably warm, go on and add the starter. But if the milk still feels hot and gives the finger a burning sensation, wait a few more minutes until it cools down to the desired temperature.


- You can use a thermometer; too, the ideal temperature should be between 37-45 degrees C.

- Once the temperature of the milk is perfect, pour the warm milk to a container.

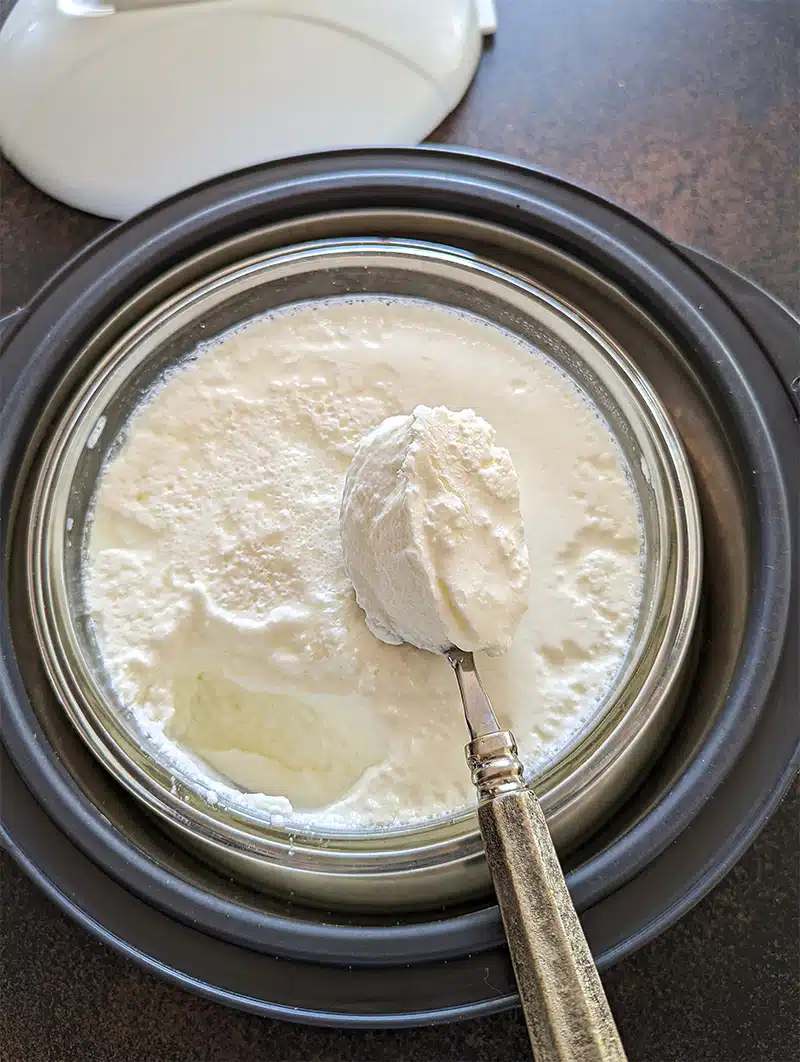
- Add the starter/culture.

- Blending the culture with the milk is essential for adequately setting the curd. Ensure that the bits of curd culture are not left in the milk in lumps. If you find any lumps, remix it until well incorporated.

- Once the starter is introduced to the milk, cover the container with the lid and keep the container in a warm place undisturbed for about 7 to 10 hours or until set. Tip — The dahi needs a specific minimum time to set properly and should not be disturbed while it sets.


- Once the dahi is set, do not insert the spoon right away to check if it is done. Instead, slightly tilt the container to check if it has set and become firm. If it jiggles and feels loose, let it remain undisturbed for some more time.


- After the approximate time has elapsed, and the dahi is set, place the container in the fridge, which will help it firm up further. Refrigeration is an essential step in setting a firmer dahi.

- Your homemade curd is ready to be relished with your favorite meal.


OTHER WAYS TO SET DAHI
- Place the warm milk in an insulated casserole.


- The casserole will retain heat and provide an ideal temperature to the warm milk that aids the setting.

- You can also wrap the dahi container with a warm blanket, shawl, or thick towel.

- The warmth helps the dahi to set correctly.


RECIPE NOTES
- Using an insulated casserole – The casserole will trap/ retain heat and provide an ideal temperature to the warm milk that aids the setting.
- Alternatively, add warm water to the casserole and seal the lid. When the warm milk is ready with the culture, drain the warm water from the casserole and place the milk container in the casserole. The heat from the warm water facilitates the growth of bacteria and assists in setting dahi.
- To maintain the temperature of the warm milk, you can also wrap the dahi container with a warm blanket, shawl, or thick towel. The warmth helps the dahi to set correctly.
- You can also place the container on the top of the fridge, as this area is consistently warm due to the heat from the fridge’s compressor.
- Another way is to place the container in an oven with the light on. The continuous heat provided by the illuminated range helps an easy setting of dahi.
- You can make it lusciously creamy with the homemade dahi that produces the best results.
- You can add creaminess and some tanginess to your upma, dum aloo, and other Indian curry dishes by adding dahi to them.
- You can also use dahi to add more flavor and fun to the chaat dishes, dahi bhalla, dahi papdi, and others.
- You can also use dahi while baking cakes and pies. It is an excellent substitute for eggless baking.
- Hang dahi in a muslin cloth and let the water drain from it completely for some hours. Now, you can use this thick curd to prepare summer drinks like smoothies, lassi, frozen popsicles, and tarts.
- The hung curd is also used as a significant ingredient for the marinade. You can use hung curd in non-veg recipes to soften the meat. Dahi tenderizes the meat more gently and effectively than traditional marinades like vinegar or citrus-based ones.
What brand yogurt culture is good?
If you live in India I find Amul brand the best and if you are in US Desi dahi brand is the closet one. Hope that helps! Thanks for stopping by!
Finally mastered the art of making curd at home. All credit to you Ruchi.Thank you for making this recipe so easy to follow with lovely photography.Very good site and nice presentation of recipes. The easy language and pictures is what draws me back t your site everyday.
You are welcome Shagun, glad to be of help 🙂
You have a beautiful site Ruchi. Your passion for cooking is displayed in your blog.
By Amul brand curd culture you mean Amul Mast Dahi? … Thanks
Thanks for your kind words Peace. Glad you liked the blog! Yes, the Amul full cream or whole milk thick dahi is best for culture.
Wonderful Blog! Thanks for posting.